Cloud Avenue Wiki
-
Overview
-
Q & A
-
Practical sheets
-
- Add a NetBackup User
- Backing up a VM
- Backup : Agent-Level B&R via NSS for IAAS offer
- Checking Backup Prerequisites
- Daily Reporting
- Deleting a VM Backup
- Identifying Your Backup Master Server
- NetBackup Portal
- NSS Home Page
- NSS Swagger APIs
- Restoring a VM
- Troubleshooting Netbackup Errors
- VM Agent Restoration Mode
-
-
- Aucun article
-
-
- Aucun article
-
-
-
- Backup : Agent-Level B&R via NSS for IAAS offer
- Backup : Create VCOD Backup
- Backup : Netbackup Agent Installation for Linux
- Backup : Netbackup Agent Installation for Windows
- Backup : Overall Design for VCOD Offer
- Backup : User's Guide for VCOD Offer
- NSX-T : Configuring a Distributed Firewall
- NSX-T : Create VPN Ipsec
- NSX-T : Creation of T1
- NSX-T : DNAT configuration
- NSX-T : How to configure a Gateway Firewall
- NSX-T : SNAT configuration
- NSX-T: Create and Configure a Geneve Overlay Segment
- NSX-T: How to configure an IPSEC solution
- Parcours Client Sauvegarde WORM pour l'Offre VCOD STD
- vCenter : Clone a VM
- VCenter : Create a new VM
- VCenter : Create a snapshot of a VM
- VCenter : Reset cloudadmin password
- VCenter : Storage Vmotion on a VM
- VCenter : Upgrade Vmware tools on a VM
- WORM Backup Customer Journey for VCOD STD Offering
-
-
Services
-
-
-
- Aucun article
-
-
- Aucun article
-
- Aucun article
-
- Aucun article
-
Restoring a VM
Please note !
The actions below arexto be done from the NetBackup Self-Service portal : here
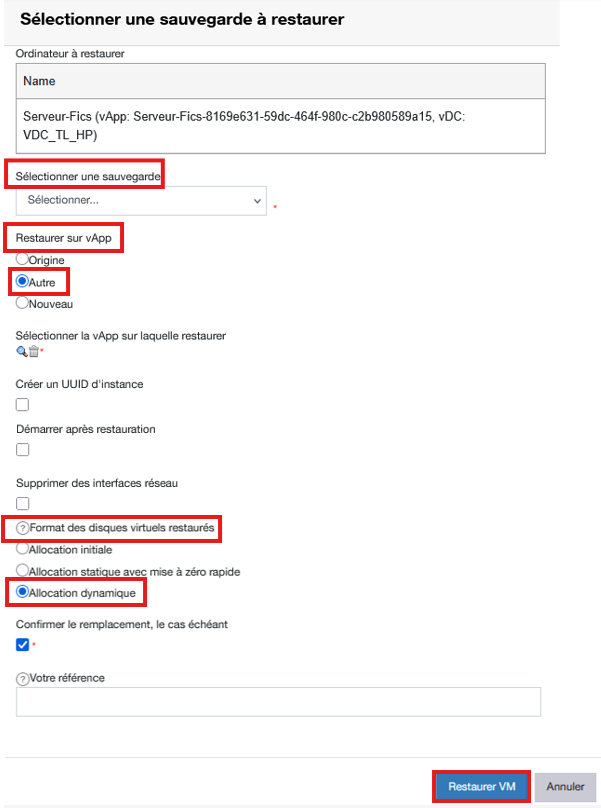
Restoring a VM
To restore a VM, click the “Restore VM” action button, which is available after selecting the VM and then “Action.”
To initiate a restore, fill in the following fields:
- VM to restore: Verify the name of the VM for which the restore will be initiated before confirming.
- Select a backup: Select the backup you want to use for the restore by its date and time.
- Restore to vApp: This field offers three options regarding the target vApp for the restore:
- Source: The VM will be restored to its original vApp; it will therefore be overwritten if it still exists (not recommended).
- Other: This option activates the “Select the vApp to restore to” submenu (you must first click the icon for this submenu. A browser will then open, allowing you to browse your organization’s vDCs and vApps to select the target vApp.)
- New: This option activates the “Select the vDC for the new vApp” submenu (you must specify a new vApp name.))
- Start after restoration: Option to start the VM after restoration.
- Remove network interfaces: Option to remove vNICs. This option is useful when the VM’s network settings need to be reconfigured before bringing it back online.
- Format of restored virtual disks: You must select Dynamic Allocation (Thin Provisioning)
- Confirm replacement, if applicable: Validate your selections.
- Your reference: Assign a label to the restore operation to identify it.
After verifying all fields, initiate the restore using the Restore VM button.
The status of the restoration operation can then be viewed in the Current Activity / View Request section or from the Activity tab.

Once the restoration operation is complete, a notification indicating its result is sent via email to the user who initiated the process.