-
Overview
-
Q & A
-
Practical sheets
-
-
- Aucun article
-
-
- Aucun article
-
-
-
- Backup : Agent-Level B&R via NSS for IAAS offer
- Backup : Create VCOD Backup
- Backup : Netbackup Agent Installation for Linux
- Backup : Netbackup Agent Installation for Windows
- Backup : Overall Design for VCOD Offer
- Backup : User's Guide for VCOD Offer
- NSX-T : Configuring a Distributed Firewall
- NSX-T : Create VPN Ipsec
- NSX-T : Creation of T1
- NSX-T : DNAT configuration
- NSX-T : How to configure a Gateway Firewall
- NSX-T : SNAT configuration
- NSX-T: Create and Configure a Geneve Overlay Segment
- NSX-T: How to configure an IPSEC solution
- vCenter : Clone a VM
- VCenter : Create a new VM
- VCenter : Create a snapshot of a VM
- VCenter : Reset cloudadmin password
- VCenter : Storage Vmotion on a VM
- VCenter : Upgrade Vmware tools on a VM
-
-
Services
-
-
- Aucun article
-
- Aucun article
-
- Aucun article
-
- Aucun article
-
- Aucun article
-
- Aucun article
-
- Aucun article
-
-
-
- Aucun article
-
- Aucun article
-
- Aucun article
-
-
- Aucun article
-
- Aucun article
-
-
Configure a VM
Overview
You can always modify the properties of a VM.
A wide range of customization options are available, and this guide covers each of these possibilities.
Prerequisites
- Know how to Access your VMs
Access to Configuration / VM Characteristics
Access VM properties
- Select Data Centers
- Select your VDC
- Menu Virtual Machines
- Select Your VM

VM Configuration
General
From the General tab > Click on EDIT
You can:
- Edit the VM name in the Portal
- Edit the Computer name (requires STOP/START of the VM from vCD)
- Edit the description
- Edit the startup delay
- Edit the default storage strategy
- Enable or disable BIOS access
More Details: HERE
Removable Support
This tab allows you to view the drives connected to your VM

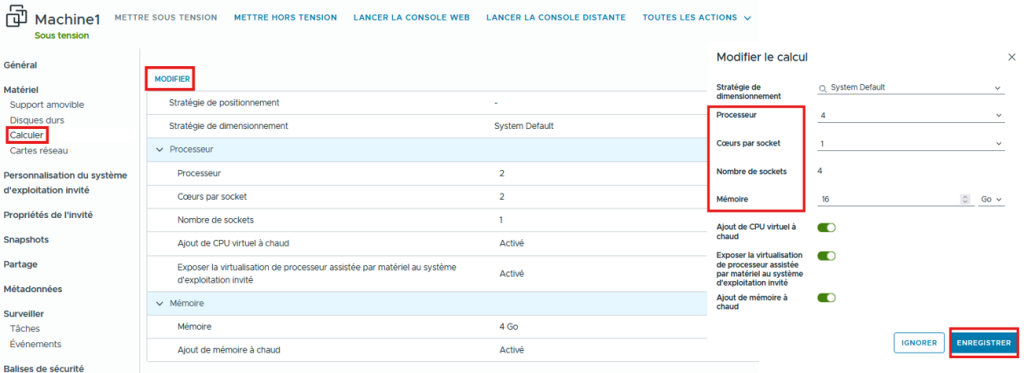
Disk Management
From the Hard Disks tab > Click on EDIT
You can:
- Add a disk
- Increase disk size
- Set disk storage strategy
- Set bus type
- Set Bus Number
- Set Unit Number
- Delete a Disk (Recycle Bin)
More Details: HERE

Attention!
For Hot CPU and Memory Management, the feature is not supported on 2008R2 Standard edition (only on Enterprise and Datacenter Editions) : here and other OS (ex: CentOS)
Some resource modifications must be done VM powered off (e.g., Cores per socket)
Network Cards Management
From the Network Cards tab > Click on EDIT
You can:
- Set the main network card (the one carrying the default route)
- Connect or disconnect a network card
- Set the adapter type (VMXNET3 being the most performant)
- Select the network to which the card will be connected
- Set IP addressing mode
- Static – IP Pool
- Static – Manual
- DHCP
- Manually set the IP (Static – Manual)
- Reset the MAC address
More details HERE
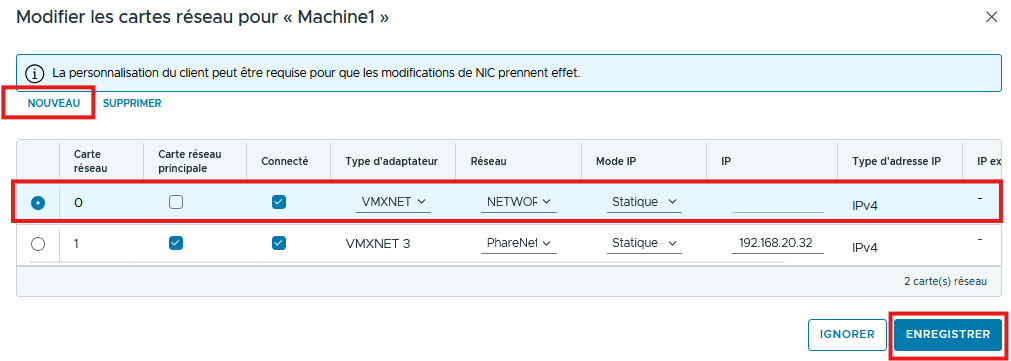

After adding a new vNic in vCD, it is important to stop and restart the VM from vCD with Personalization enabled.
Guest Operating System Customization
From the Guest OS Customization tab > Click on EDIT
The computer name and network settings configured for this VM apply to the guest OS of the virtual machine when it is powered on.
The following settings only apply the first time the VM is powered on or if a “Power on and force re-personalization” operation is performed: Password reset, Join domain, and Customization script.
Guest customization should not be enabled if the VM uses Guest Properties for customization.
Some appliances use Guest Properties, which allows pre-configuring the VM.
More Details HERE
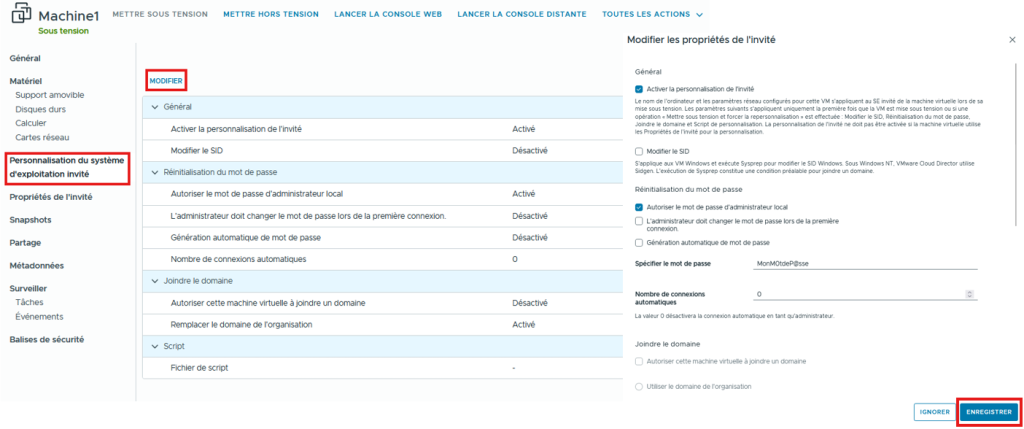
To apply the settings from this page, it is necessary to restart the VM forcing re-personalization

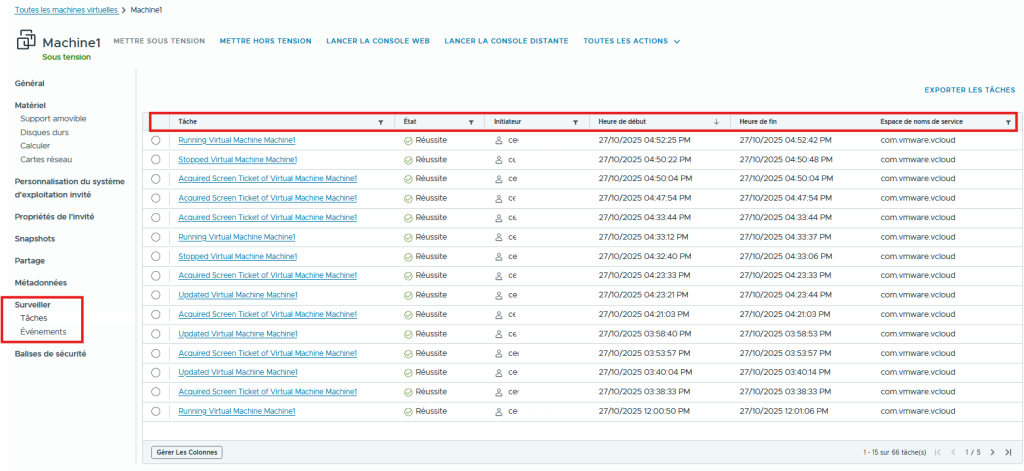
Tasks and Events
From the Tasks or Events tab
You can:
- View recent tasks or events.
- Export logs