-
Overview
-
Practical sheets
-
-
- Aucun article
-
-
- Aucun article
-
-
-
- Backup : Agent-Level B&R via NSS for IAAS offer
- Backup : Create VCOD Backup
- Backup : Netbackup Agent Installation for Linux
- Backup : Netbackup Agent Installation for Windows
- Backup : Overall Design for VCOD Offer
- Backup : User's Guide for VCOD Offer
- NSX-T : Configuring a Distributed Firewall
- NSX-T : Create VPN Ipsec
- NSX-T : Creation of T1
- NSX-T : DNAT configuration
- NSX-T : How to configure a Gateway Firewall
- NSX-T : SNAT configuration
- NSX-T: Create and Configure a Geneve Overlay Segment
- NSX-T: How to configure an IPSEC solution
- vCenter : Clone a VM
- VCenter : Create a new VM
- VCenter : Create a snapshot of a VM
- VCenter : Reset cloudadmin password
- VCenter : Storage Vmotion on a VM
- VCenter : Upgrade Vmware tools on a VM
-
-
Q & A
-
Services
-
-
- Aucun article
-
- Aucun article
-
- Aucun article
-
- Aucun article
-
- Aucun article
-
- Aucun article
-
- Aucun article
-
-
-
- Aucun article
-
- Aucun article
-
- Aucun article
-
-
-
- Aucun article
-
- Aucun article
-
-
Importing a VM/Media with OVFTool
Overview
OVF Tool is a free tool provided by VMware.
It is a command-line only tool that allows you to import and export OVF/ISO packages between environments or from third party providers.
A user guide is available on the OVT Tool help page here
Prerequisites
Please note !
Install the utility and follow the User Guide as documented on the help page by following the link above.
You must have a VMware account for this particular download.
Importing an OVA file
Pleas choose console1/ console2 or console4 to be iso with your vCloud Director Tenant name as follows:
.\ovftool.exe –vCloudTemplate –acceptAllEulas –overwrite <chemin .ova> “vcloud://<login>:<pwd>@3.flexible-computing-advanced.orange-business.com?org=<vOrg>&vappTemplate=<Template>&catalog=<catalogue>“
1. Now, pleas open a DOS/PowerShell window as follows:
From the installation directory you can use ovftool.exe.
2. Now rSun the above command with the following options:
- –vCloudTemplate: specifies that it is a new Template
- -acceptAllEulas: accepts all types of licenses
- –overwrite: replaces file if present
- < path. ova > : location of OVA file to Uploader
- < login > :< pwd >: Login/Password vCD (Advanced Organization Admin rights)
- < apiURL >: console1/console2/console4.cloudavenue.orange-business.com
- < vOrg >: Name of Organization
- < Template >: Name of the Template in the Catalog
- < catalogue >: Name of the Target Catalogue

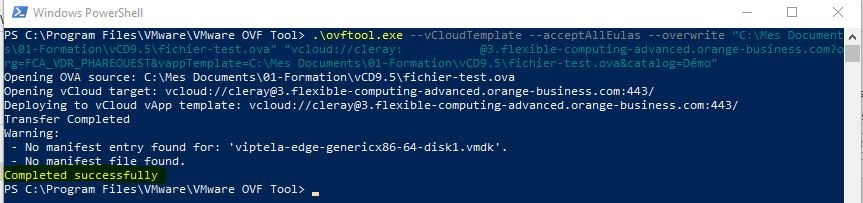
Résultat


Importing an ISO file
Choose console1/ console2 or console4 to be iso with your vCloud Director Tenant name. Here is an example:
.\ovftool.exe –sourceType=”ISO” “<chemin .iso>” “vcloud://<login>:<pwd>@3.flexible-computing-advanced.orange-business.com?vdc=<oVDC>&org=<vOrg>&media=<media>&catalog=<catalogue>”
- Open a DOS/PowerShell window
From the installation directory you can use ovftool.exe. Here are the steps to take:
2. Run the above command with the following options:- –sourceType: Specifies the source file type (ISO)
- < path. iso > : location of the ISO file to upload
- < login >:< pwd > : Login/Password vCD (Advanced Organization Admin rights)
- < apiURL > : 3.flexible-computing-advanced.orange-business.com
- < oVDC > : Virtual DataCenter name
- < vOrg > : Name of Organization
- < media > : Name of the Media in the catalogue
- < catalogue > : Name of the Target Catalogue


Résultat


Exporting a vApp to an OVF package
Please launch the following code :
cd ‘C:\Program Files\VMware\VMware OVF Tool’
.\ovftool.exe vcloud://username:password@3.flexible-computing-advanced.orange-business.com?org=OrgName“&”vdc=VDCName“&”vapp=vAppName C:\Users\username\Desktop\vAppName.ovf => (dossier de destination)