DBaaS – User Manual
Service Overview
Database as a Service (DBaaS) is a flexible and efficient cloud-based database solution that simplifies database management. DBaaS offers support for various database models, including:
- Relational Databases
- MySQL
- PostgreSQL
- NoSQL Databases
- MongoDB
DBaaS provides automated backups, scaling options, and built-in high availability, ensuring your databases are both resilient and easily manageable. The user-friendly management interface allows you to perform tasks such as provisioning, monitoring, and configuring databases without requiring extensive technical expertise. This streamlined approach minimizes routine O&M workloads, enabling your team to concentrate on developing innovative applications and services. With DBaaS, you can achieve rapid deployment and agile scalability, aligning with your business needs.
Supported Database Technologies
DBaaS is a reliable and scalable cloud database service that is easy to manage. It supports the following DB engines, under Community Edition:
- MySQL
- PostgreSQL
- MongoDB
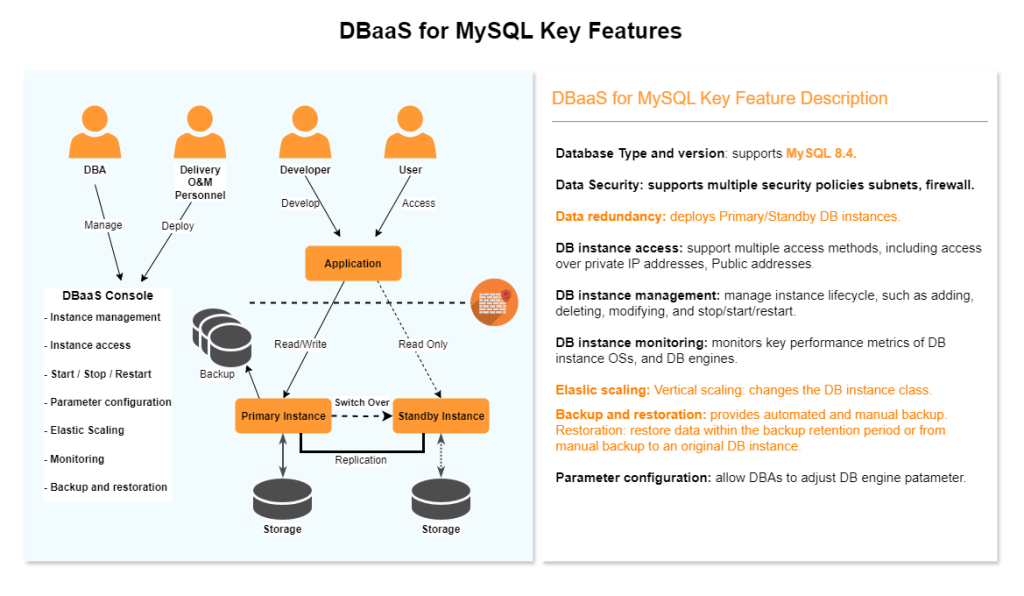
MySQL
MySQL is one of the world’s most popular open-source relational databases. It works with the Linux, Apache, and Perl/PHP/Python to establish a LAMP model for efficient web solutions. DBaaS for MySQL is reliable, secure, scalable, inexpensive, and easy to manage.
- It supports various web applications and is cost-effective, preferred by small- and medium-sized enterprises.
- You can flexibly scale resources based on your service requirements and pay for only what you use.
PostgreSQL
PostgreSQL is an open-source relational database management system (RDBMS) known for its robustness, extensibility, and standards compliance. It has earned a reputation for reliability and data integrity, and is widely used for websites, location-based applications, and complex data object processing.
- ACID Compliance: Ensures reliable transactions.
- Extensibility: Users can define their own data types, operators, and functions.
- Concurrency: Utilizes Multi-Version Concurrency Control (MVCC) to handle multiple transactions simultaneously without locking.
- Rich Query Language: Supports SQL and additional features like JSON, XML, and full-text search.
DBaaS for PostgreSQL :
When PostgreSQL is offered as a DBaaS, it combines the benefits of PostgreSQL with the convenience of Cloud Avenue services (Orange Cloud). Key advantages include:
Ease of Use: Simplified setup and management through web interfaces.
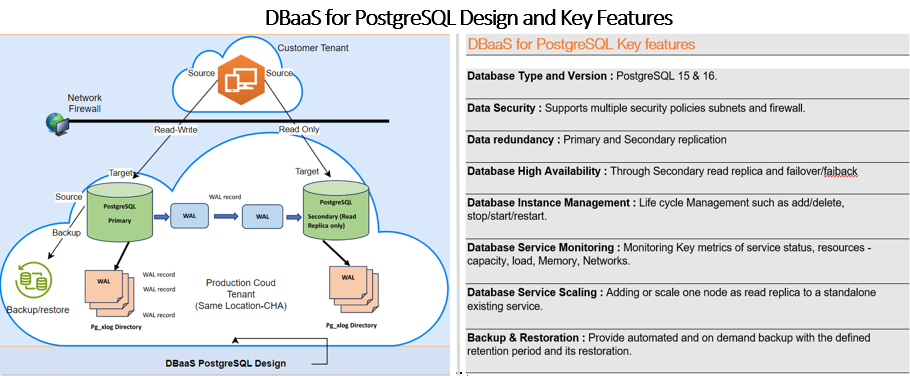
PostgreSQL Features Explanation :
1. Provisioning: Create service
With this feature user will be able to:-
Create database as a service with the form available on User Interface (UI). The user can fill the form with proper inputs and click on submit button to create service .
2. High Availability(HA) in PostgreSQL: Can select HA option while create service, states the two nodes, one is Primary, and another is Secondary as read replica. The is to facilitate, in case when Primary nodes goes down or not available. The failover will be facilitated with another feature. It comes with extra cost feature.
The database service will be created as Standalone or with HA option described above.
3. Backup: Backup of database , during creation of service and is part of provisioning and included , Default retention is 7 days.
4. Restore: Restore database service covers two types:
Full Restore : Restore full backup with complete recovery as per defined SLA RTO/RPO in operation guide
PITR : Point in Time recovery, have to input timestamp till the time database is required to be restored, which is incomplete recovery up to particular give time.
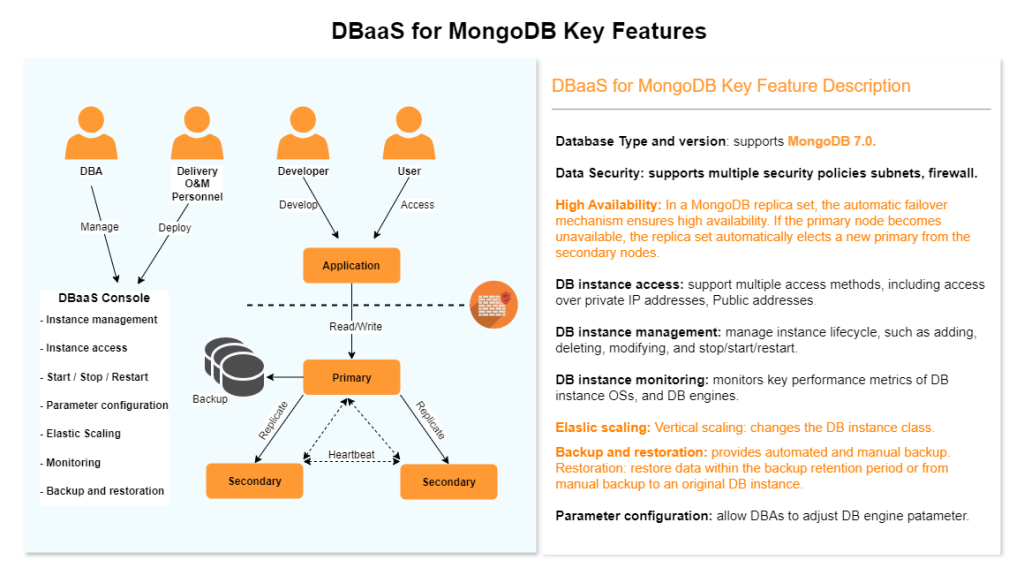
MongoDB
MongoDB is a secure, high availability (HA) database service that is reliable, scalable, and easy to use. MongoDB uses JSON-like documents when storing documents in collections.
DBaaS Access
DBaaS access requires below steps to be completed on your tenant before your application / VM’s are able to connect to Database Instances created below.
NAT and Firewall Rule creation
Once the request is completed customer Tier-0 Gateway would be connected to DBaaS network and customer would be allocated a network subnet (/27) called the fronted network. IP from this range would be used to connect the Database instances.
- Identify Edge Gateway to use for DB Client / Application VM Network:
- Login to your vCloud tenant portal > Go to Networking > Edge Gateways > Click each edge gateway (one by one) > go to IP Management section > IP Allocations, Look for the IP range that matches $FRONTEND_NETWORK$.
- Add Network (if none exists create new) that connects to the edge gateway hosting your Front End NAT Network $FRONTEND_NETWORK$ to your Application / DB Client VM .
- Create NAT Rule:
- Click the edge gateway hosting your Front End NAT Network $FRONTEND_NETWORK$, Go to Services > NAT
- Click New, Enter a name, For NAT Action : Select “SNAT” from drop down list
- For External IP: Manually enter one IP from the your front end network range $FRONTEND_NETWORK$
- For Internal IP: Enter your Application / DB Client VM private IP
- Additionally Expand Advanced setting and set Priority to be lowest value e.g. 3 or 4, Click Save.
- Create Firewall Rule:
- Click the edge gateway hosting your Front End NAT Network $FRONTEND_NETWORK$, Go to Services > Firewall > Click New, Enter a Name.
- For Application : Click “edit icon”, on Applications and Raw Port-Protocols window, click Raw Port-Protocols > Click Add, For Type: Select “TCP” from drop down list and For Destination Ports: Manually enter $DB_PORT$, Click Save.
- For Source : Click “edit icon”, on Select Source Firewall Groups window, click Firewall IP Addresses > click ADD > Click Add, and Manually enter Application / DB Client VM External IP that you have used in SNAT rule from frontend network range$FRONTEND_NETWORK$, Click Keep.
- For Destination : Click “edit icon”, on Select Destination Firewall Groups window, click Firewall IP Addresses > click ADD > Click Add, and Manually enter Database Instance IP:$DB_INSTANCE_IP$, Click Keep, Click Save.
Operation Guide
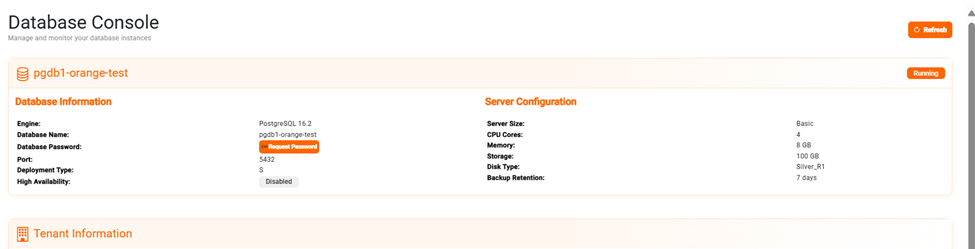
On the DBaaS-UI console, you can perform almost all necessary tasks. The console simplifies operations and reduces routine O&M workloads, so you can stay focused on application and service development.
You can create and connect to DB instances using DBaaS UI with a simple steps
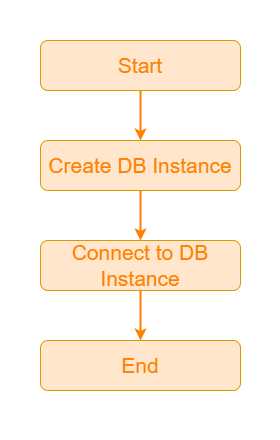
Create DB Instance for MySQL
This section describes how to create a DB instance on DBaaS management console
DBaaS management console allows you to tailor your compute resources your business needs.
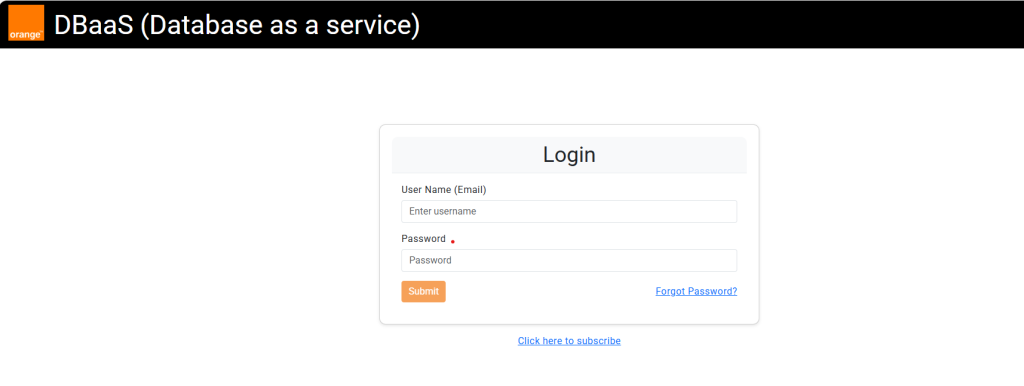
Step 1: Access DBaaS management console
1) Log in to the following URL with user credential.
URL: https://dbaas.cloudavenue.orange-business.com/login

2) Dashboard will be shown up with the supported database types as shown below.
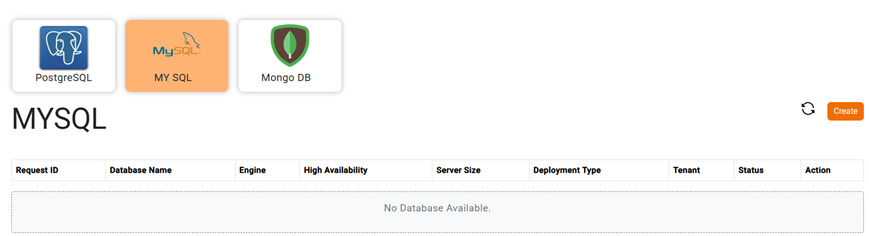
3) Choose MySQL database type, then click on Create button.
Step 2: Fill in Required Fields
To successfully create a database, you must fill in the following required fields:
- Database Name
- BSS ID (Auto Fill)
- MySQL Version
- Server Size
- App User
- Use MySQL Replica
- Port
- Backup Retention
- Storage Disk Type

Step 3: Submit the Provisioning Request
After filling in all required fields, click the “Provision” button to submit your request. You will receive a confirmation message once the database is successfully created.
Connecting to MySQL Database
Once your database has been provisioned, you can connect to it using the connection string provided in the UI.
Step 1: Locate the Connection String
- After provisioning, navigate to the “Databases” section in the UI.
- Find your newly created database and click on it to view details.
- Copy the connection string displayed in the database details.
Step 2: Create NAT and Firewall Rule
- Refer to to NAT and Firewall rule creation steps in above section.
Step 3: Connect Using the Connection String
1) Install MySQL client on the machine which is allowed to access database instance.
2) Use the following command to connect to the remote server:
$ mysql -h <connection_string> -P <port> -u <username> -p <database_name> |
- Replace <connection_string> with the IP address or domain name of the MySQL server.
- Replace <port> with the defined port number. The default port number is 3306.
- Replace <username> with your MySQL username.
- The -p flag will prompt you to enter your password.
- Replace <database_name> the database defined during the creation.
3) Enter Your Password: After running the command, you’ll be prompted to enter the password for the specified user. Type your password and press Enter.
4) Access the Database: Once connected, you can use SQL commands to interact with the database.
Example:
$ mysql -h 100.123.244.2 -P 3306 -u myuser -p test_database |
This would connect to a MySQL server located at 100.123.244.2 with the username myuser.
Create DB Instance for PostgreSQL
This section describes how to create a DB instance on DBaaS management console
DBaaS management console allows you to tailor your compute resources your business needs.
Step 1: Access DBaaS management console
1) Log in to the following URL with user credential.
URL: https://dbaas.cloudavenue.orange-business.com/login

2) Dashboard will be shown up with the supported database types as shown below.

3) Choose PostgreSQL database type, then click on Create button.
Step 2: Fill in Required Fields
To successfully create a database, you must fill in the following required fields:
- Database Name
- BSS ID (Auto Fill)
- Postgres Version
- High Availability
- Server Size
- App User
- Port
- Backup Retention
- Storage Disk Type

Step 3: Submit the Provisioning Request
After filling in all required fields, click the “Provision” button to submit your request. You will receive a confirmation message once the database is successfully created.
Connecting to PostgreSQL Database
Once your database has been provisioned, you can connect to it using the connection string provided in the UI.
Step 1: Locate the Connection String
- After provisioning, navigate to the “Databases” section in the UI.
- Find your newly created database and click on it to view details.
- Copy the connection string displayed in the database details.
Step 2: Create NAT and Firewall Rule
Refer to to NAT and Firewall rule creation steps in above section.
Step 3: Connect Using the Connection String
1) Install postgresql-client on the machine which is allowed to access database instance.
2) Use the following command to connect to the remote server:
$ psql -d <db_name> -h <connection_string> -U <username> -p <port> -W |
- Replace <db_name> with exact database name.
- Replace <connection_string> with exact connection string of PostgreSQL server available.
- Replace <username> with username defined or given during creation of services.
- Replace <port number> with selected port during creation of services.
3) Enter Your Password: After running the command, you’ll be prompted to enter the password for the specified user. Type your password and press Enter.
4) Access the Database: Once connected, you can use SQL commands to interact with the database.
Example:
$ psql -d db_test -h 100.123.245.2 -u myuser -p 5432 -W |
This would connect to a PostgreSQL server located at 100.123.245.2 with the username myuser.
Create DB Instance for MongoDB
This section describes how to create a DB instance on DBaaS management console
DBaaS management console allows you to tailor your compute resources your business needs.
Step 1: Access DBaaS management console
1) Log in to the following URL with user credential.
URL: https://dbaas.cloudavenue.orange-business.com/login
2) Dashboard will be shown up with the supported database types as shown below.
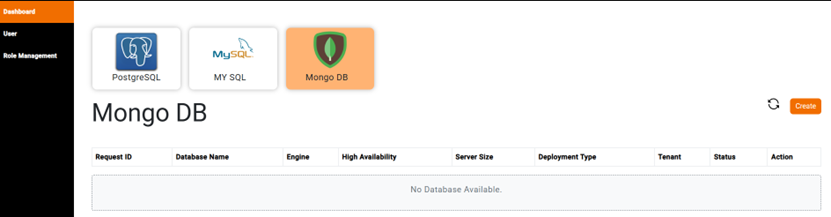
3) Choose MongoDB database type, then click on Create button.
Step 2: Fill in Required Fields
To successfully create a database, you must fill in the following required fields:
- Database Name
- BSS ID (Auto Fill)
- MongoDB Version
- Use MongoDB Replica
- Server Size
- App User
- Port
- Backup Retention
- Storage Disk Type
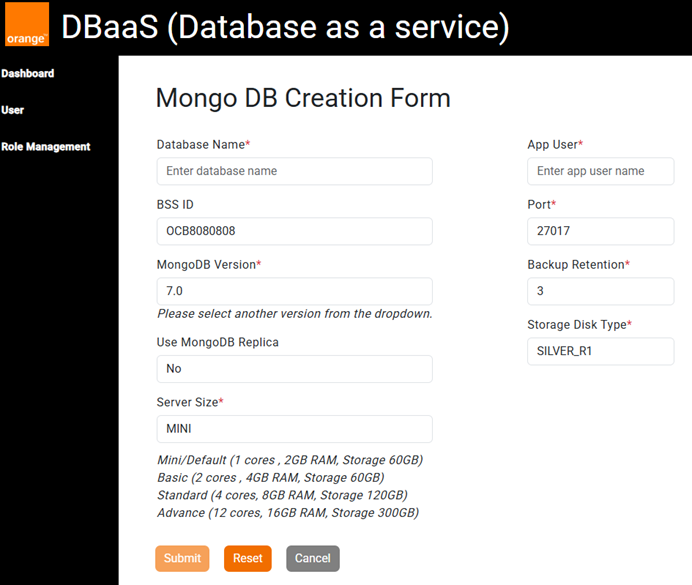
Step 3: Submit the Provisioning Request
After filling in all required fields, click the “Provision” button to submit your request. You will receive a confirmation message once the database is successfully created.
Connecting to Mongo Database
Once your database has been provisioned, you can connect to it using the connection string provided in the UI.
Step 1: Locate the Connection String
- After provisioning, navigate to the “Databases” section in the UI.
- Find your newly created database and click on it to view details.
- Copy the connection string displayed in the database details.
Step 2: Create NAT and Firewall Rule
Refer to to NAT and Firewall rule creation steps in above section
Step 3: Connect Using the Connection String
1) Install Mongo client on the machine which is allowed to access database instance.
2) Use the following command to connect to the remote server:
-
- Connect to a MongoDB on Single node:
$ mongo –host <connection_string> –port <port> -u <username> -p <password> <database_name> –authenticationDatabase <auth_db> |
-
-
- –host connection_string: Replace <connection_string> with the actual connection string (100.123.246.x) or hostname of your MongoDB server.
- –port <port>: This specifies the port number; in your case, it’s 28015. (Note that the default MongoDB port is 27017, but this command specifies a different port.)
- -u <username>: Replace <username> with your MongoDB username.
- -p <password>: Replace <password> with your MongoDB password.
- Replace <database_name> the database defined during the creation.
- –authenticationDatabase auth_db: Replace <auth_db> with the name of the database that contains the user you are authenticating against (often admin or the specific database the user is associated with).
-
b. Connect to a MongoDB Replica Set:
You can specify the replica set name and members in the connection string
$ mongo "mongodb://mongodb0.example.com.local:27017,mongodb1.example.com.local:27017,mongodb2.example.com.local:27017/<database_name>?replicaSet=replA" |
Stop/Start/Reboot a Service
Select from the drop down Options under Actions column for the respective service. (as example shown below in red box)
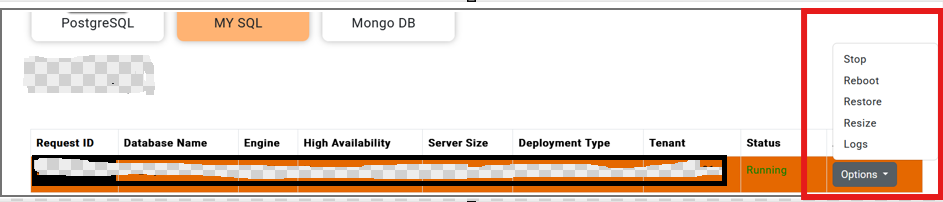
Example of Stop:
• The Stop option will only be enabled when the service has been successfully created and is currently running.
• Upon clicking Stop, a confirmation prompt will appear requesting you to enter the Request ID.
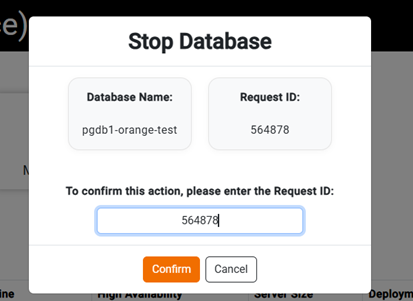
• This Request ID is the same one displayed on the dashboard for the service.
• Enter the correct Request ID and click Confirm to proceed with stopping the service
Once you click Confirm, the status for that Request ID on the dashboard will change to “In Progress”.

When the service is successfully stopped, the status will update to “Stopped”, as shown below:

Similarly,
For Start : When the service is successfully started, the status will update to “Running”
For Reboot : When the service is successfully rebooted, the status will update to “Running”
Resizing Service
To resize a DBaaS, select from the drop down Options under Actions column.
• The resize option will only be enabled when the service is successfully created and running.
• Upon clicking Resize, a confirmation prompt will appear asking you to enter the Request ID and provide the necessary values to scale the instance.
• This Request ID is the same one displayed on the dashboard for the service.
- Enter the correct Request ID and click Confirm to proceed with resize.
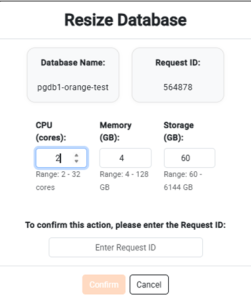
Note :
There are resizing limits for DBaaS based on the server size:
- For the Mini server size, memory can only be scaled up to 3 GB; however, CPU cores and storage can be scaled similarly to other server sizes.
- For other server sizes, you can scale resources as follows:
- CPU Cores: from 2 up to 32 cores
- Memory: from 4 GB up to 128 GB
- Storage: from 60 GB up to 6144 GB
- Once you click Confirm, the status for that Request ID on the dashboard will change to “In Progress”.
- When the instance is successfully resized , the status will change to “Running”, as shown below
- You can also verify that the resize has been applied as per the inputs by clicking on the respective Request ID displayedin dashboard as shown below
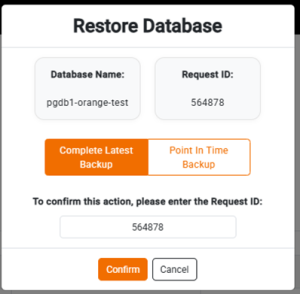
Restore a Service
To restore a DBaaS, select the Restore from the drop down Options under Actions column.
• The restore option will only be enabled when the service is created successfully and running.
• Upon clicking Restore, a confirmation prompt will appear asking you to select whether you want to restore the DBaaS from the Complete Latest Backup or to select Point In Time Backup.
Restore from ‘Complete Latest Backup’ option: Here, DBaaS would be restored from the latest complete backup
Restore from ‘Point In Time Backup’ Option: In this option, the DBaaS is restored till the timestamp specified in the Point-in-Time Recovery (PITR), as illustrated in the screenshot below.
The date must be provided in the format ‘YYYY-MM-DD HH:MI:SS’ , Example :’2023-10-25 14:30:00′, and the time should follow the 24-hour clock format.
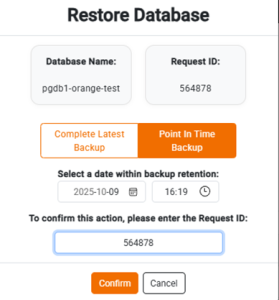
• Also be prompted to enter the Request ID. This Request ID is the same one displayed on the dashboard for the service.
• Enter the correct Request ID and click Confirm to proceed with restoring the DBaaS.
Once you click Confirm, the status for that Request ID on the dashboard will change to “In Progress”.
When the instance is successfully restored from the backup , the status will change to “Running”.
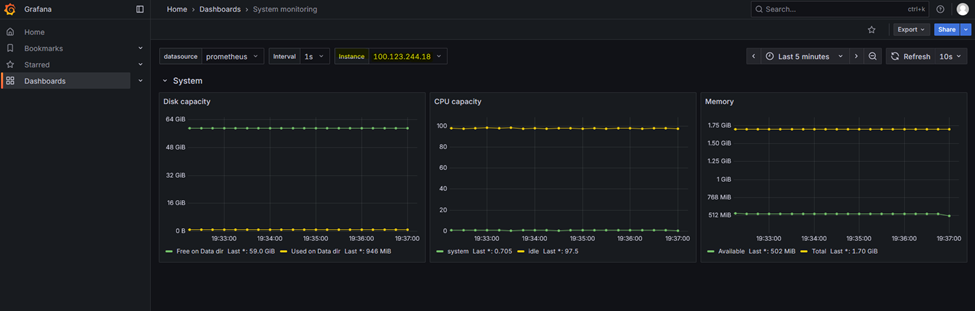
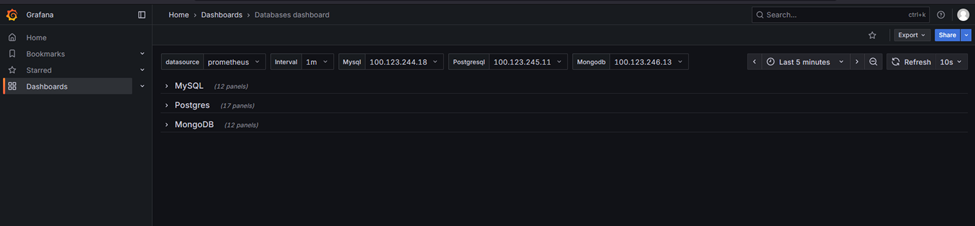
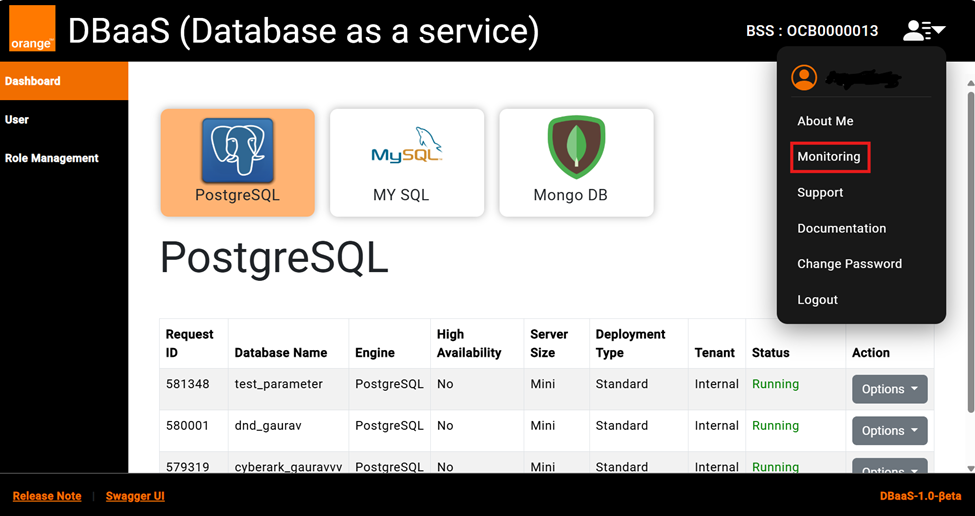
Monitoring DBaaS By Grafana
After login to DBaaS Portal, goto to above right corner of page under User drop down , as marked in red box “Monitoring”
1. Click on “Monitoring” which will take you to monitoring URL
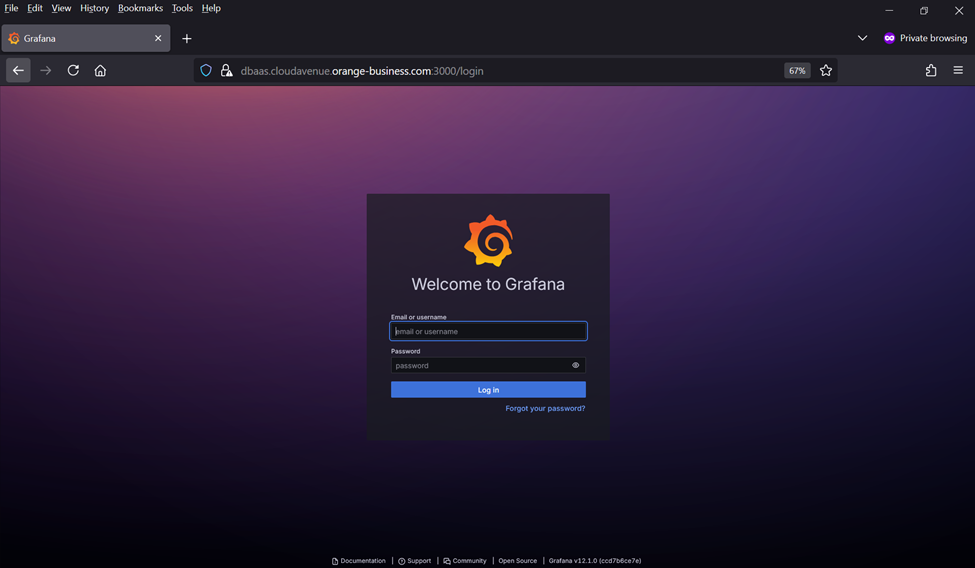
2. Login to monitoring URL with provided username and password at the time of On-Boarding.
3. Once, logged in Grafana home page, there is dashboard option to check OS and Database level monitoring which is highlighted in
below screenshot
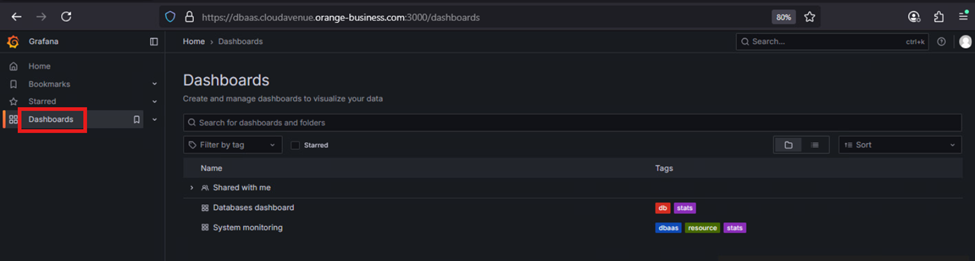
4. After clicking Dashboard, there are two dashboards as mentioned in above step
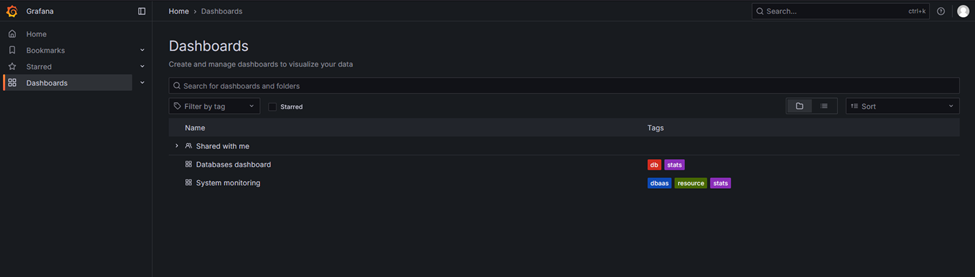
5. Click on each dashboard to view respective monitoring, use drop down to view respective instance details