Backups Configuration
- Backup Definitions
- Subclient management
- Activity disabling
- Application backup Configuration
- (VSA) Virtualization Client backup Configuration
- Database backup Configuration
- Hyperscalers applications protection configuration
- Object Storage Backup configuration
Backup Definitions
In order to run, a backup must be defined specific parameters:
- Backup Plan:
- Schedule
- Storage location
- Data retention
- Subclient:
- Content
- Exclusions and/or Exceptions
In FAB, Backups are grouped by sets of Subclients.
These sets are only logical groups to further help you manage the hierarchy of your backup data. Their name varies depending on the FAB agent in question (BackupSets for Filesystem agent).
The true container of your data to protect is the Subclient
It’s therefore only by associating Backup Plans to Subclients that you can protect your data.
|
Some Backup Plans are pre-configured for your use See the FAB preconfigured Backup Plans section |
Another important notion to understand is the Backup Level. In FAB (as in most backup softwares) these are:
- Full: A Full backup includes everything defined in the backup content of the backed up Subclient. The first backup of a subclient is always a Full backup.
- Synthetic Full: A Full backup built on the backend with all differential/incremental backups since the last Full backup. A synthetic Full does not require interactions with the FAB agent and has no impact on the backed up device. However, a synthetic full backup does not include the files modified since the last backup.
- Incremental: An incremental backup includes every data modified since the last Full or Incremental backup.
- Differential: A differential backup includes every data modified since the last Full backup only.
- Transaction Log: Only for DB agents, the transaction log is the DB backup log. It includes all committed and uncommitted transactions. A new DB log file is generated.
Deduplication
If you are bringing your own storage (see the BYOS section), you must understand the Deduplication principle.
Data Deduplication is a technique for eliminating duplicate copies of repeating data before actually storing the backup on the storage.
The data Deduplication technique greatly improves storage utilization, which may in turn lower capital expenditure by reducing the overall amount of storage media required to meet storage capacity needs.
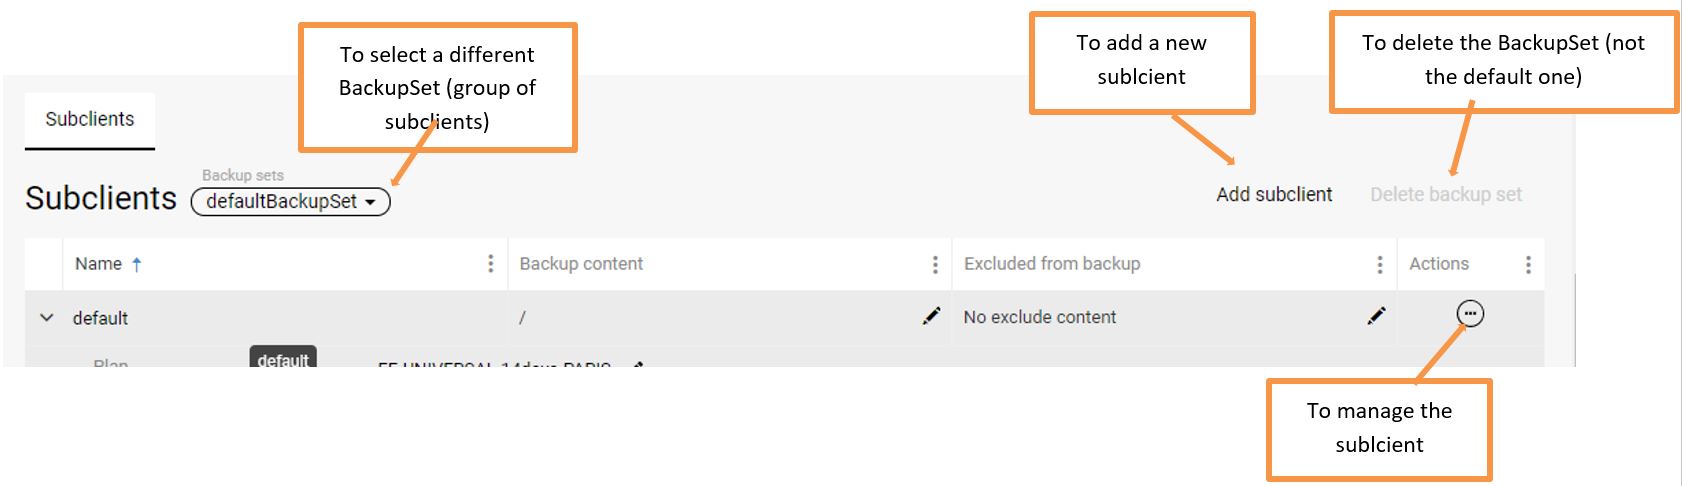
Subclient management
In order to modify a backup content, add or remove exclusions, create file exclusion exceptions, or modify a Backup Plan to a given set of files, you may add or edit subclients:
- Connect to the FAB Backup console, Protect / File servers section:
- Select the device for which you wish to modify the backup:

- Possible operations as described below from the “Sublcients” section (page bottom):
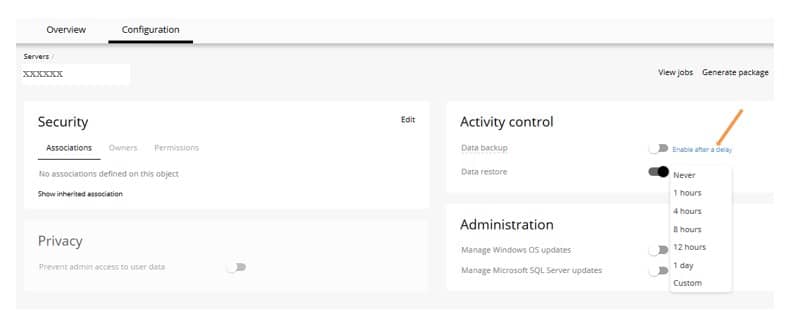
Activity disabling
If required, any backup / restore activity may be disabled and re-enabled:
- Connect to the FAB Backup console, to the configuration page of the element to disable/enable
- Click on Configuration

- Slide the toggle bar to disable the activity (Data backup / Data restore…)

- Click on Enable after a delay to enable backup/restore after a certain duration, choose the desired delay period of create a custom one
Application backup Configuration
Microsoft Exchange (DAG) Backup Configuration
| Prerequisite: The FAB Exchange agent is installed on all nodes |
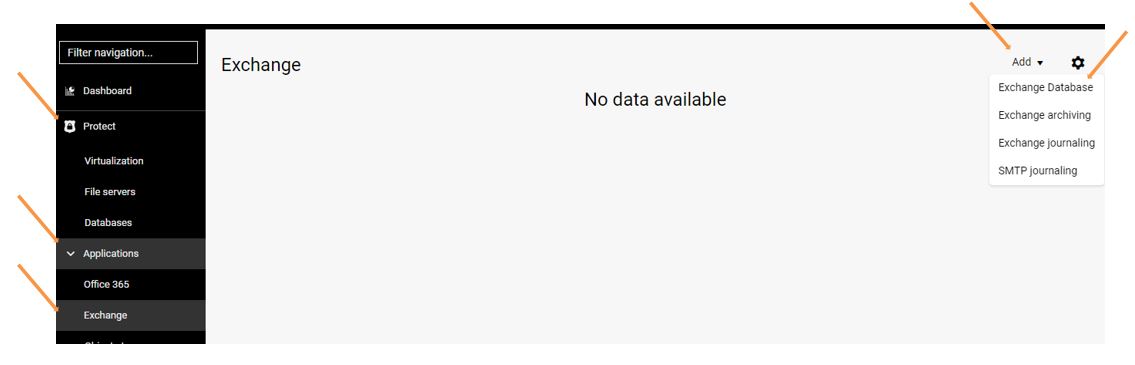
- In the FAB Backup console, go to the Protect / Applications / Exchange section
- Click on Add and then select Exchange Database
- Provide all required details, then click on Discover and provide input after discovery
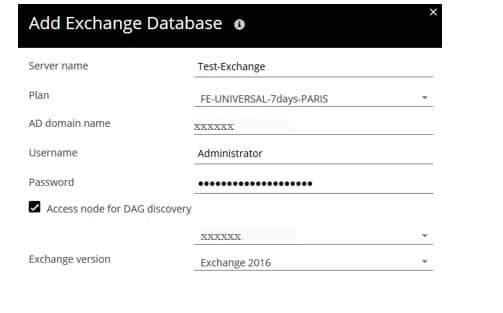
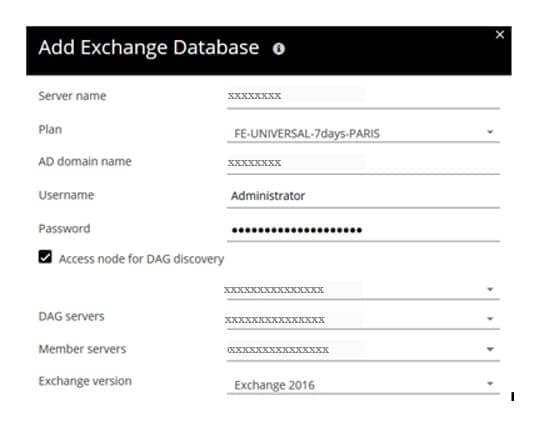
- In the DAG servers list, select a DAG with an available member server
- In the Member servers list, select a member server, and then click on OK
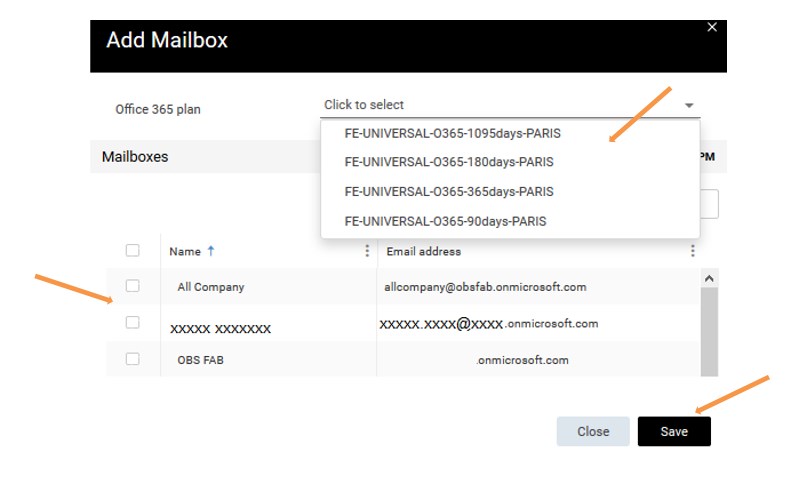
Add Mailboxes to backup:
- Go to the FAB Backup console, Protect / Exchange section
- Click on the Exchange server

- In the Subclients section, click on the subclient

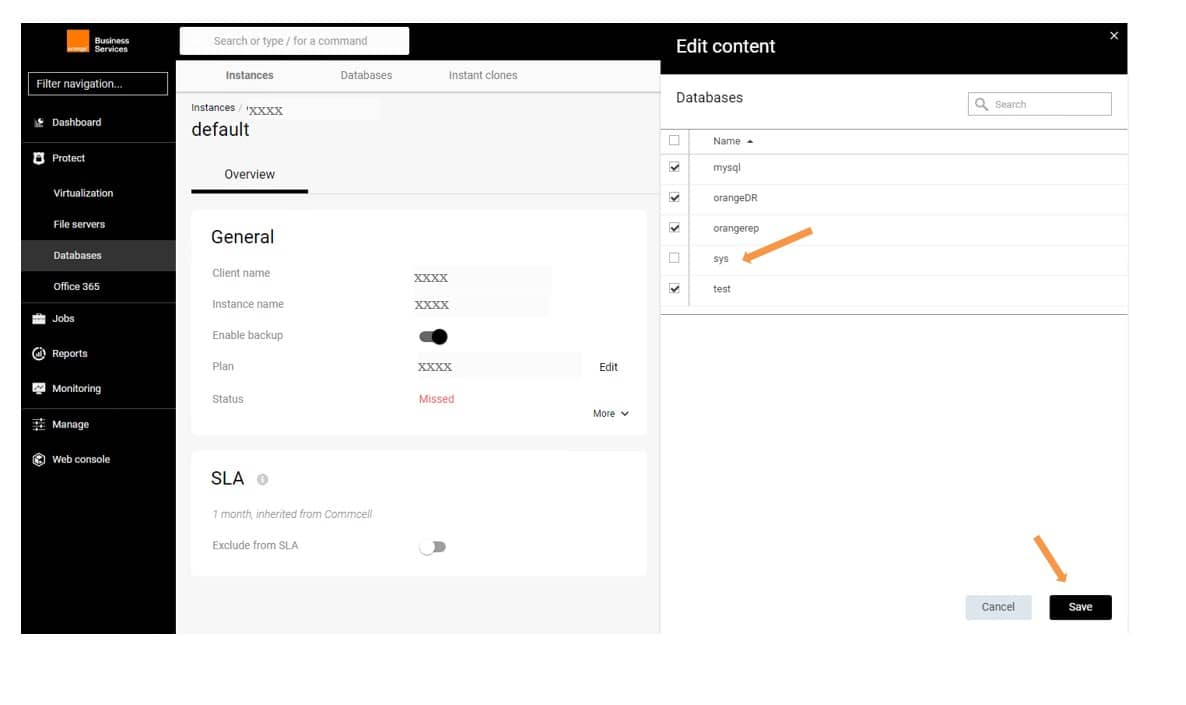
- In the Content section, click on Edit
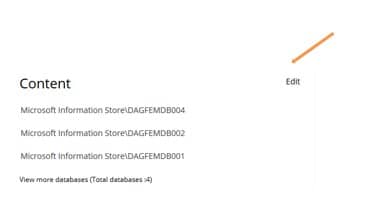
- Select the databases to backup

- Click on Save
- In the Server details section, click on Edit
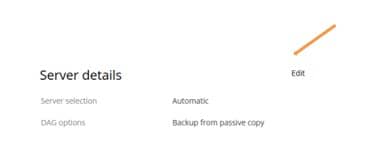
- Select Backup from passive copy in the DAG options
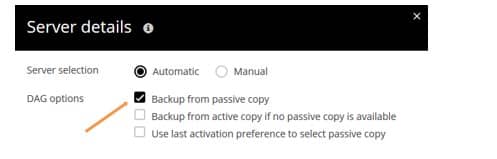
- Click on Save
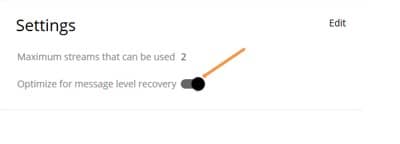
- In the Settings section, enable Optimize for message level recovery
(VSA) Virtualization Client backup Configuration
(VSA) VMware Backup Configuration
Prerequisites:
|
- In the FAB Backup console, go to the Protect / Virtualization section
- Click on Add hypervisor in the Hypervisors tab
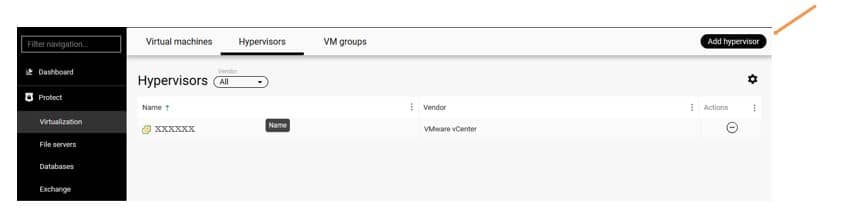
- In the Add hypervisor window, from the drop down list in Select vendor click VMware vCenter.
Provide the vCenter Hostname, Hypervisor display name (a display name, can be anything), enter the credentials Username and Password or select pre-saved-in credentials, and select the Access node (the server with the FAB VSA agent):
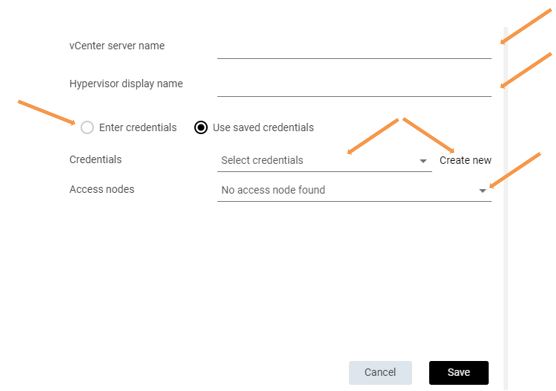
| Note: The credentials required here are for accessing the vCenter. Administrator role is required. |
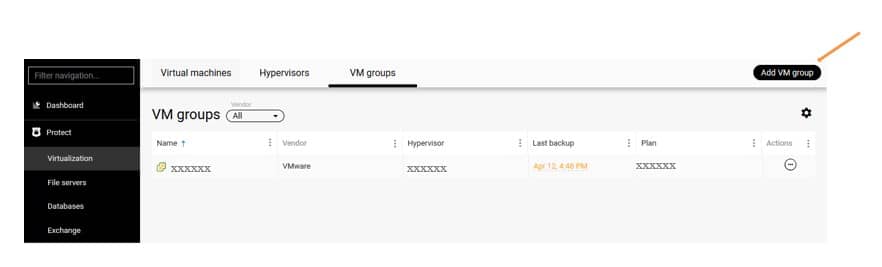
- Go to the VM groups menu, and click on Add VM group
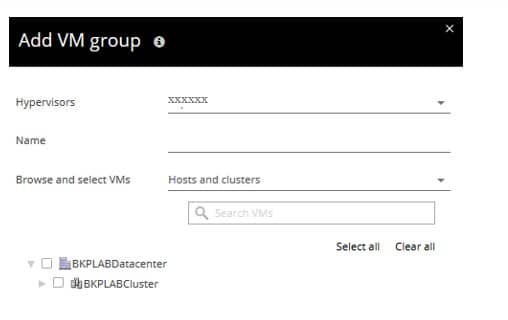
- In the Add VM group window, choose the Hypervisor that was added in previous steps. Provide a Name (any name). In the Browse and select VMs there are several options to help you select your VMs to protect from your VMware infrastructure. Check the boxes next the the VMs to protect
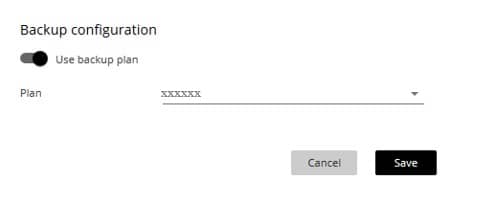
- Select the Plan to associate to this backup from the dropdown list based upon the region where your server / vCenter is located
Note: The Plan will determine where to store your data. It is recommended to take extra attention in determining the data location (see Backup plans description section) as it may cause degraded performances |
- Click on Save
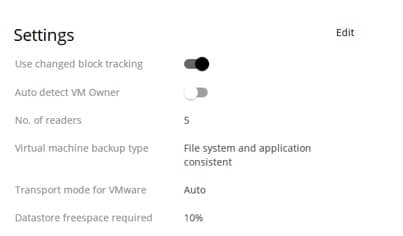
(VSA) VM application consistency setup
VMware tool is by default used for taking application consistent backup, but to provide granular application level recovery this needs to be modified.
Application Aware definition: It quiesces the application, flushes its memory, and completes pending writes, then creates a software snapshot of application data. After the software snapshot is created, the application resumes
- In the FAB Backup console, go to the Protect / Virtualization section
- Go to the VM groups menu, and click on the configured VM group (see VMware backup Configuration section for configuring it)
- then go to the Configuration tab and click on edit under the Settings frame
- In the Edit settings window:
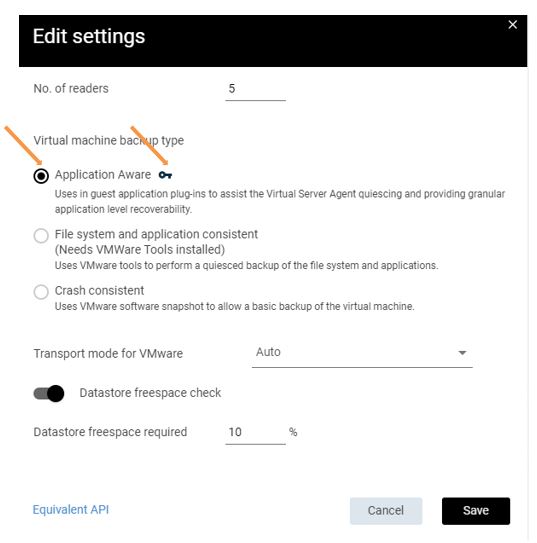
- Select the Aplication Aware option
- Click on the key icon
- Enter the server credentials (as it’s application aware, and as this model has no FAB agent present on the server, it requires credentials on the system)
- Click Save
Note: This option is supported on Windows VMs (and some Linux) |
Prerequisite: The FAB Oracle agent has been installed on the Oracle server to protect as instructed in section Oracle agent installation |
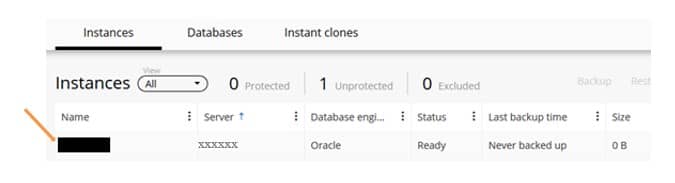
- In the FAB Backup console, go to the Protect / Databases / Instances section and Click on the DB instance (the instance is automatically discovered once the agent correctly installed, if not, follow the instructions detailed 3 steps here below)
- Click on edit under the General section in the Overview page
- Select the Backup Plan (see the Backup Plans description section) to use for the backup of this Oracle environment, and provide the connection credentials, then click on Save
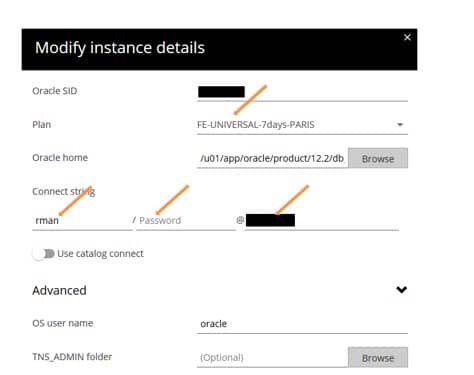
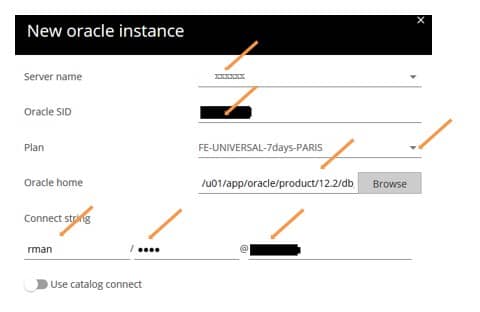
- If the Instance is not automatically discovered, click on Add instance / Oracle


- and provide the details:
Prerequisites: The FAB MS-SQL agent is installed on node as instructed in section MS SQL agent installation |
- Ensure that your server is discovered in the FAB Backup console:
- Go to the Protect / Databases / Instances section:
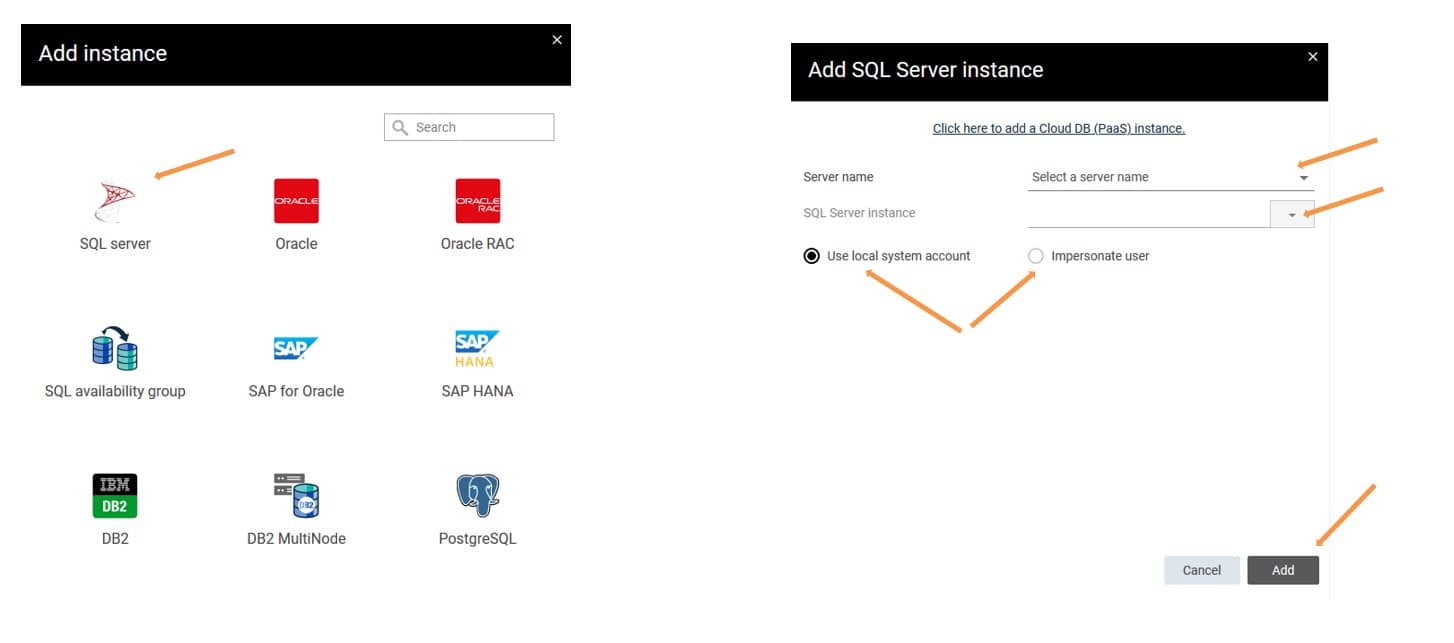
- If the instance is not detected after the installation, or if the user account for the SQL service is not the local system account, then, in the Protect / Databases / Instances section, click on “Add Instance” :

- Select the Server and the SQL instance, define the credentials required, and click on the Add button:
Prerequisite: The FAB MYSQL agent has been installed on the MYSQL server to protect as instructed in section MYSQL agent installation. |
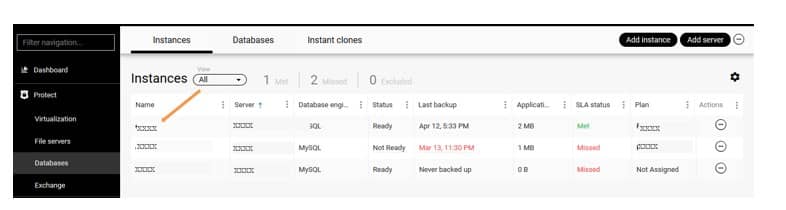
- On the FAB console, go to Protect / Databases / Instances.
If the MYSQL instance is not visible automatically after the agent installation then follow below steps.
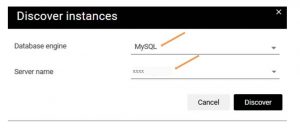
- On instances sub-tab, click on the three dots present on right Side of the page. Click on discover instances
- Select the Database engine as MySQL and select the server name from drop down menu. Click on Discover
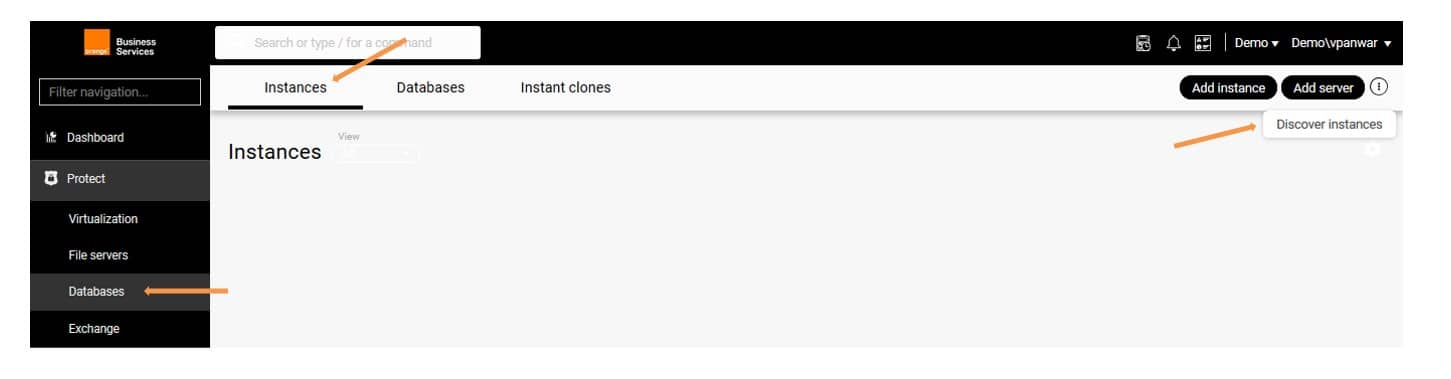
If the Discover instances option doesn’t work, add the Database manually by following the below steps:
- From the navigation pane, go to Protect / Databases
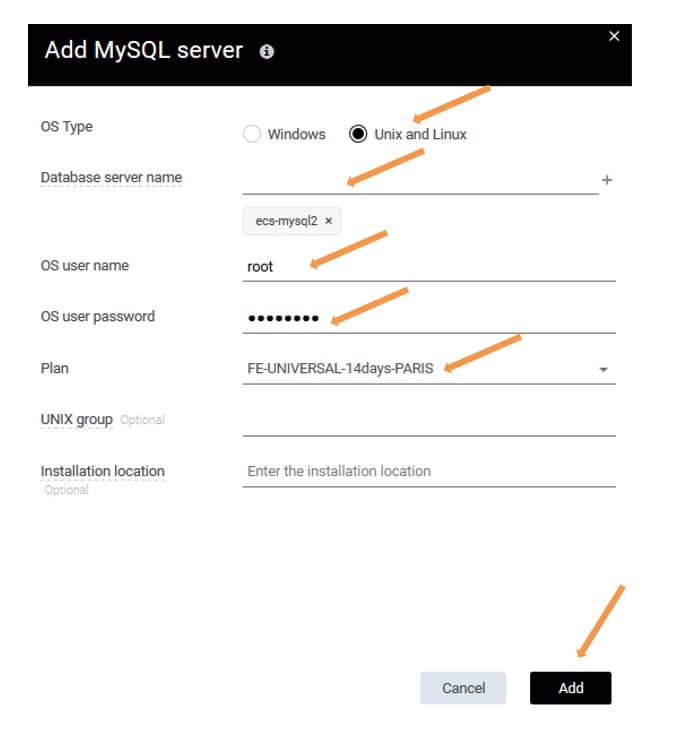
- On Instances page click Add server, and then select the database type.
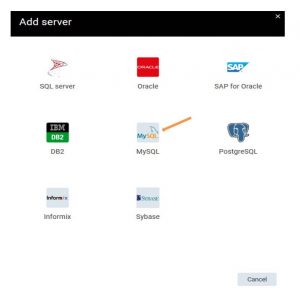
- Fill the details like OS Type, Database server name, OS user name password, plan and others. Click on Add.
- The MySQL Instance is now present under section Protect / Databases / Instances
- Click on the newly added Instance then click on edit under the General section in the Overview page
- Select the Backup Plan (if you wish to use preconfigured backup plans, see the FAB preconfigured Backup Plans description section) to use for the backup of this MySQL environment, and provide the connection credentials, then click on Save
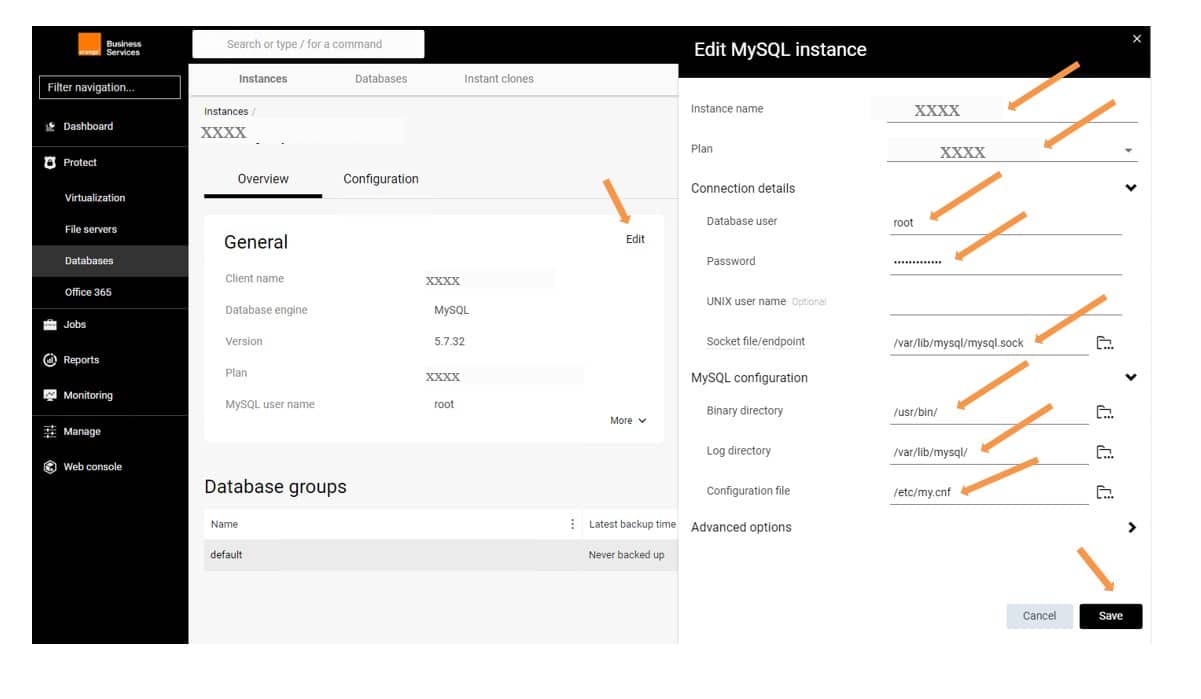
| Note: for Master-slave configuration: Skip the /sys from slave backup dataset configuration as shown below. |
Hyperscalers applications protection configuration
- Exchange Online (Microsoft 365 mailbox) Configuration
- SharePoint Online Configuration
- OneDrive for Business Configuration
- Teams protection App Configuration
- Object Storage Backup configuration
Exchange Online (Microsoft 365 mailbox) Configuration
Prerequisites:
|


| Note: All mailboxes configured on the same plan will share the same backup configuration (backup retention period and location). For using different configurations, you must use different plans on the mailboxes. |
- (Optional) AD Groups can be added so that any new user’s mailbox can be automatically backed up with the retention set on the group.
- In the FAB Backup console, Protect / Applications / Office 365 click on the App name

-
- Click on Add and select AD group from drop down
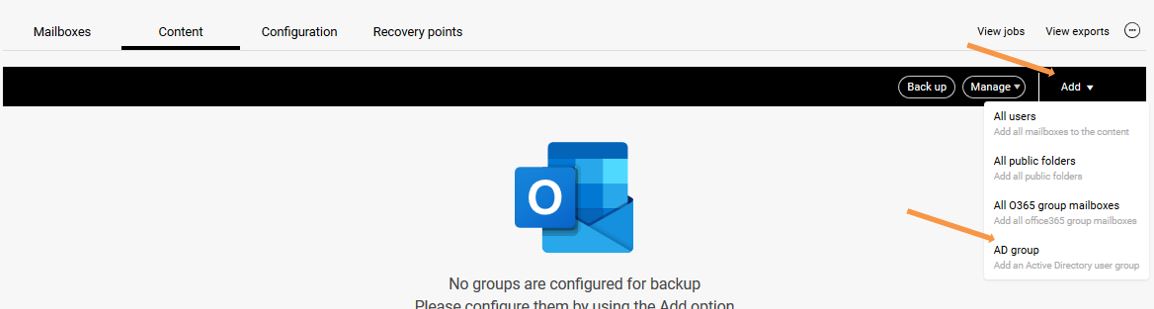
-
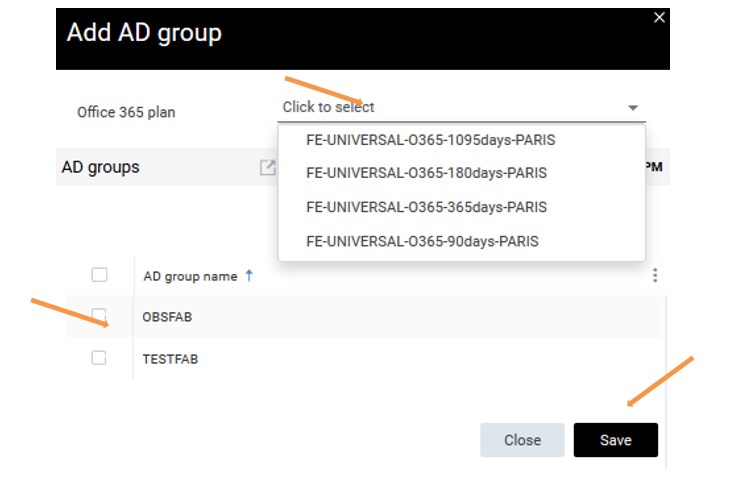
- In the Add AD group window Select the groups sharing the same backup retention requirements and Choose the desired Exchange plan accordingly, then click on Save
Notes:
|
- In the FAB Backup console, Protect / Applications / Office 365 section, click on the App name hosting the mailbox to disable
- Select the user mailbox to disable and click on the three dots menu, then select Manage and click Exclude from backup
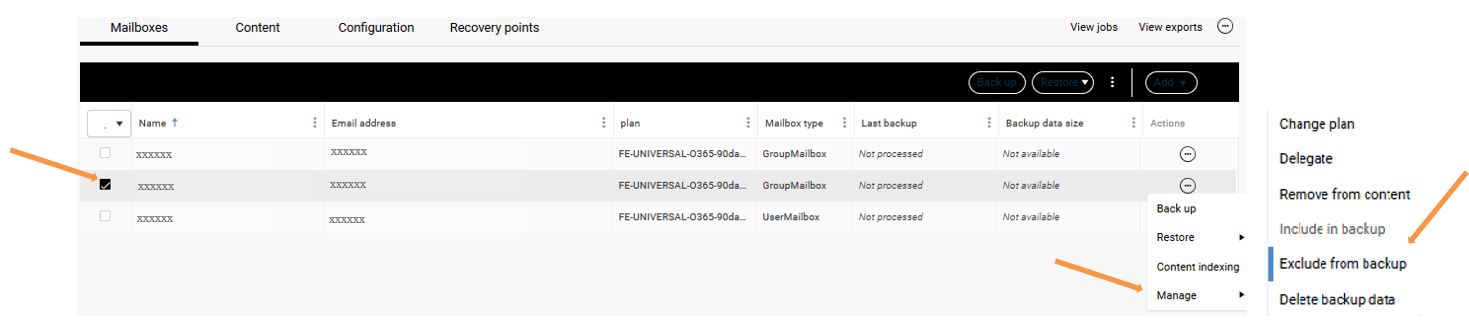
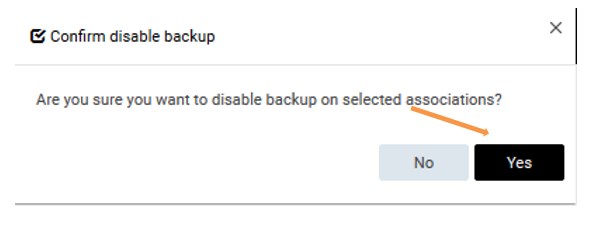
- In the “Confirm disable backup” window, click on Yes
Delete Exchange Online Mailbox Client
| Note: Deleting the MS 365 App removes within 24hrs all the mailbox backups currently in retention for that app |
To remove the whole MS 365 Exchange online application:
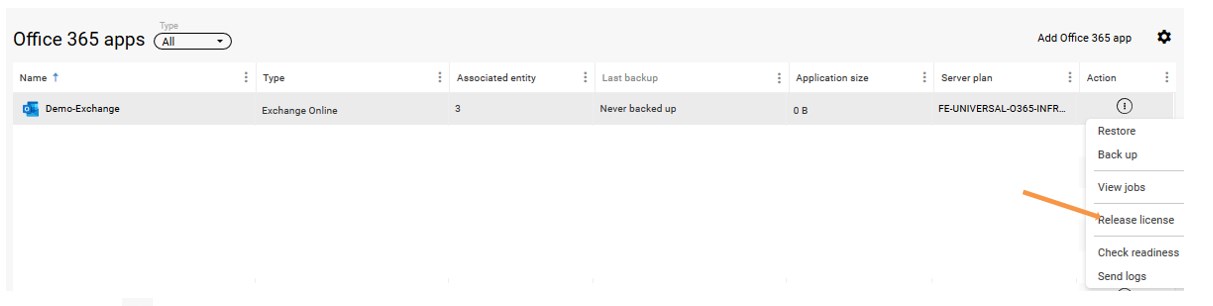
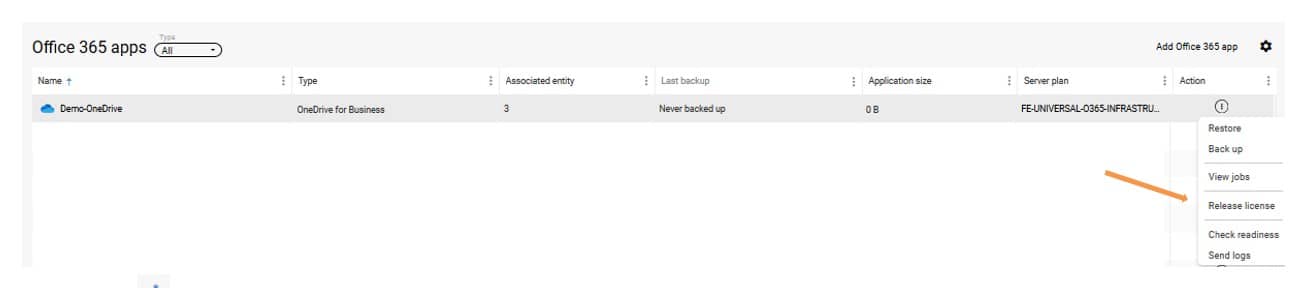
- In the FAB Backup console, Protect / Applications / Office 365 section,
- Click the three dots action menu against the Exchange online App / client name and click Release license, it would disable client
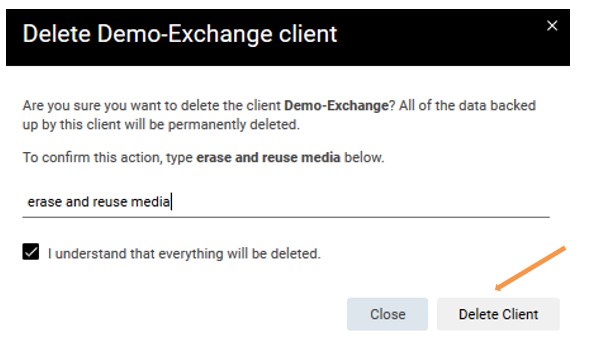
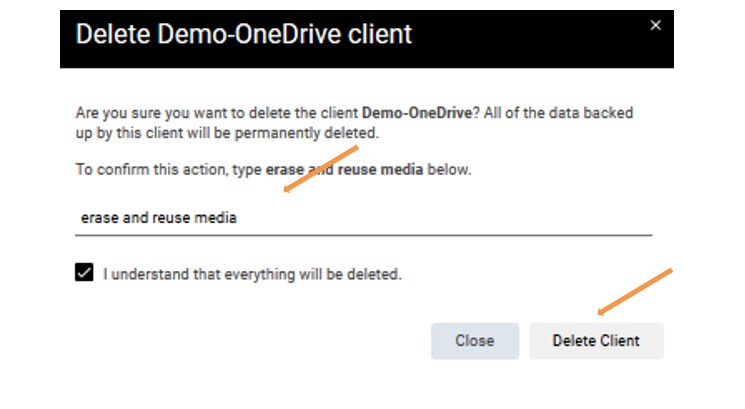
- Click the three dots action menu again and click Delete
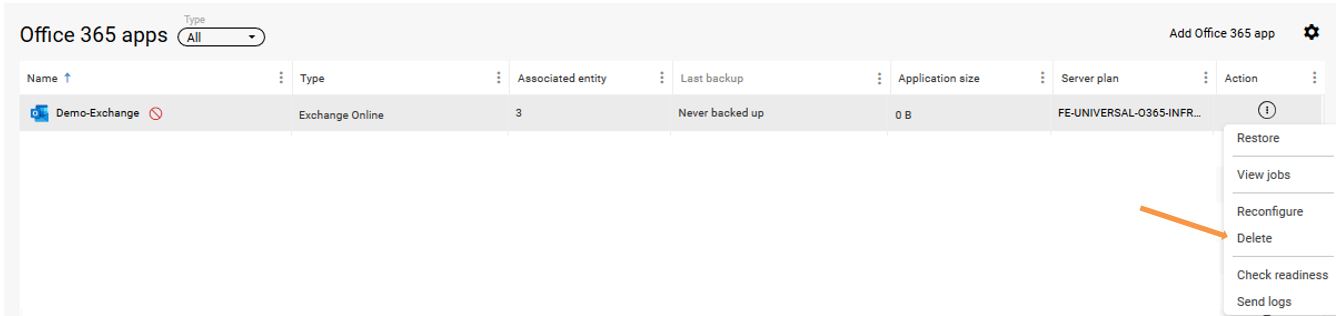
- Type in erase and reuse media when asked to confirm client deletion by clicking Delete Client
SharePoint Online Configuration
Prerequisites:
|
- In the FAB Backup console, go to the Protect / Applications / Office 365 section
- Click on Add Office 365 App

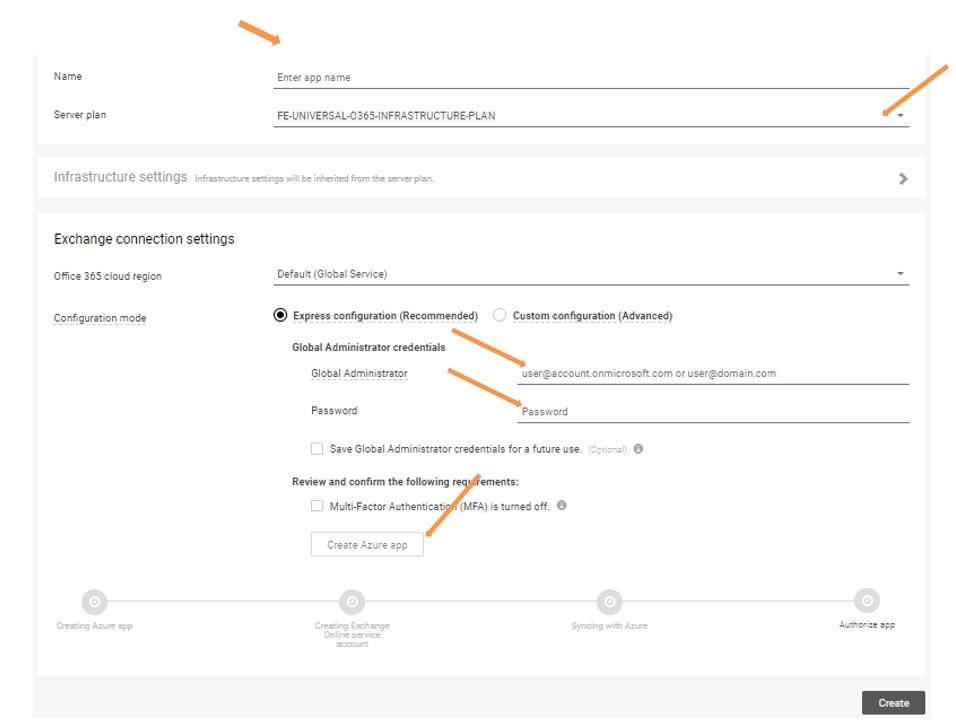
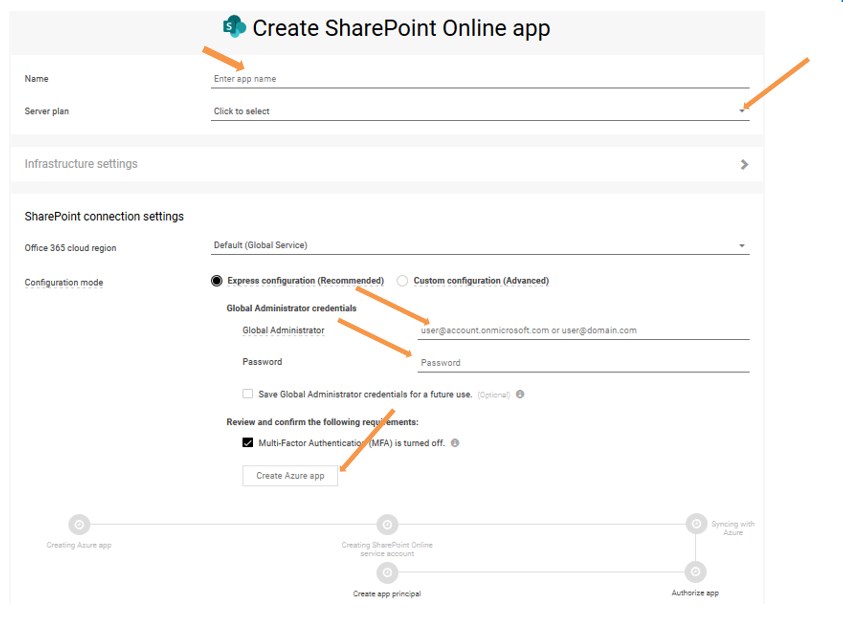
- In the Add Office 365 app window, Click SharePoint online and provide the application Name (pseudo name to identify this SharePoint online application)
- It’s mandatory to select the FE-UNIVERSAL-O365-Server-Plan plan from the drop down list in Server plan
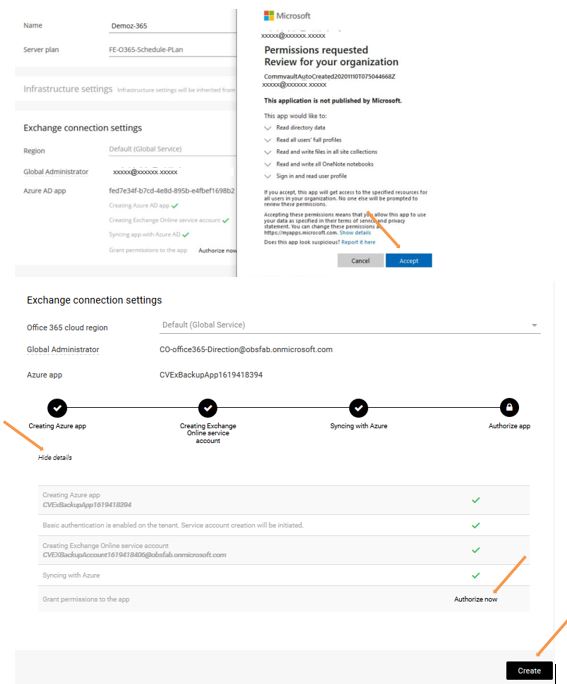
- Input Global Administrator name and Password, check the box “MFA is turned off” and, once done, click on Create Azure app
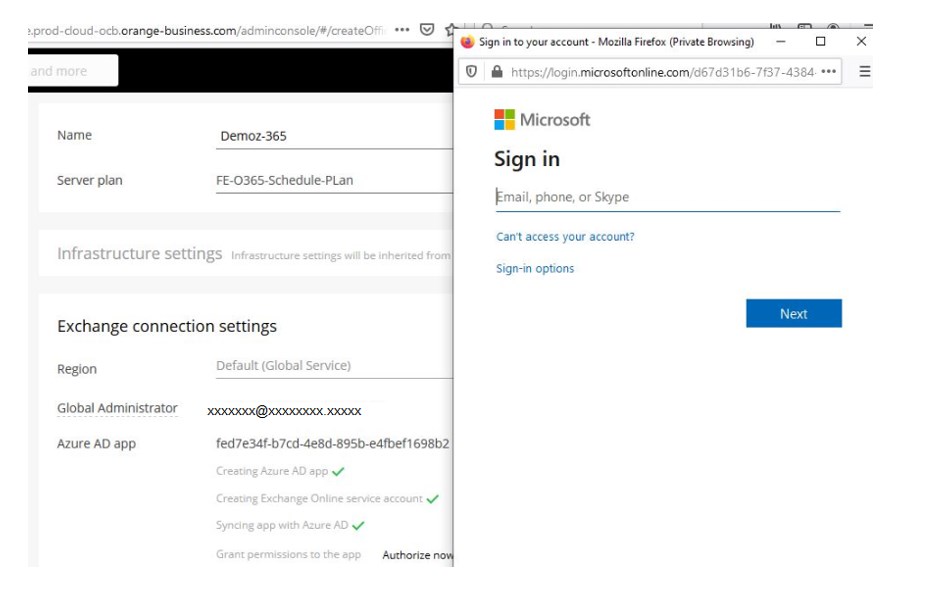
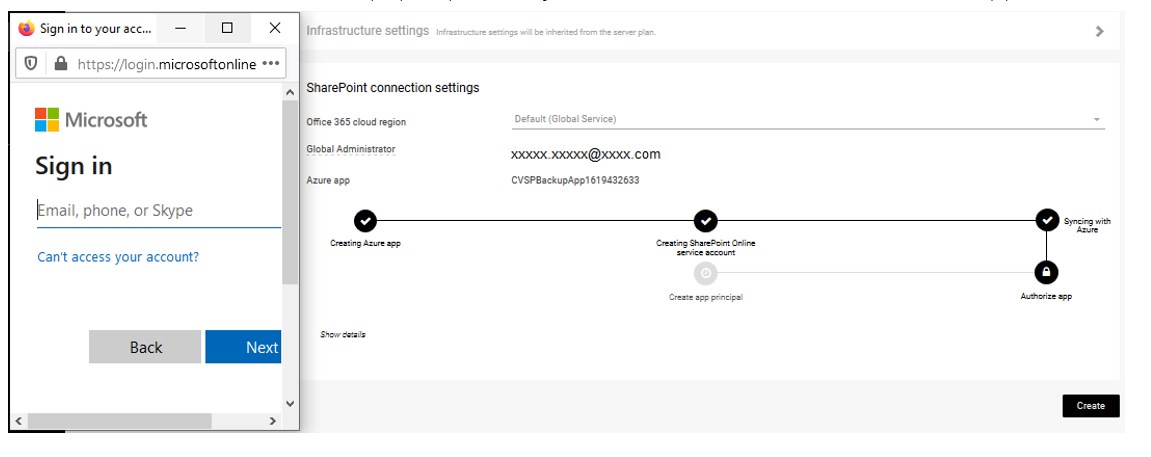
- A Microsoft Azure authentication window pops up. Enter your admin credentials to authorize the app.
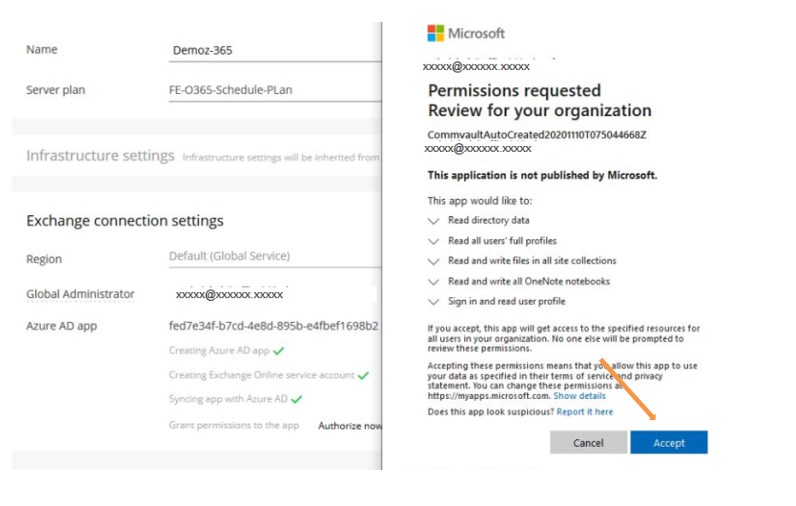
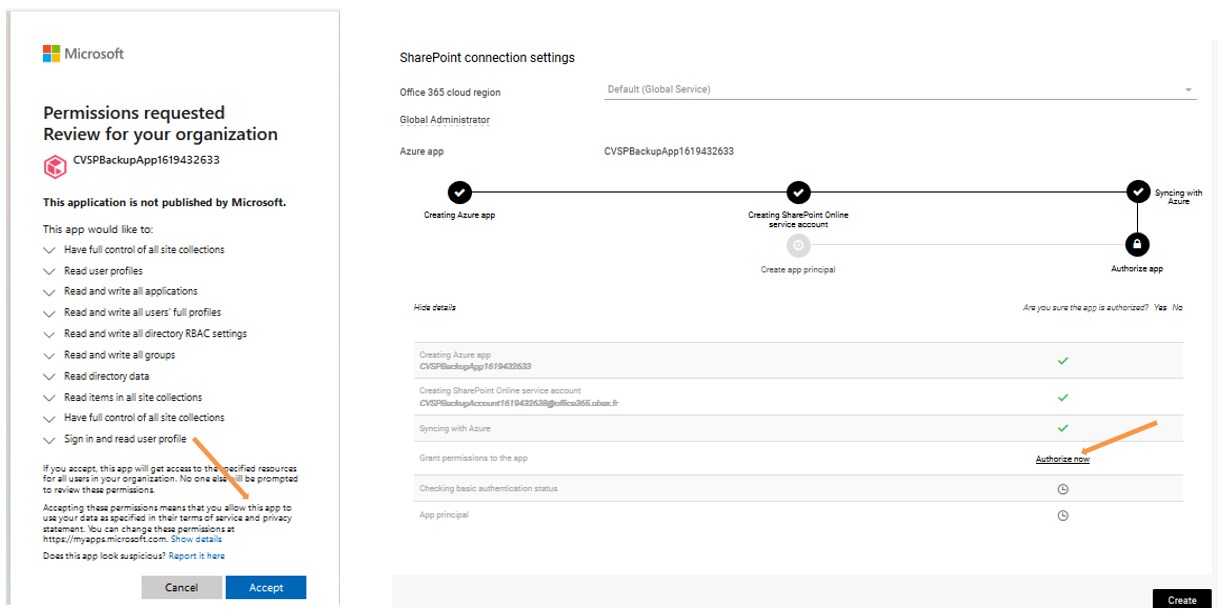
- Click on Accept and Verify that App is authorized by expanding Hide details (if required click Authorize Now)
- In the Create app principal window, Click on the link in step 1. It would open Sharepoint admin portal in another window (care to accept the popup in your browser)
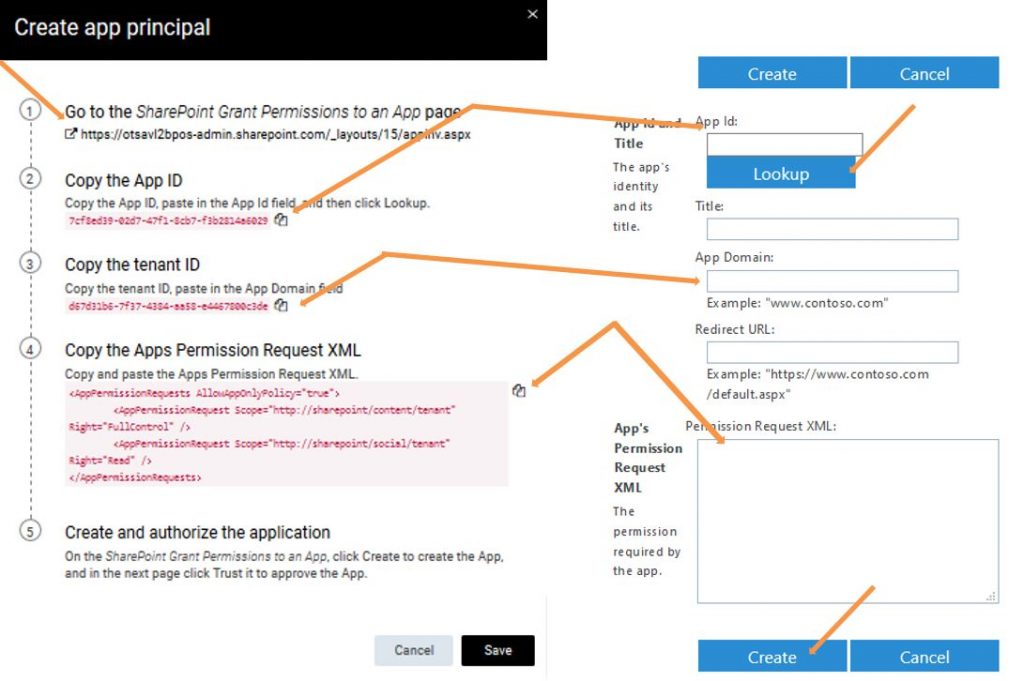
- Copy the App ID from the FAB page and paste it in the Sharepoint popup window “App Id” field
- click Lookup
- Copy the tenant ID from the FAB page and paste it in the Sharepoint popup window “App Domain” field
- Then Copy the Apps Permission Request XML from the FAB page and paste it in the Sharepoint popup window “Permission Request XML” field
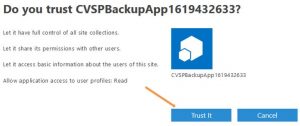
- Now click Create and Trust it
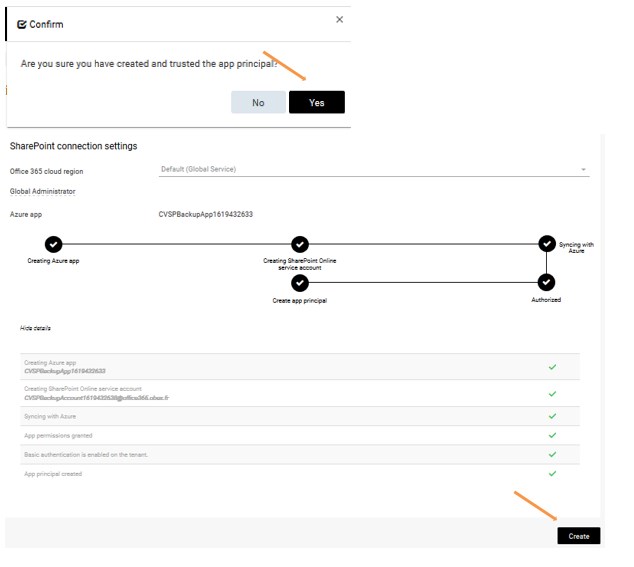
- Click Save in the Create app principal window once above steps are completed and in the confirm window click Yes then click Create in the SharePoint Online wizard
Sites protection (subclient) configuration
Once the SharePoint online client is created, the app subclient must be configured to associate Sharepoint sites with FAB O365 plans:
- In the FAB Backup console, Protect / Applications / Office 365 section, click on the Sharepoint online App name to protect

- Select the Sites section (top left corner) and click Add then Add Sites

- In the Add Sites window, select the Sites and choose the desired Office 365 plan accordingly then click on Add
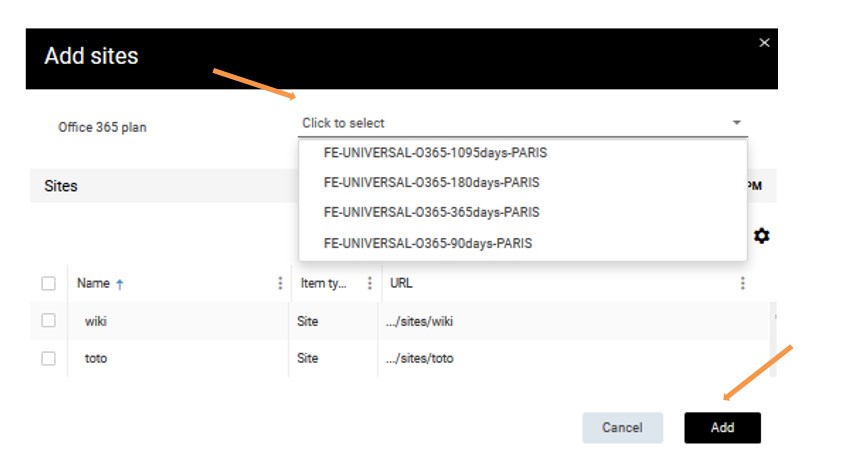
| Note: All sites configured on the same plan will share the same backup configuration (backup retention period and location). For using different configurations, you must use different plans on the sites. |
Disable Specific Sites backup
This section describes how to specifically disable one or more Sharepoint online site protection. In order to disable completely the whole Sharepoint online application, see the Activity Disabling section
Notes:
|
- In the FAB Backup console, Protect / Applications / Office 365 section, click on the App name hosting the Sites to disable
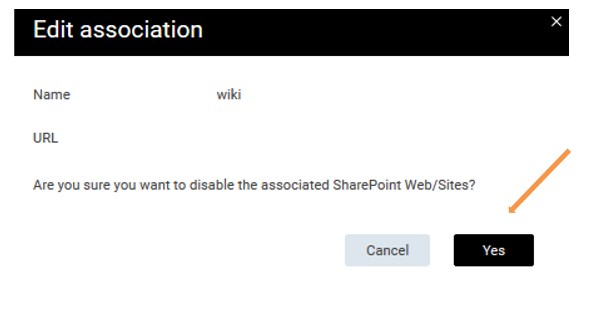
- Select the site to disable the protection, click the three dots action menu, then select Manage and then click Exclude from backup

- In Edit association window, click Yes
Delete SharePoint Online Client
| Note: Deleting the SharePoint Online App removes within 24hrs all the sites backups currently in retention for that app |
To remove the whole MS 365 SharePoint online application:
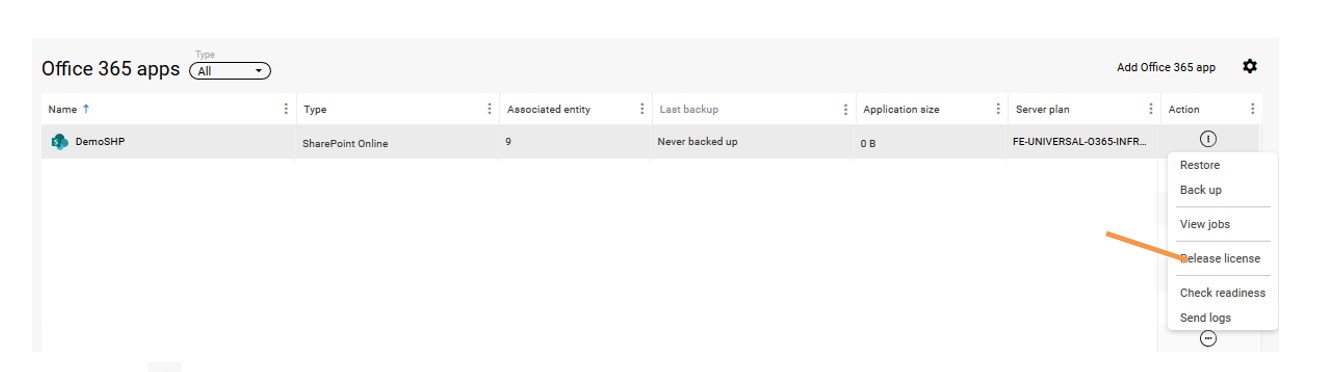
- In the FAB Backup console, Protect / Applications / Office 365 section,
- Click the three dots action menu against the SharePoint online App / client name and click Release license, it would disable client
- Click the action menu again and click Delete
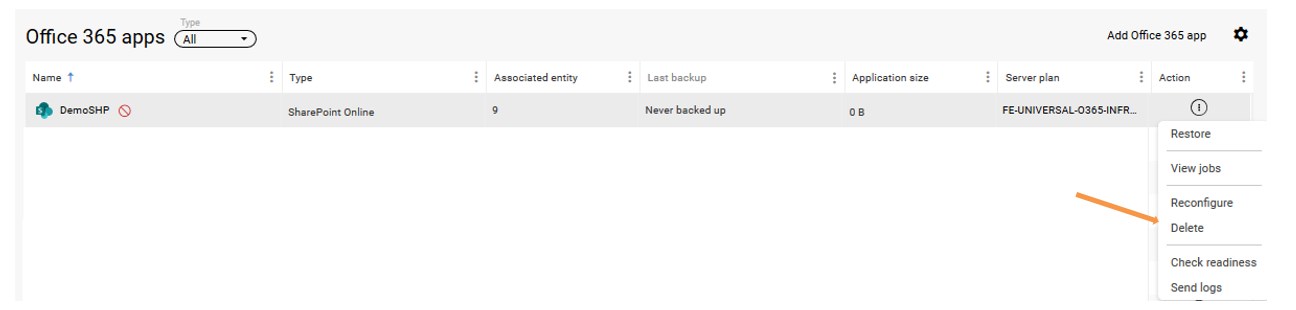
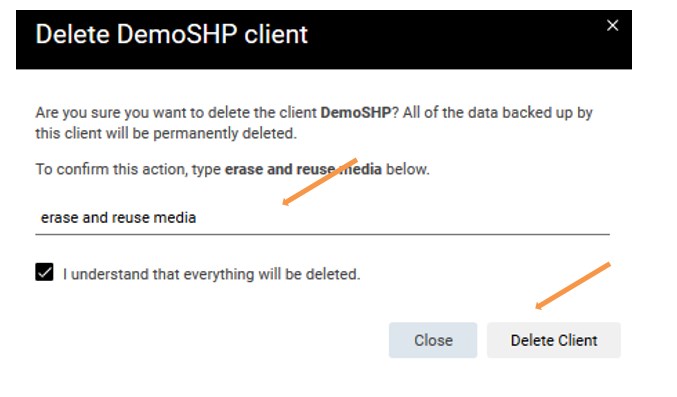
- Type in “erase and reuse media” when asked to confirm client deletion by clicking Delete Client
OneDrive for Business Configuration
Prerequisites:
|
- In the FAB Backup console, go to the Protect / Applications / Office 365 section
- Click on Add Office 365 App

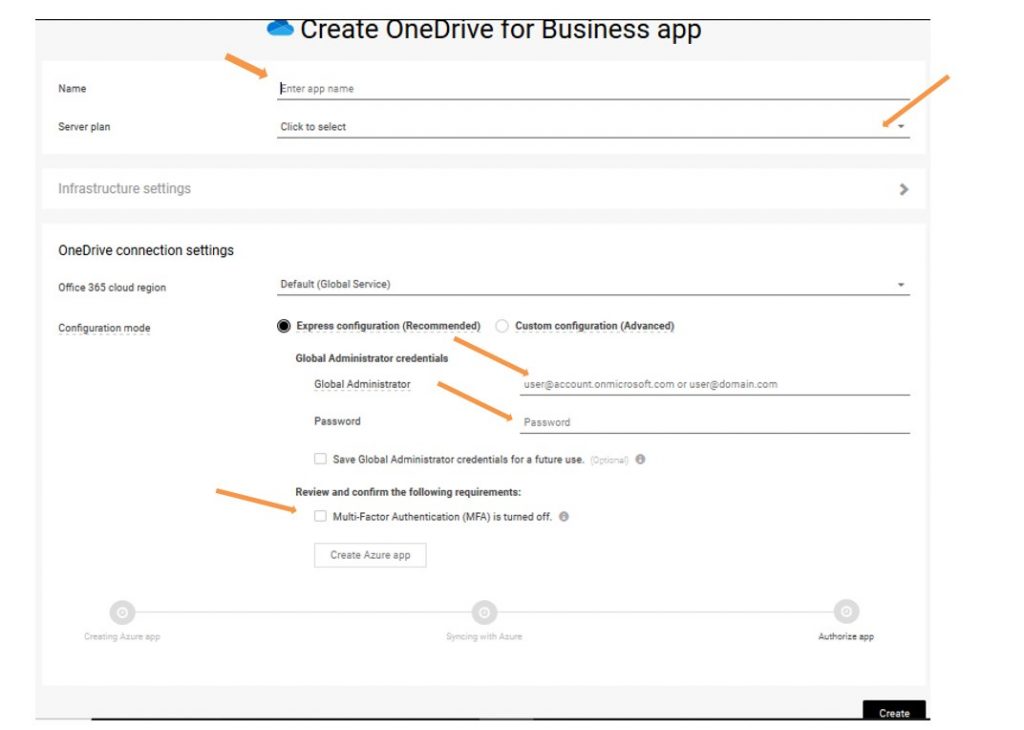
- In the Add Office 365 app window, Click OneDrive for Business and provide the application Name (pseudo name to identify this OneDrive App environment in FAB)
- It’s mandatory to select the FE-UNIVERSAL-O365-Server-Plan plan from the drop down list in Server plan
- Input Global Administrator name and Password, check the box “MFA is turned off” and, once done, click on Create Azure App
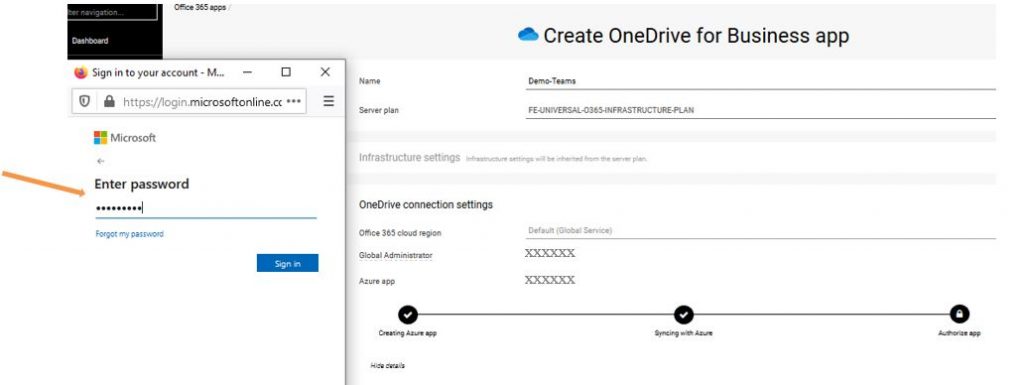
- A Microsoft Azure authentication window pops up (care your browser popup restrictions)
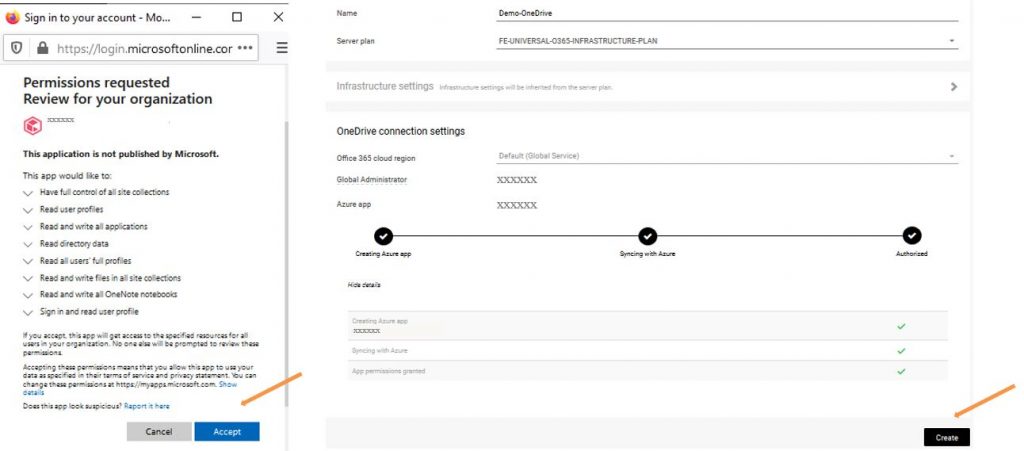
- Enter your admin credentials to authorize the app.
- Click on Accept and Verify that App is authorized by expanding Hide details (if required click Authorize Now) then click Create in the OneDrive for Business wizard
OneDrive Users backup (subclient) configuration
Once the OneDrive app is created in FAB, you must configure the Users subclient to associate them with a Backup Plan.
- In the FAB Backup console, Protect / Applications / Office 365 section, click on the App name to configure

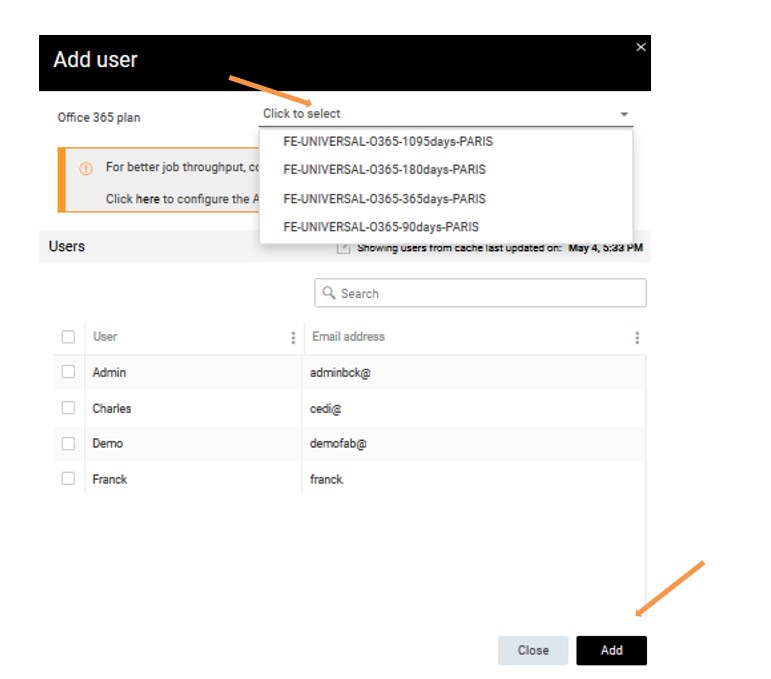
- Select the Users section (top left corner) and click Add then Users

- In the Add user window, select the users and choose the desired Office 365 plan then click on Add
- (Optional) Azure AD Groups can be added so that any new user’s OneDrive environment can be automatically protected with the retention set on the group:
- In the FAB Backup console, Protect / Applications / Office 365, click on the App name

-
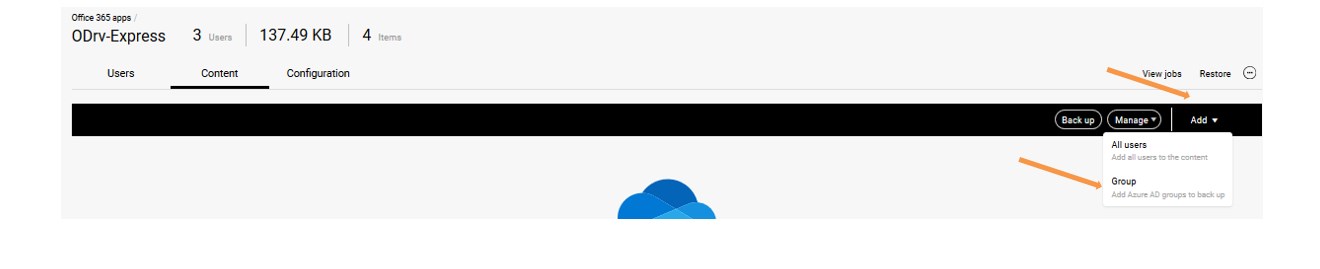
- Select the Content section (top right corner) and click Add and then select Group from drop down
-
- In the Add group window Select the groups sharing the same backup retention requirements and Choose the desired Office 365 plan accordingly, then click on Add

Note: All users configured on the same plan will share the same backup configuration (backup retention period and location). For using different configurations, you must use different plans on the users. |
Disable Specific OneDrive User backup
This section describes how to specifically disable one or more User’s OneDrive environment protection. In order to disable completely the whole OneDrive application from FAB, see the section Activity Disabling
Notes:
|
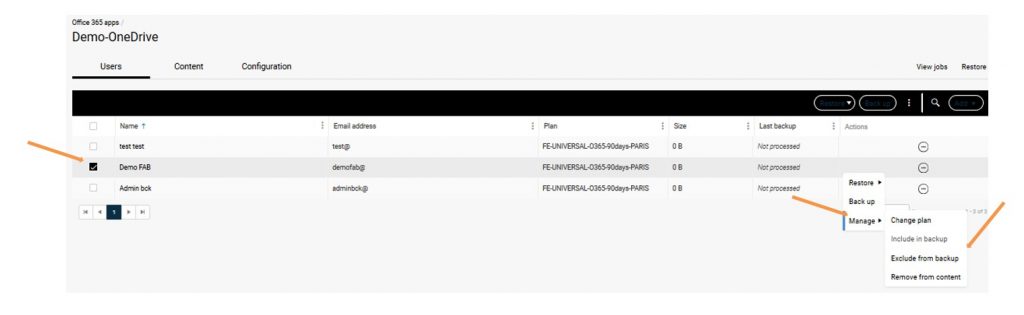
- In the FAB Backup console, Protect / Applications / Office 365 section, click on the App name hosting the users to disable
- Select the user(s) whose OneDrive protection is to be disabled and click then select Manage and then click Exclude from backup
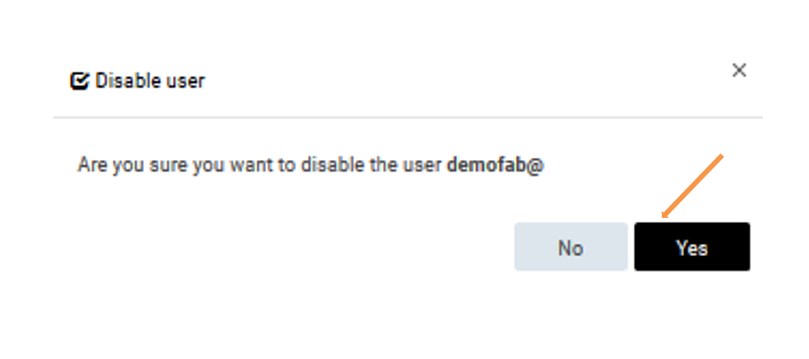
- In Disable user window, click Yes
Delete OneDrive protection App
| Note:Deleting the whole OneDrive protection App removes within 24hrs all the backups currently in retention for that app |
To remove the whole OneDrive protection App:
- In the FAB Backup console, Protect / Applications / Office 365 section,
- Click Action against the OnDrive App / client name and click Release license, it would disable client
- Click the three dots action menu against the OneDrive App / client name again and click Delete

- Type in “erase and reuse media” when asked to confirm client deletion by clicking Delete Client
Teams protection App Configuration
Prerequisites:
|
|
Note:
it could be required to apply to Microsoft for access to their Protected API. Follow the steps described in the Troubleshooting section HERE for such It is not mandatory to gain access to MS Protected APIs before configuring the FAB Teams protection app. |
- In the FAB Backup console, go to the Protect / Applications / Office 365 section
- Click on Add Office 365 App
- In the Add Office 365 app window, Click Teams and provide the application Name (pseudo name to identify this Teams App environment in FAB)
- It’s mandatory to select the FE-UNIVERSAL-O365-Server-Plan plan from the drop down list in Server plan
- Input Global Administrator name and Password, check the box “ MFA is turned off” and, once done, click on Create Azure App

- A Microsoft Azure authentication window pops up (care your browser popup policy setting).
- Enter your admin credentials to authorize the app.
- Click on Accept and then click Create in the Team app wizard
Teams backup (subclient) configuration
Once the Teams App protection is created in FAB, you must configure the Users subclient to associate them with a Backup Plan.
- In the FAB Backup console, Protect / Applications / Office 365 section, , click on the Teams App name to protect

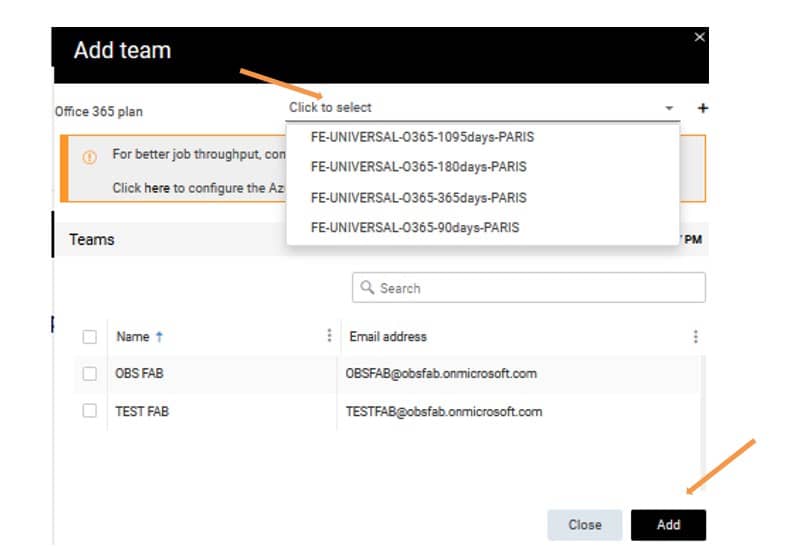
- Select the Teams section (top left corner) and Click Add and Teams

- In the Add team window, select the teams and the desired Office 365 backup plan to use for their protection, then click Add
| Note: All team configured on the same plan will share the same backup configuration (backup retention period and location). For using different configurations, you must use different plans on the users. |
Disable Specific Team backup
This section describes how to specifically disable one or more Team’s protection. In order to disable completely the whole Teams App protection in FAB, see the section Activity Disabling
Notes :
|
- In the FAB Backup console, Protect / Applications / Office 365 section, click on the Teams App name hosting the teams to disable
- Select the Team to disable backup and click the three dots menu symbol then select Manage and click on Exclude from backup
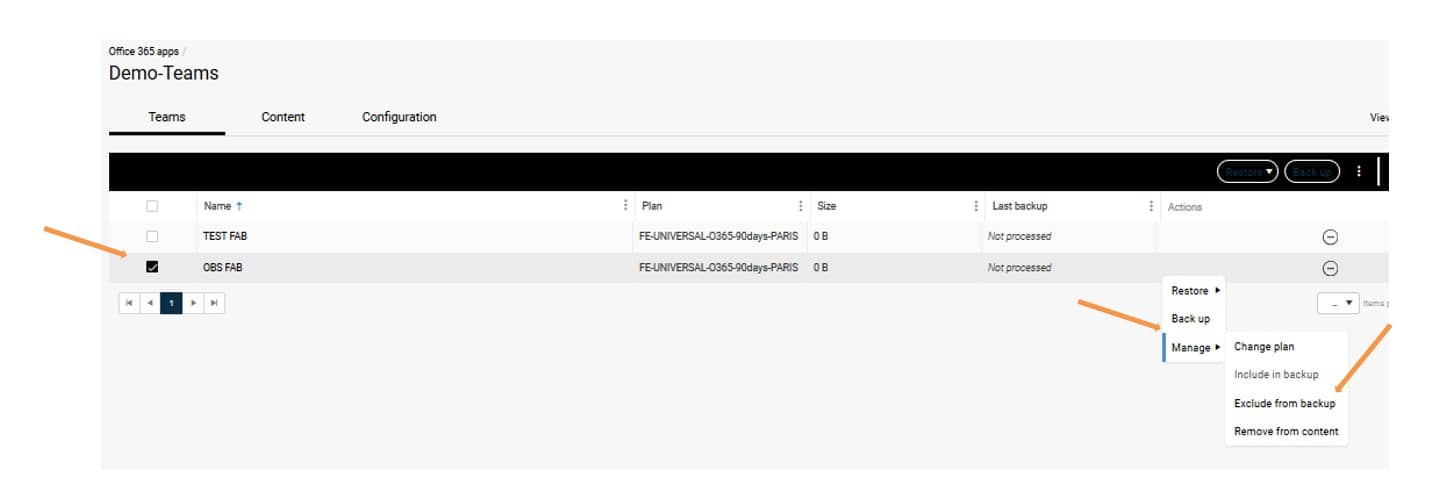
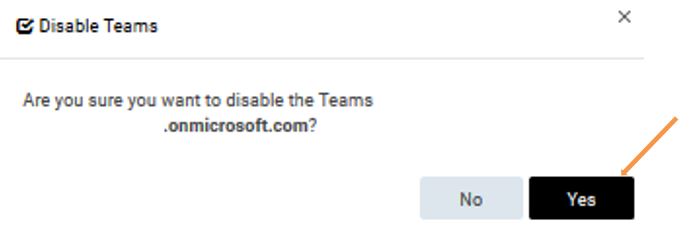
- In Disable Teams window, click Yes
| Note: Deleting the Teams App removes within 24hrs all the Teams bacups currently in retention for that App |
To remove the whole Teams App client:
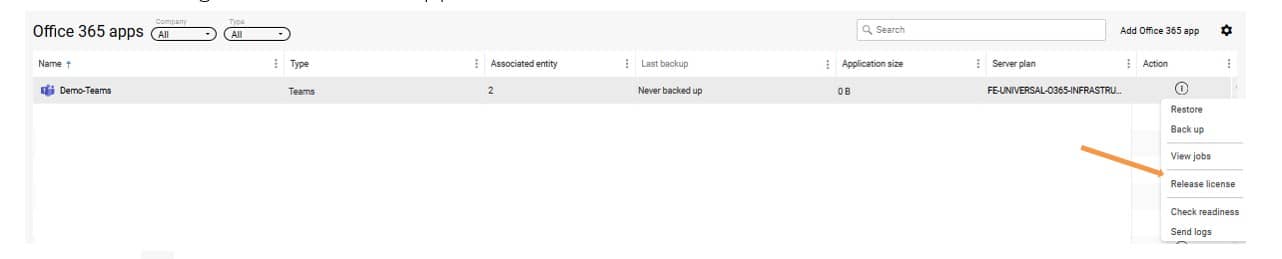
- In the FAB Backup console, Protect / Applications / Office 365 section,
- Click on the three dots menu against the Teams App / client name and click Release license, this will disable App in FAB
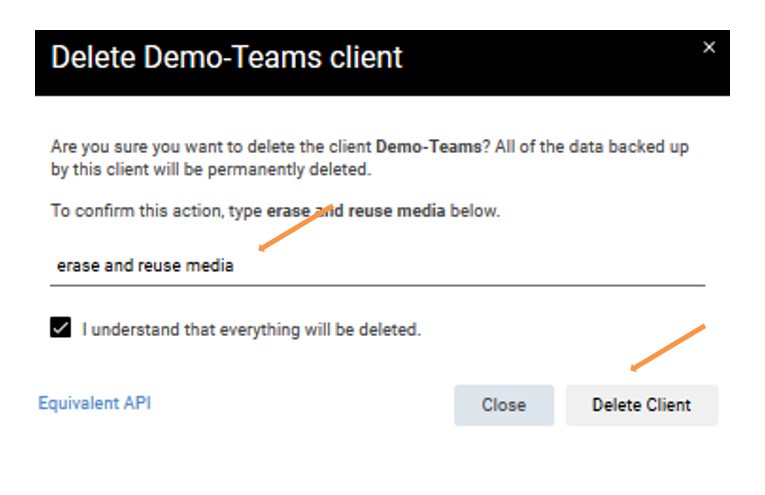
- Click on the three dots menu against the Teams App / client name again and click Delete

- Type erase and reuse media when asked to confirm client deletion by clicking Delete Client
Object Storage Backup Configuration
Prerequisites:
|
Azure BLOB Storage protection configuration
-
- In the FAB Backup console, go to the Protect / Object storage section
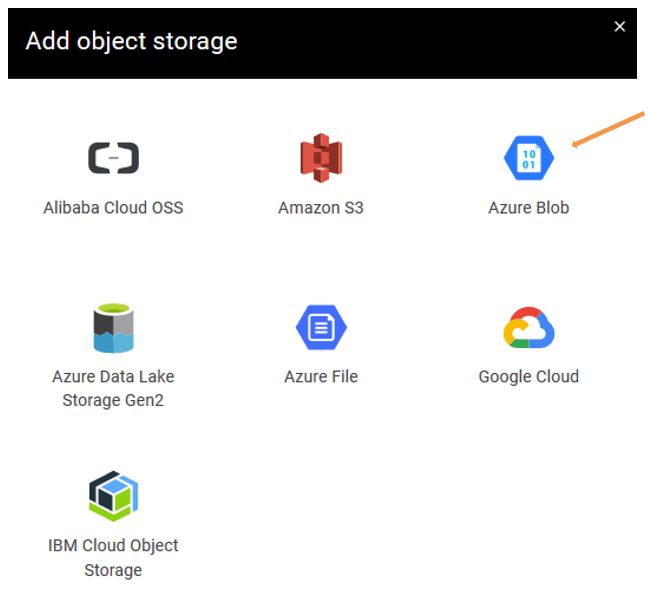
- Click on Add object storage

-
- Click on your Azure Blob
-
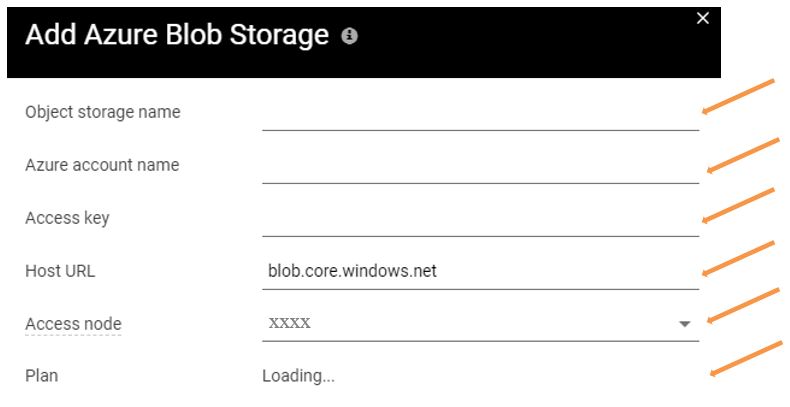
- In the Add Azure Blob Storage window,
1. Type in the Object storage name
2. Provide your Azure storage account name
3. Provide the Access key for your storage account
4. Choose the access node (Azure instance on which the FAB Cloud apps agent is installed) from the dropdown menu
5. Choose the Backup Plan form the dropdown menu
6. Then click on Save
- In the Add Azure Blob Storage window,
BLOB Storage Content group (subclient) configuration
Once the object storage client is created, by default all containers / buckets are associated with default content group. This default content group backup can be disabled and a new content group can be created.
- In the FAB Backup console, Protect / Object storage section, click on the Object storage client name to configure

- In the Overview section click Add content group

- In the Add content group window provide the below details
1. Type in the Content group name
2. Select the Backup Plan from the dropdown menu
3. Browse and select the path to protect (container / bucket) and click Save
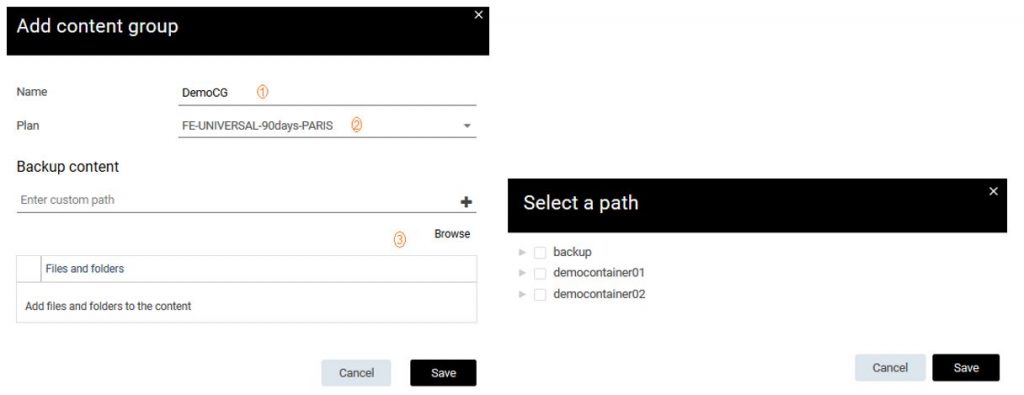
- The new content group is now visible under the Content groups section

Delete an Object storage client
| Note: Deleting the whole Object storage client removes within 24hrs all the backups currently in retention for that client |
To remove the whole Object storage client:
- In the FAB Backup console, Protect / Object storage section, click on the Object storage client name to delete
- In the Overview section click on the three dots menu button and click Deconfigure, to disable the client backups
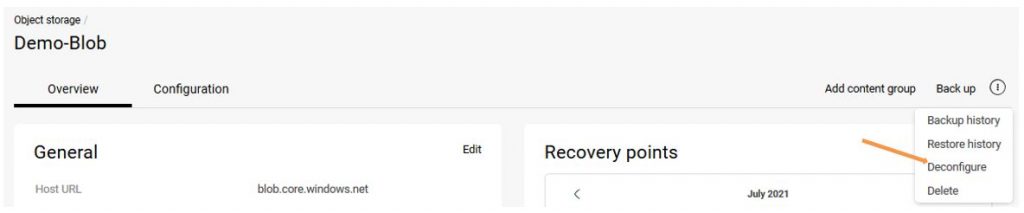
- Click on the three dots menu again and click on Delete

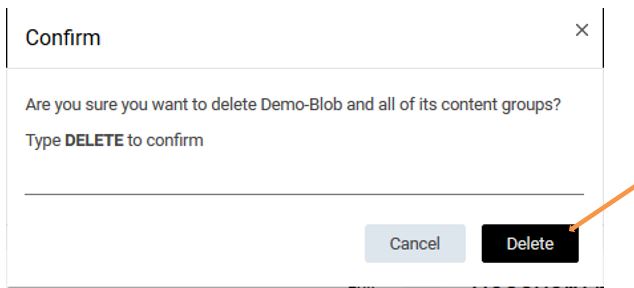
- Confirm by typing in DELETE when asked and click Delete
You must now uninstall the FAB Cloud Apps agent from the FAB access node you have previously created:
- In the FAB Backup console, Manage / Servers section, click on the Object storage client name to delete
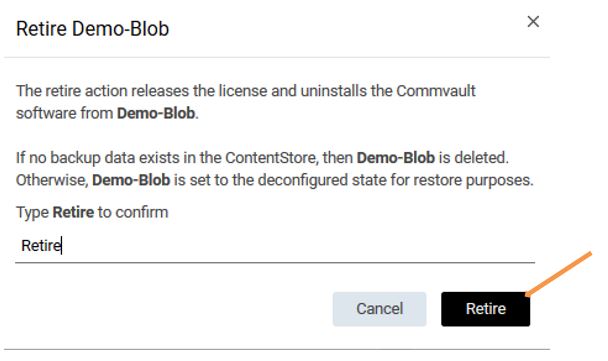
- In the Overview section click on the three dots menu button and click Retire

- Type Retire when asked and click on Retire