Backup : User’s Guide for VCOD Offer
Introduction
The goal of this document is to provide detailed instructions on how to use and operate the Backup solution provided with the VCOD offer hosted on NGP/FCX/Cloud Avenue core Infra platforms.
The vCenter on Demand “VCOD” is based upon reserving dedicated resources, HW & SW, for the customer based on VMware vSAN cluster. The backup solution design follows the same concept.
VCOD can be a single or dual site offer.

VCOD offer will provide the customer with:
From virtual env side :
- Dedicated ESXi(s)
- Dedicated vCenter Server
- Dedicated vSAN stretched cluster (if needed)
From backup env side :
- Dedicated backup server.
- Dedicated storage server per site.
- Reporting tool, if needed.
- Self-Service portal, if requested by the customer
Design Overview
The Backup solution for VCOD includes:
- One backup server, as a VM deployed on the customer`s vSAN cluster.
- Logical storage provided from the back-end physical storage to host the customer`s backup images.
- vCenter plugin
The backup images could be stored on single site or dual site.
Single Site: Only one backup image will be stored at the same site.

Dual Site: Two backup images will be stored (one per site)

Accessibility
The backup environment could be managed and accessed using either NetBackup WebUI or NetBackup Plugin for vCenter
NetBackup WebUI
The WebUI provides all NetBackup features including monitoring, configuring, and managing backup and restore jobs.
Sign-in to NetBackup WebUI
To sign-in to a NetBackup primary server using a username and password
- Open a web browser and go to the following URL https://primaryserver/webui/login The primaryserver is the host name or IP address of the NetBackup primary server that you want to sign in to.
- Enter your credentials and click Sign in.

NetBackup Plugin for vCenter
The plugin could be accessed from vCenter using same UI credentials and you can use the plug-in to do the following:
- View the backup status of virtual machines at various vSphere levels.
- View messages that are related to backups, such as snapshot deletion failure.
- Sort and filter the backup information and export the information for analysis.
- Recover virtual machines.

More info about the Plug-in could be found at
NetBackup™ Plug-in for VMware vSphere Client (HTML5) Guide
Reporting
Reporting service is provided through a back-end tool to send the needed customized reports to all customers by mail.
These reports will be created by the Service Provider`s back-end teams.
By default, a daily report will be generated for each customer contains the backup status of the last night`s backup window.

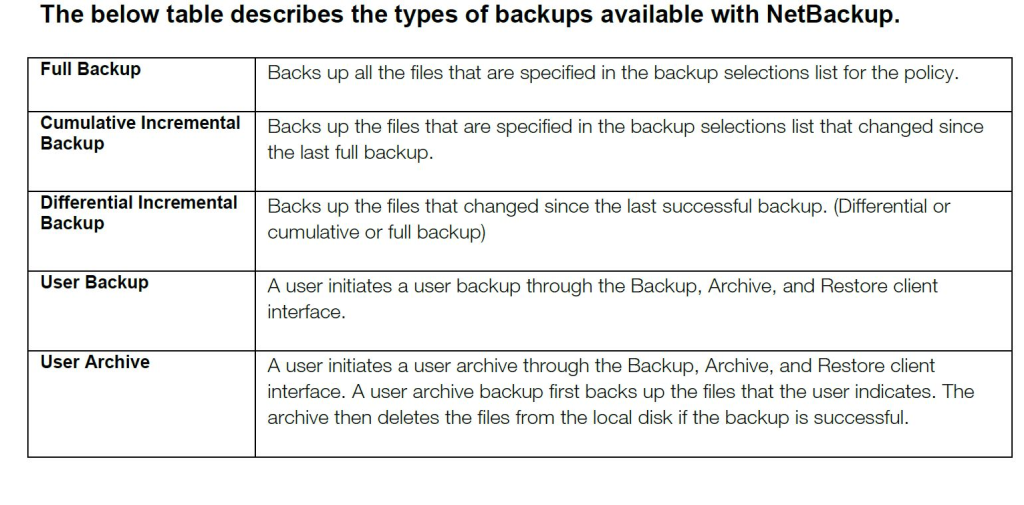
VM-Level Backup & Restore
Managing Backups
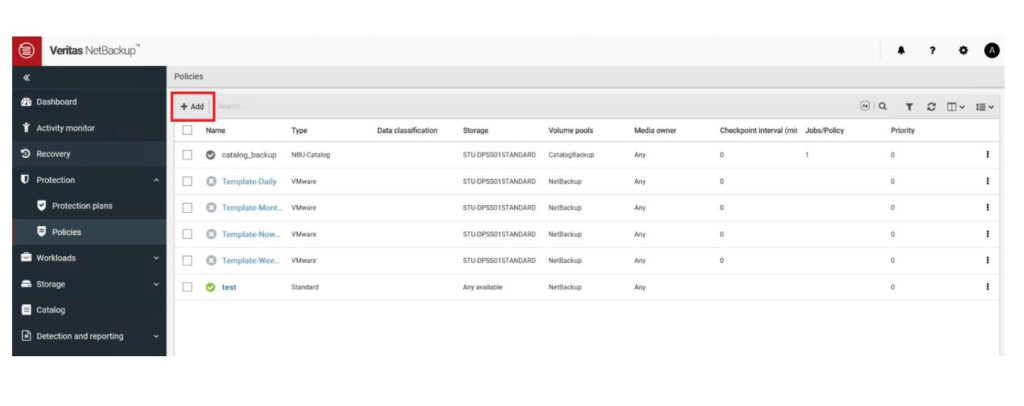
Creating a Backup Policy
To add a backup policy in the WebUI
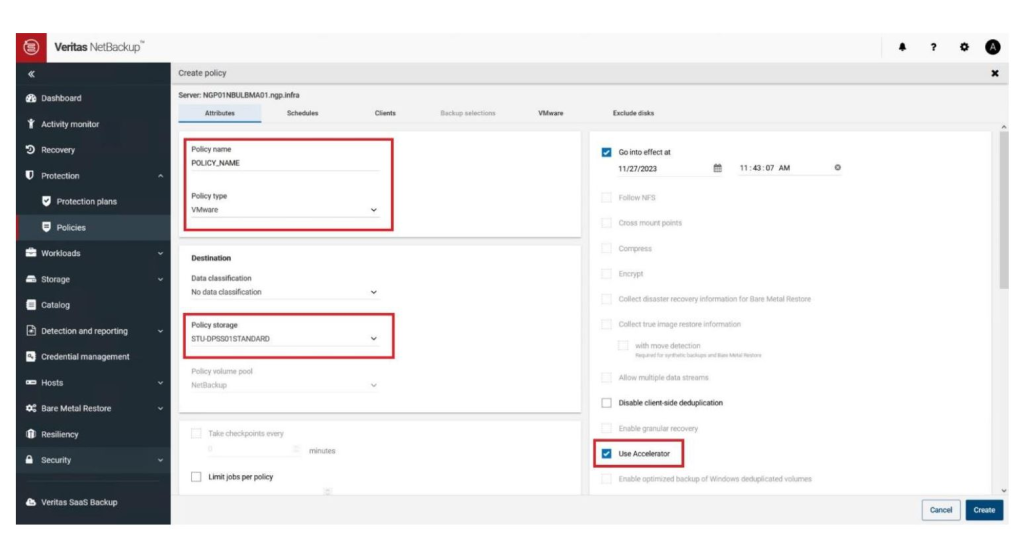
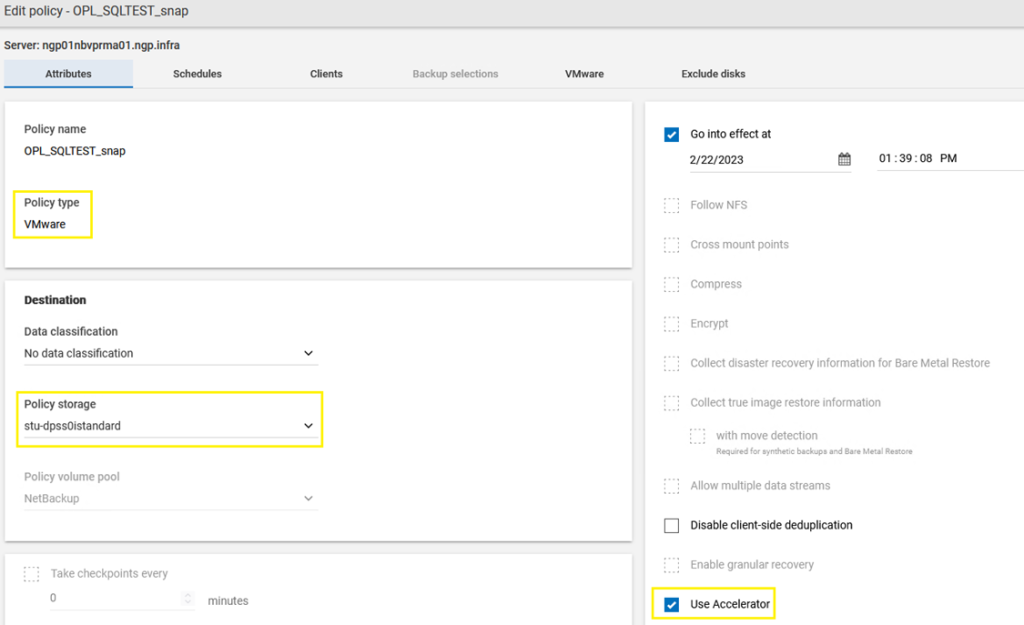
2. On the Attributes tab enter a Policy name, and select VMware from the Policy type drop-down list, and select stu-dpss01standard from the Policy storage drop-down list and select Use Accelerator.
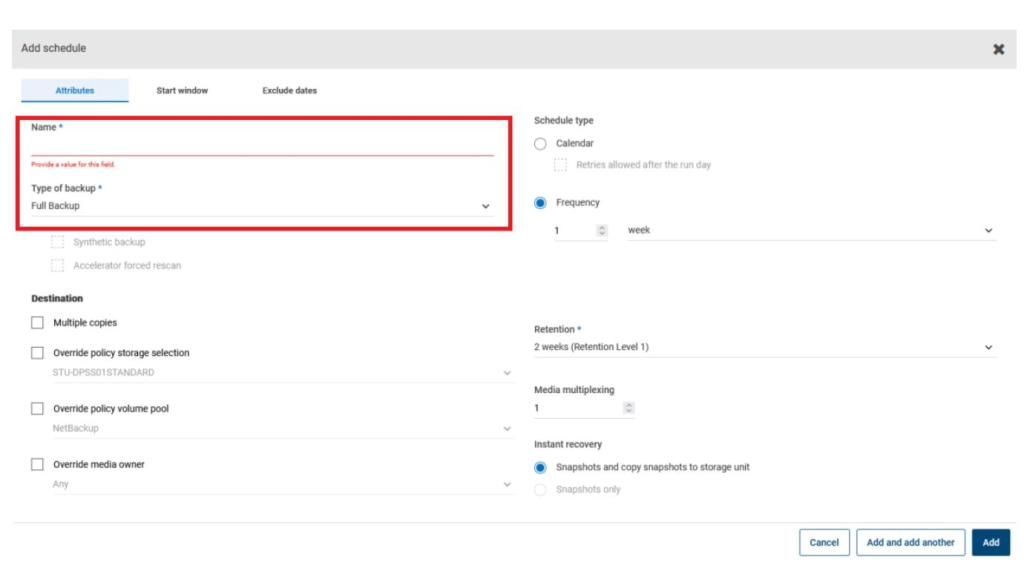
3. On the Schedules tab, Click on Add

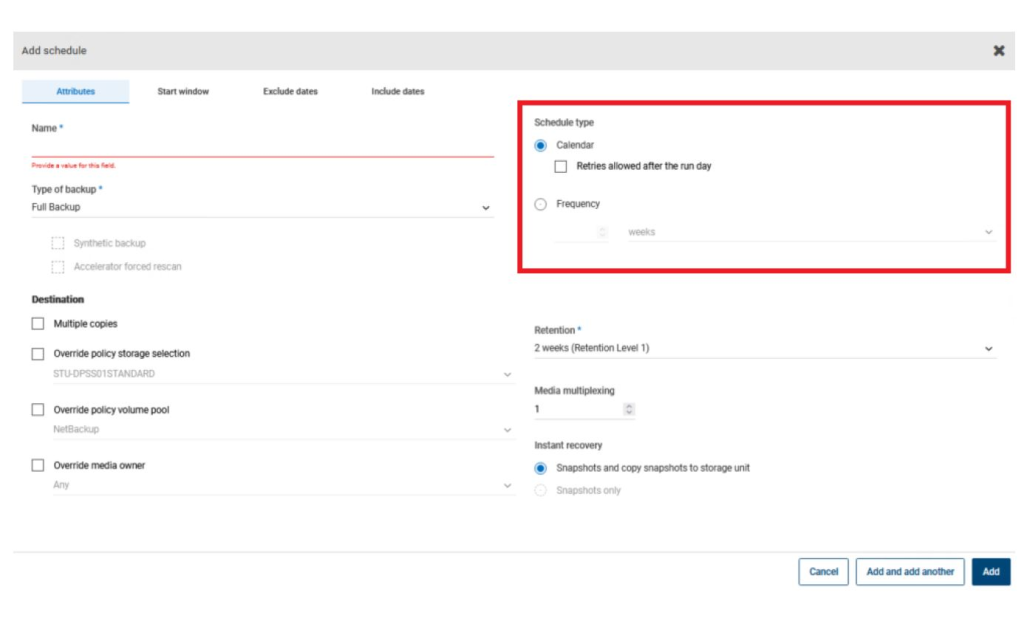
4. Specify a name for the schedule by typing it in the Name attribute and select Type of backup from the drop-down list.
5. Select Schedule type, either Calendar or Frequency. Calendar-based schedules allow administrators to create a job schedule based on a calendar view. Select Calendar to display the Include Dates tab. Use the Frequency attribute to specify how much time must elapse between successful backups. To set the frequency, select a frequency value from the list. The frequency can be seconds, minutes, hours, days, or weeks.
6. The Retention attribute specifies how long NetBackup retains the backups. To set the retention period, select a time period (or level) from the list. When the retention period expires, NetBackup deletes information about the expired backup.
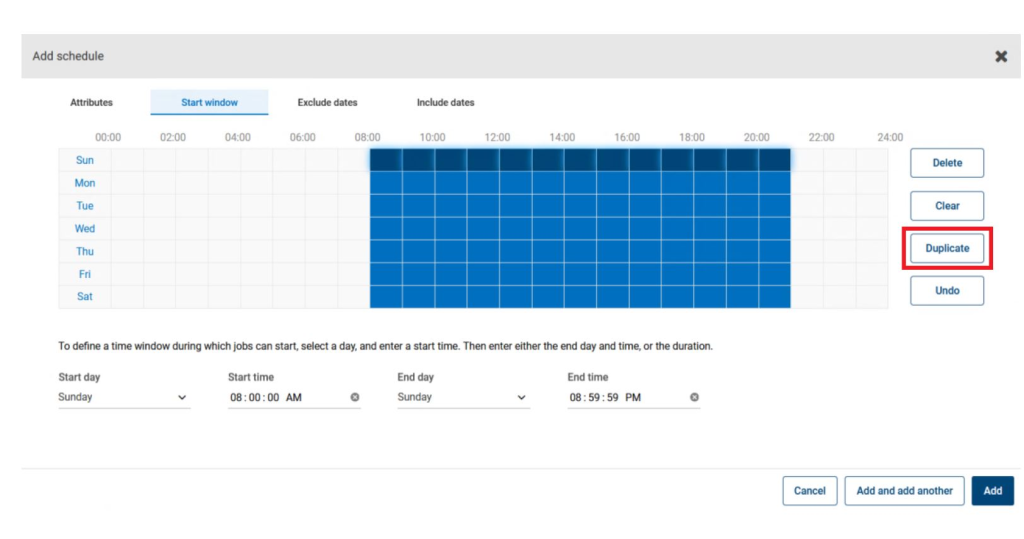
7. Select Start Window tab to set time periods during which backups can start when using a schedule. Select the Start day and Start time for the backup window and click on Duplicate to replicates the time window for the entire week.
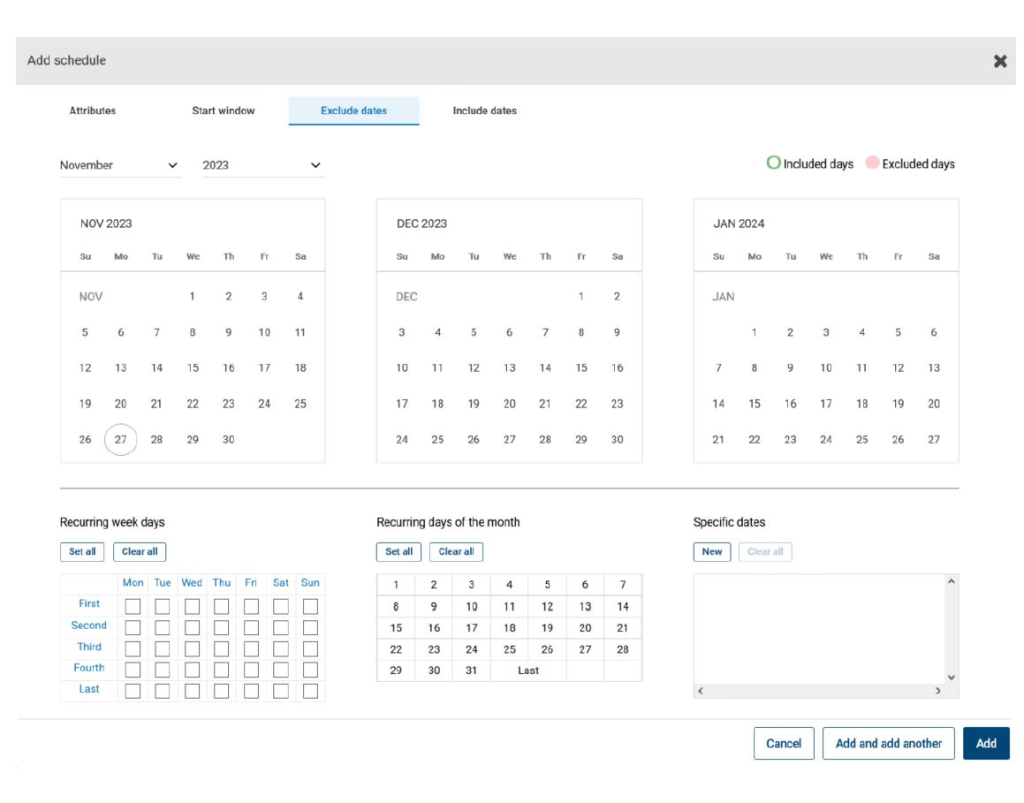
8. Use the Exclude Days tab to exclude specific days from a schedule for a backup policy. If a day is excluded from a schedule, jobs do not run on that day.
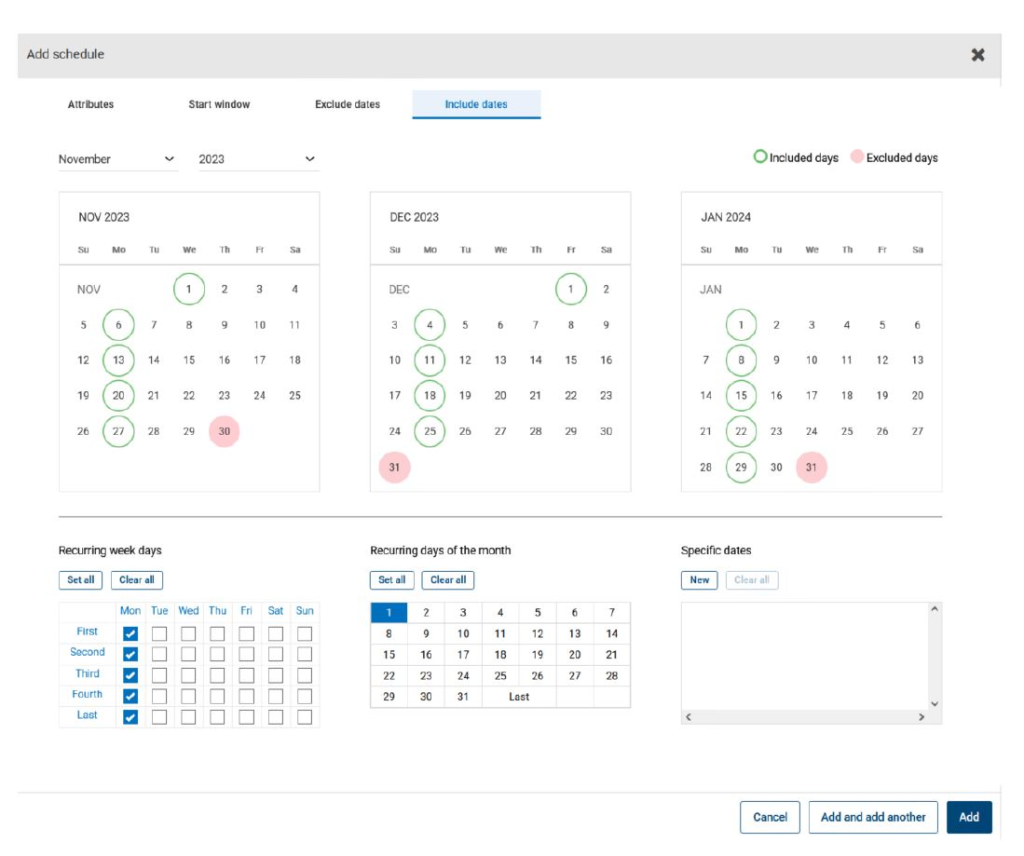
9. Use the Include Dates tab to configure the schedules that run according to specific days, on recurring week days, or on recurring days of the month.
10. Click on Add to save the Schedule.
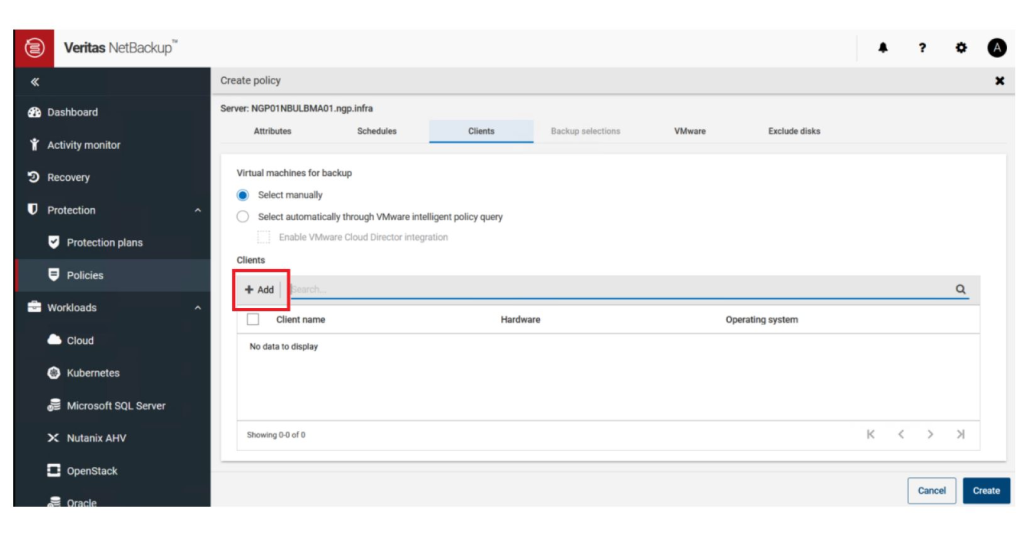
11. On the Clients tab, click on Select manually, then click Add.
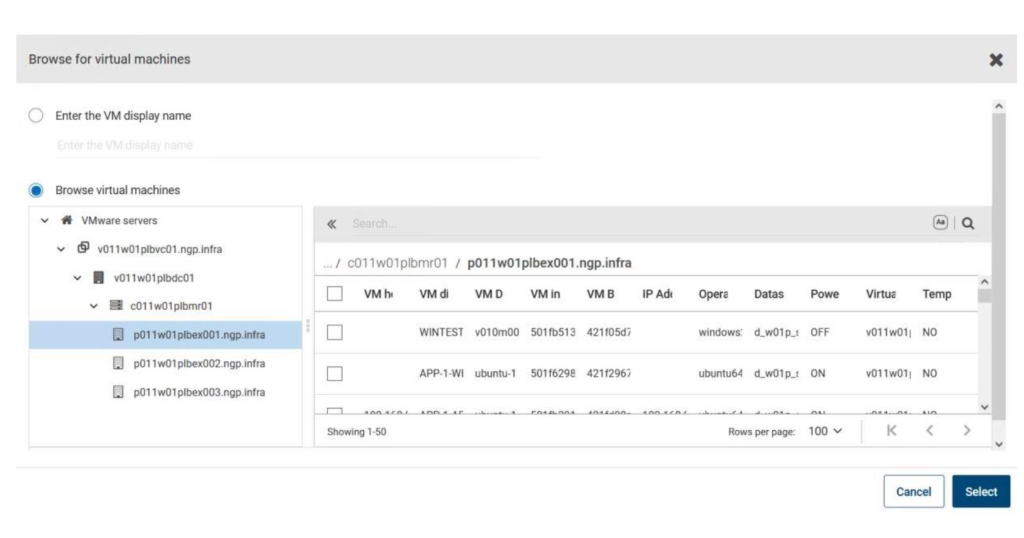
12. Select Client by either Enter the VM hostname or Browse virtual machines and click Select.
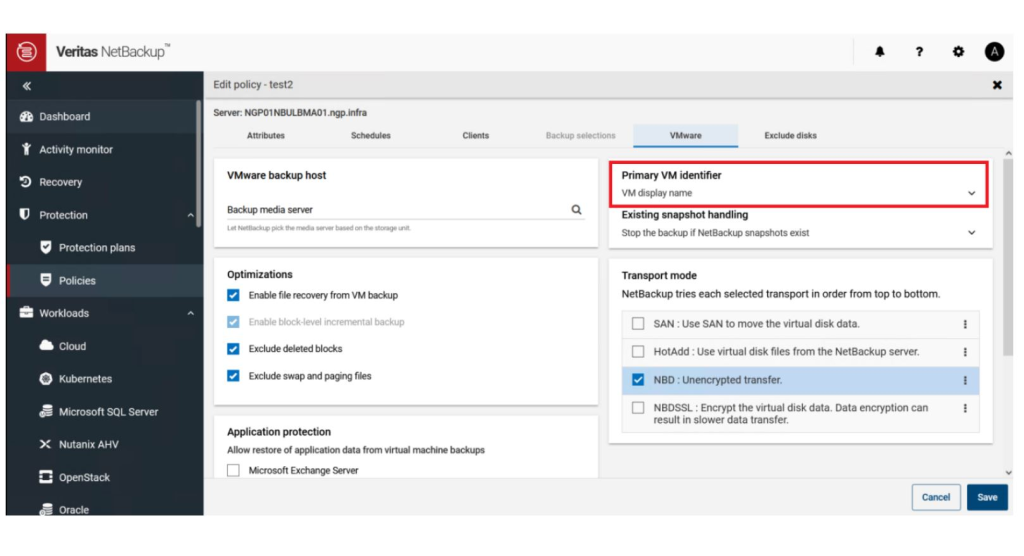
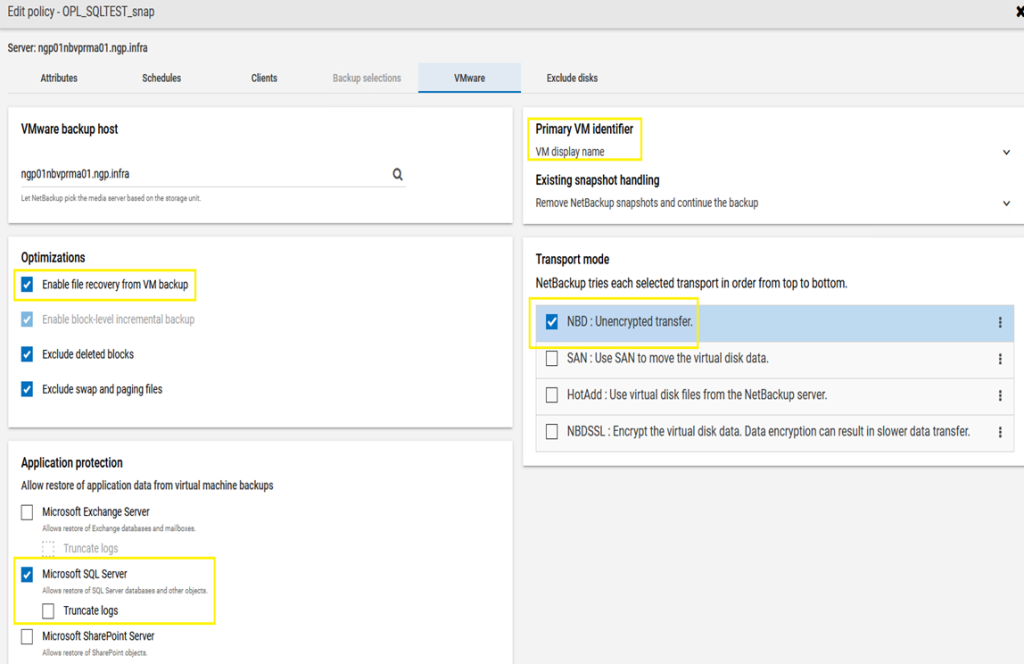
13. On VMware tab change the Primary VM identifier to VM display name, and from Transport mode section select NBD: Unencrypted Transfer and leave all other attributes to default.
14. Check the Exclude disks tab if it is required to exclude any disks from the VM backup.
15. Click on Create to add the newly configured policy.
Modifying a Backup Policy
- To modify a policy, on the left, click Protection > Policies, and select the required backup policy to be modified.
- Click on Edit to modify the parameters of the selected backup policy.
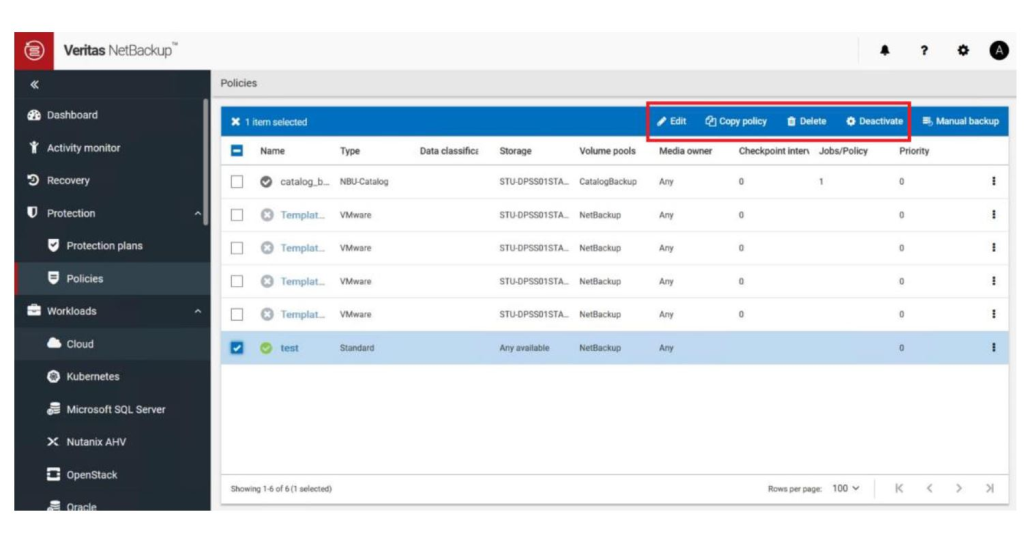
3. You can also Copy, Delete and Deactivate a backup policy.
Initiate a Backup Policy
To initiate a backup policy, click on Manual backup and select the schedule you want to use and the clients you want to backup and click OK

Managing Restores
You can recover a VM to its original location where it existed when it was backed up or to different location. You can choose to recover from the default copy of the backup image or from an alternate copy, if one exists. The default copy is also known as the primary copy.
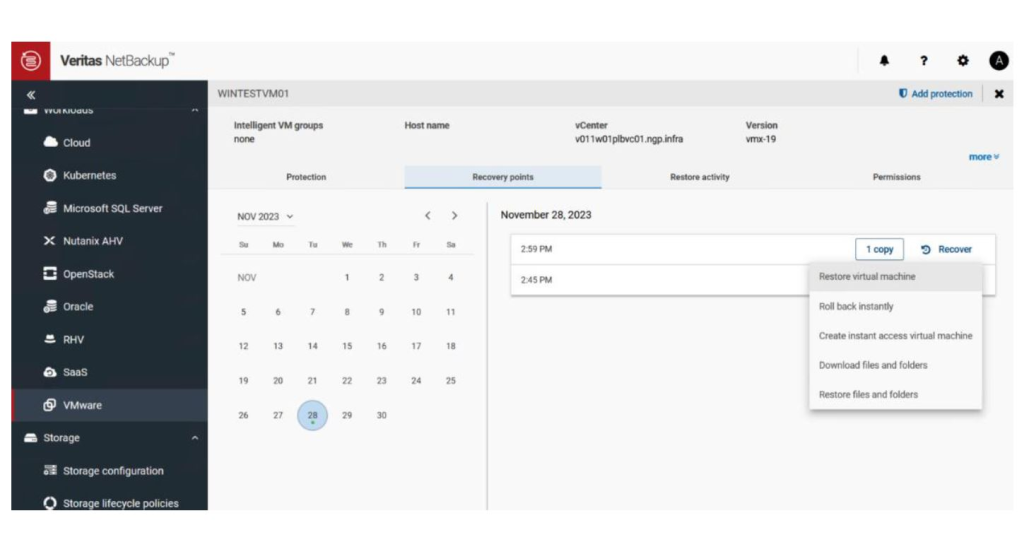
To recover a VM
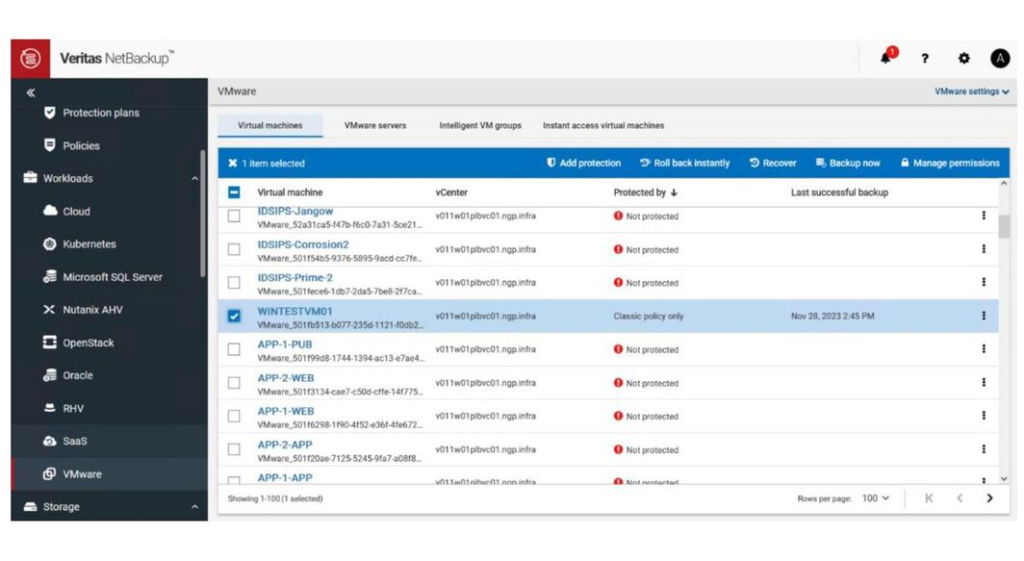
2. Click the Recovery points tab. In the calendar view on the left, select the date on which the backup occurred.
3. On the image that you want to recover, click Recover and select Restore virtual machine from the drop-down list.
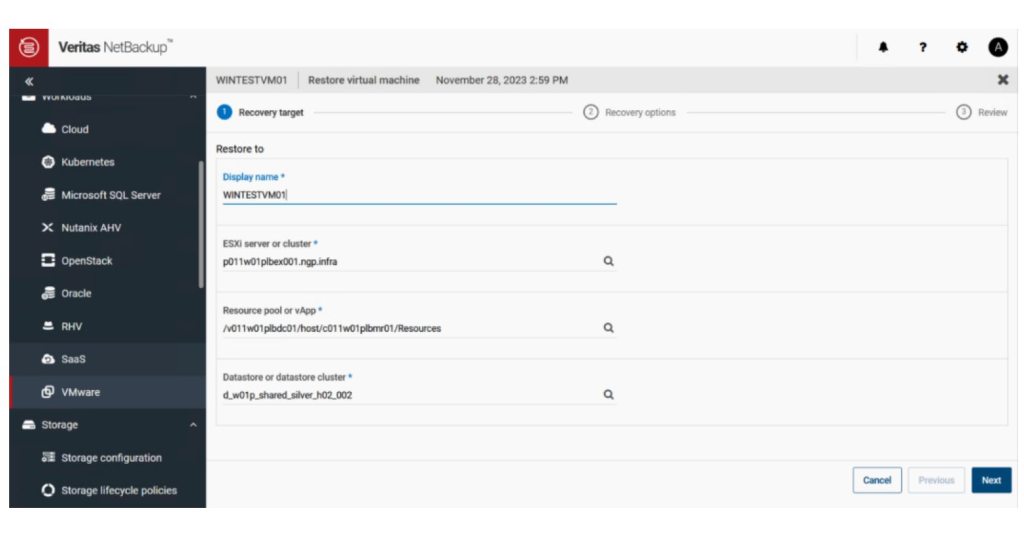
4. Review the Restore to values. To recover to an alternate location, change the restore values, if necessary, then click Next.
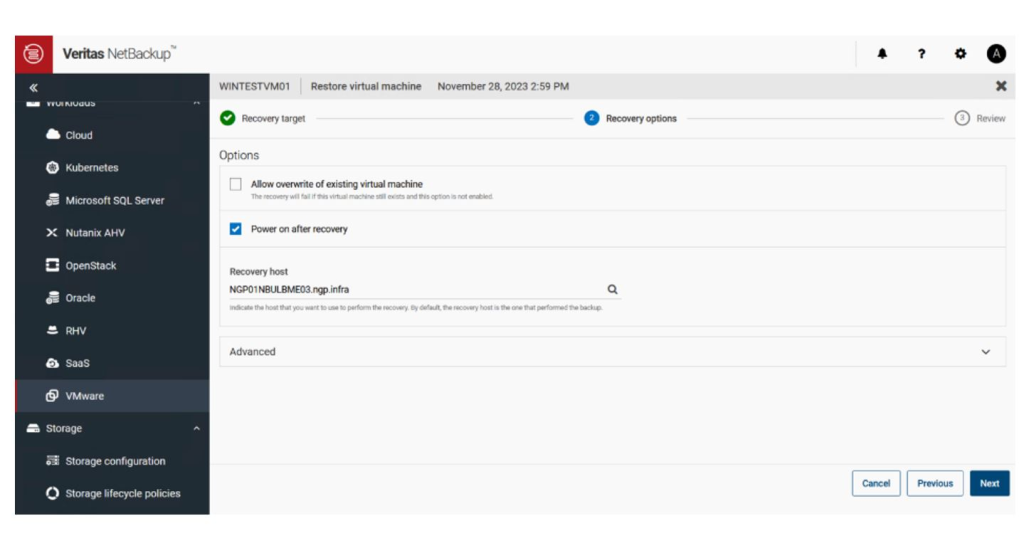
5. Review or change the Recovery options values and click Next to run the Pre-recovery check.
6. NetBackup verifies the credentials and appropriate paths and connectivity, determines whether the datastore or datastore cluster has available space, and reviews other requirements. Resolve any errors and Click Start recovery.

Agent-Less File-Level Restore
There is a possibility to restore files and folders from a VM backup without an agent if the VM OS is compatible with this feature as per the following matrix:

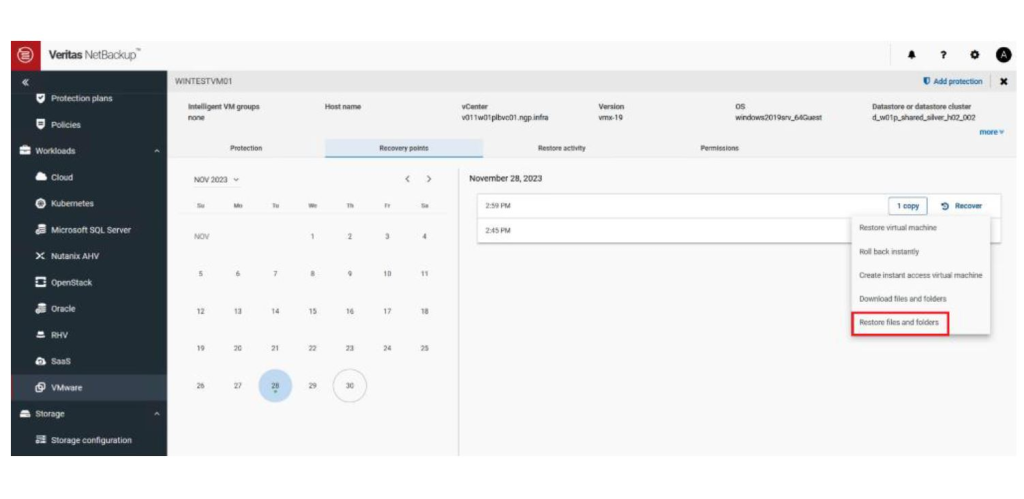
- On the left, click VMware then locate and click on the VM.
- Click the Recovery points tab. In the calendar view, click the date on which the backup occurred.
- On the image or the copy of the image, click Recover > Restore files and folders.
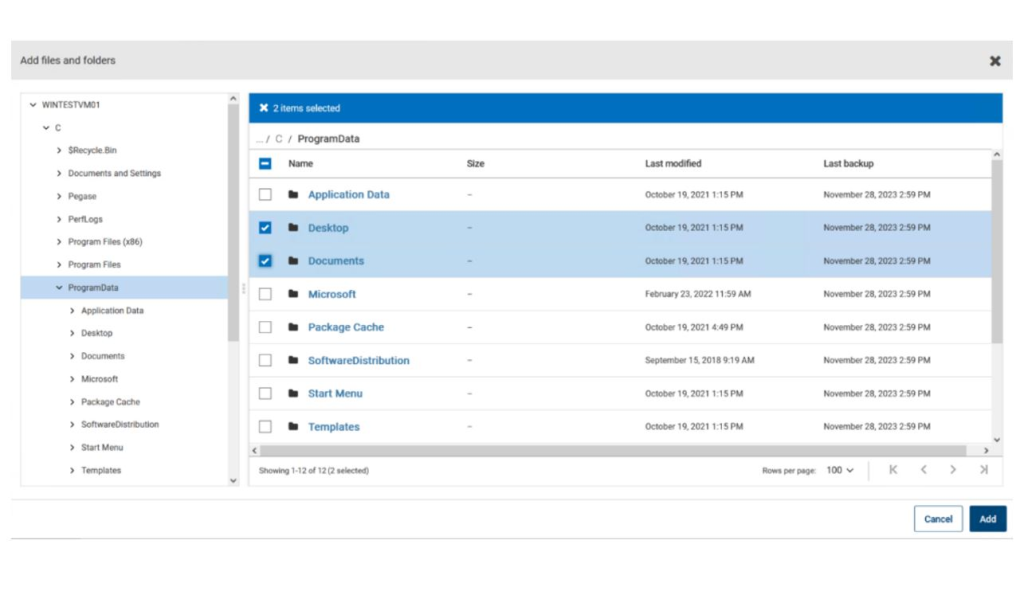
4. Select the files and click Add. Then click Next to choose Recovery target.
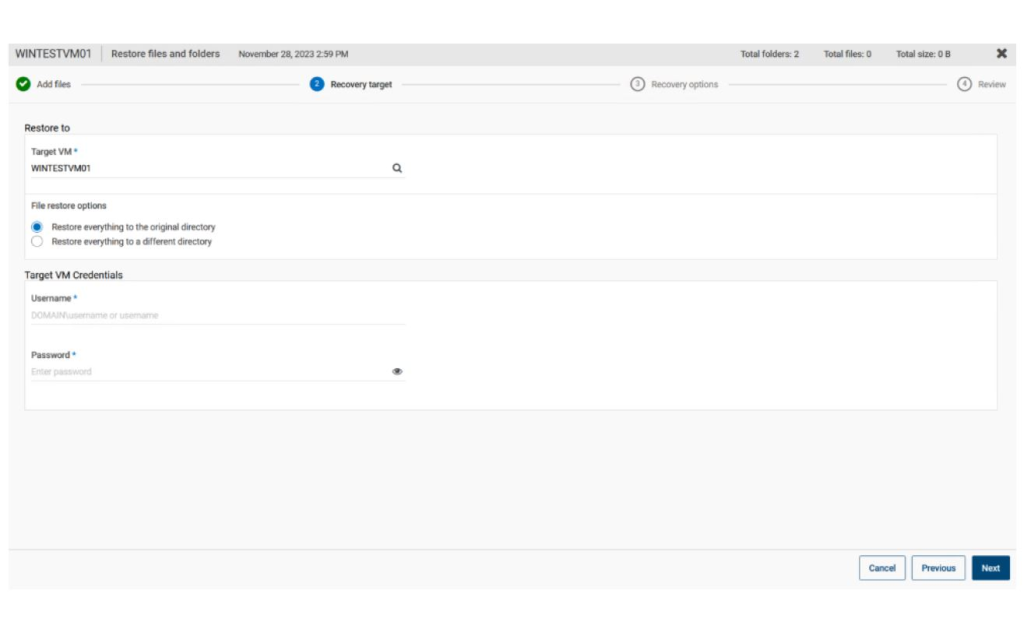
5. On Recovery target page enter the name of the Target VM (the default is the original VM) and the username and password for the target VM and select the restore options.
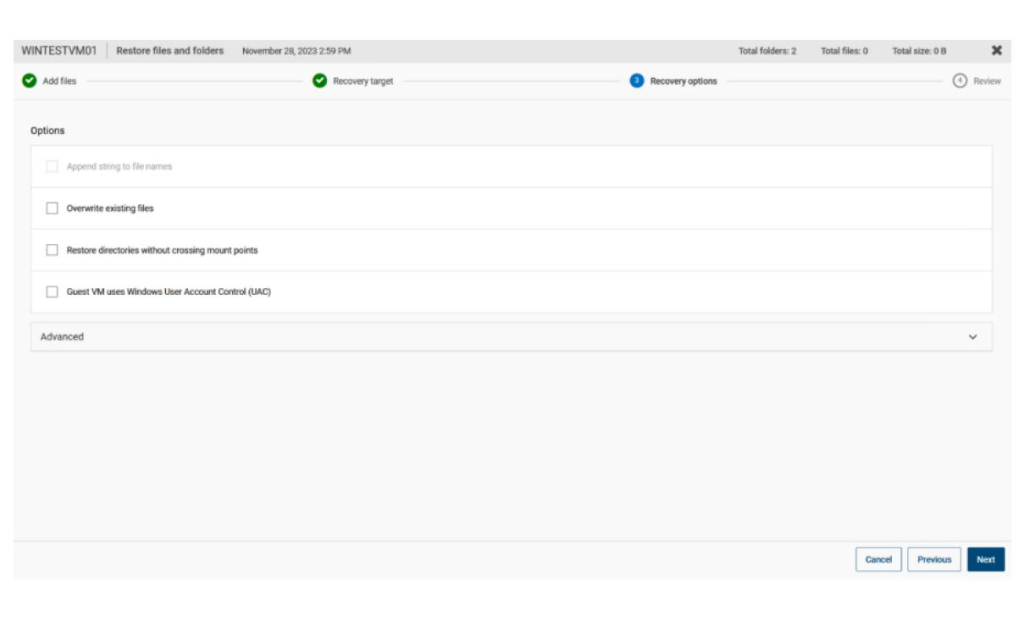
6. On the Recovery options page you can choose whether to Overwrite existing files. Click Next to run Pre-recovery check. A summary of your selections is displayed.
7. Click Start recovery to restore the files. The Activity tab displays the status of the recovery.
Application Protection
Microsoft SQL Server
SQL Aware VM Snapshot Backups :
When you have a SQL DB client which is a VM and is configured for regular DB backups using NetBackup for SQL agent as well as a VM snapshot backups then you can merge both backups and leverage the feature known as SQL Aware VM Snapshot backups which can be enabled in VMware policy type and also you can enable transaction log truncation within same policy.
Introduction
To truncate logs, We must perform a full VMware backup first without log truncation. When this backup is complete, then enable log truncation in the policy.
With a VMware backup policy and the Veritas VSS provider, NetBackup can create consistent, full backups of an application database that resides on a virtual machine. VMware application backups let you:
· Choose whether to truncate logs.
· Use the existing SQL Server restore process to restore and recover data from VMware backups.
· From one VMware backup, choose from these restore options: Volume-level restore, file-level recovery, or database restore.
· Restore and recover databases from VMware backups to alternate clients. The target destination client can be a physical computer or a virtual machine.
Limitations of VMware application backups:
- Incremental backups. Instead, you can create an MS-SQL-Server policy for SQL Server incremental backups.
- SQL Server clusters or SQL Server availability groups.
- SQL Server databases are not cataloged and backed up if they exist on the following:
- Any virtual machines that use raw device mapping (RDM).
- Virtual Machine Disk (VMDK) volumes that are marked as independent.
- Mount points that use MBR disks. Mount points that contain SQL Server database files are only supported when the underlying disk is a GPT disk.
- Virtual hard disks (VHDs).
- RAID volumes.
- ReFS file systems.
- An excluded Windows boot disk
Pre-requisite:
1. NetBackup Client must be installed on SQL Server.
2. Veritas VSS provider must be installed on the SQL Server, needs a reboot.
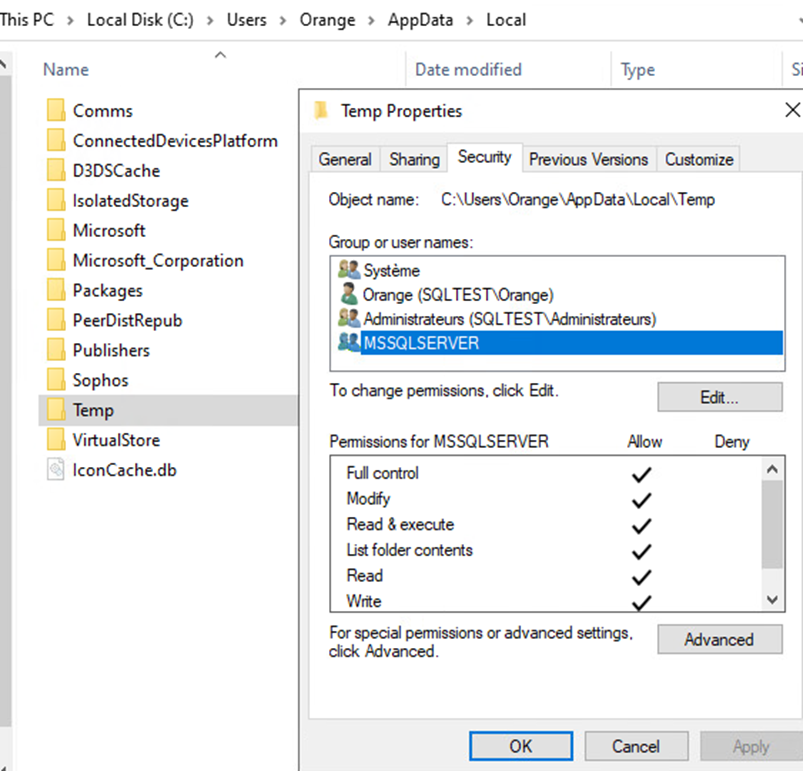
3. The account that runs the Microsoft SQL Server Service must have full NTFS permissions for the Legacy Network Service temp directory.
(C:\Users\user\AppData\Local\Temp\ )
4. On the client VM, the “NetBackup Client Service” and “NetBackup Legacy Network Service” must configured to use a Log In account meeting the following requirements:
(a) Must be a member of the local Administrators group.
(b) Must be a member of the sysadmin server role in the SQL Server instance to be backed up.
5. Install the Veritas VSS provider for vSphere.
User creation:
(1) Prior to the configuration of MS SQL backup with VMware policy type, make sure a dedicated user account has been created on the OS level and MS SQL DB end to perform the backup of the Instance with “sysadmin” roles.
(2) Create a local user account on your client at OS level and add this user to the Administrators group. Select “Password never expires” and leave the rest of the options unchecked, e.g.

(3) Add this previously created user account (Orange in our demo) to SQL Host Instance with the role “sysadmin” in MS SQL Server Management Studio.
For security reasons, it’s recommended to ask the DB-Admin’s to create and provide this user-name with sysadmin roles in MS SQL Server Management Studio and then later we can use this user-account as the user in step 2.
Installation of Veritas VSS provider for vSphere: (OS restart required!)
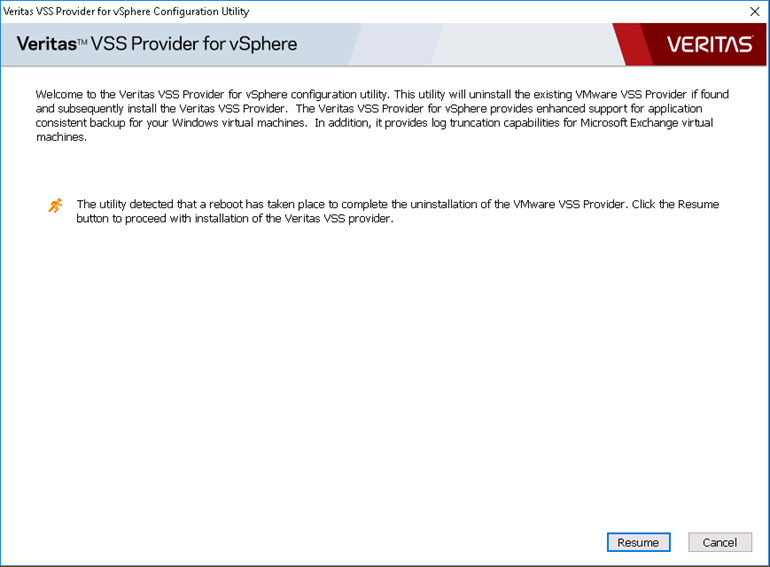
- To use the Veritas VSS provider, you must install it manually following installation of the NetBackup for Windows client.
- If the VMware VSS provider is installed, the installation program removes it and may require a restart of the computer.
- To install the Veritas VSS provider
- Browse to the following location: install path\Veritas\NetBackup\bin\goodies\
- Double-click on the Veritas VSS provider for vSphere shortcut.
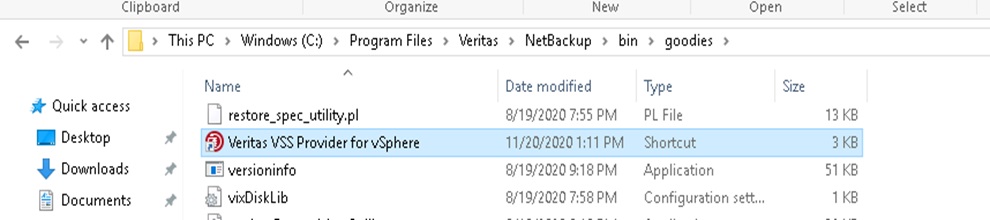
- Follow the prompts.
- When the utility has completed, restart the computer if prompted.

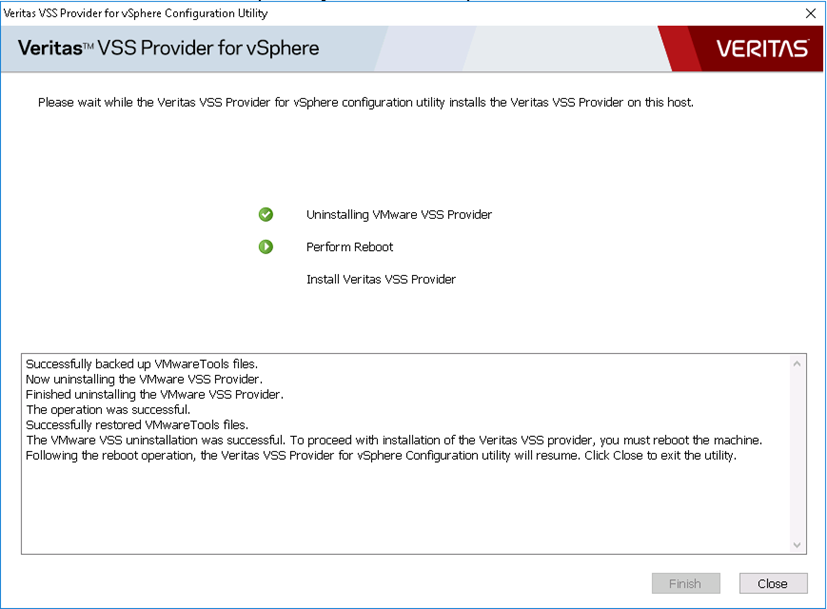
Following the restart, run the utility again and follow the prompts to complete the installation.
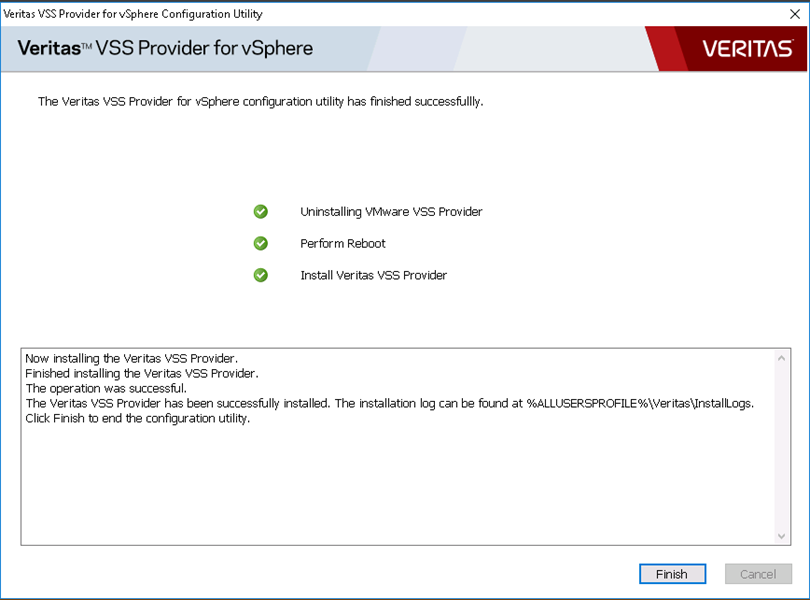
- You can verify the installation from Control Panel à Programs & Features

Protecting SQL Server data with VMware backups:
- Configure the NetBackup Client Service and the NetBackup Legacy Network Service
- Both services must use the same logon account.
- You must use a previously created local account as the logon account.
- Configure the account as follows:
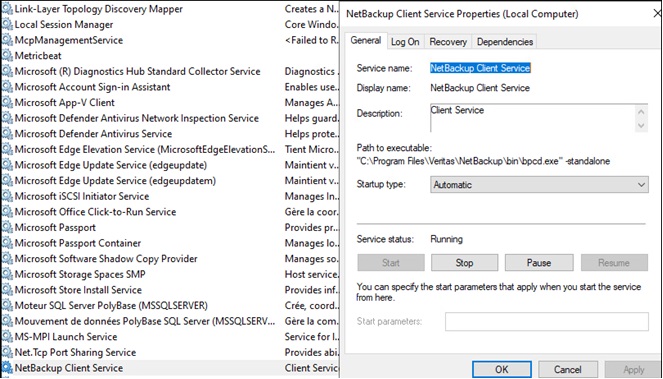
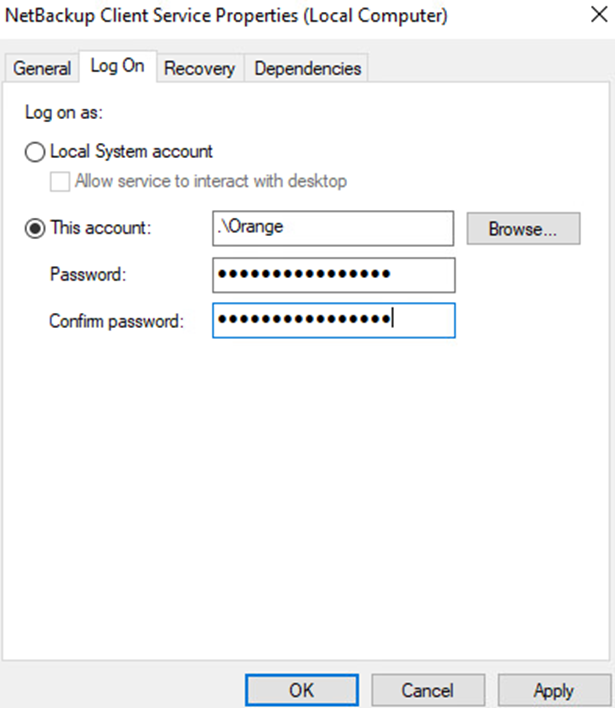
o Open the NetBackup Client Service under Windows Services application.
o Open the “Log On” tab, provide the name of the logon account and click OK.
o Configure the same logon account for both NetBackup Client Service and NetBackup Legacy Network Services.
- After the changes are made, restart NetBackup services.
- C:\Program Files\Veritas\NetBackup\bin\bpdown.exe /f /v
- C:\Program Files\Veritas\NetBackup\bin\bpup.exe /f /v
- Configure the NetBackup services for SQL Server backups and restores.
- Log on to the Windows host with the previously created account that has the SQL Server sysadmin role and any necessary local security privileges.
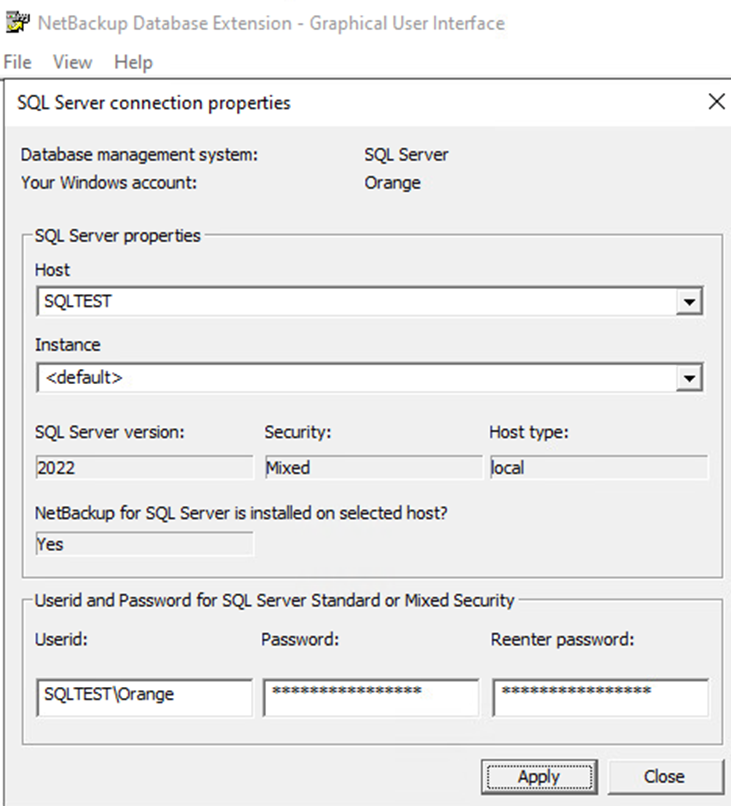
- Perform the following steps to configure SQL Server connection.
- Open the NetBackup MS SQL Client using “Run as administrator” option.
- Select File > Set SQL Server connection properties.
- Provide the SQL Server User-id and Password, click Apply > Close.
Truncate logs feature:
- If you choose to truncate logs in VMware policy configuration, ensure that the account that runs the Microsoft SQL Server Service has full permissions for the NetBackup Legacy Network Service temp directory. This directory is C:\Users\user\AppData\Local\Temp
· Configuration steps:
- Open the Microsoft SQL Server Service under Windows Services application.
- Check logon account for this service.
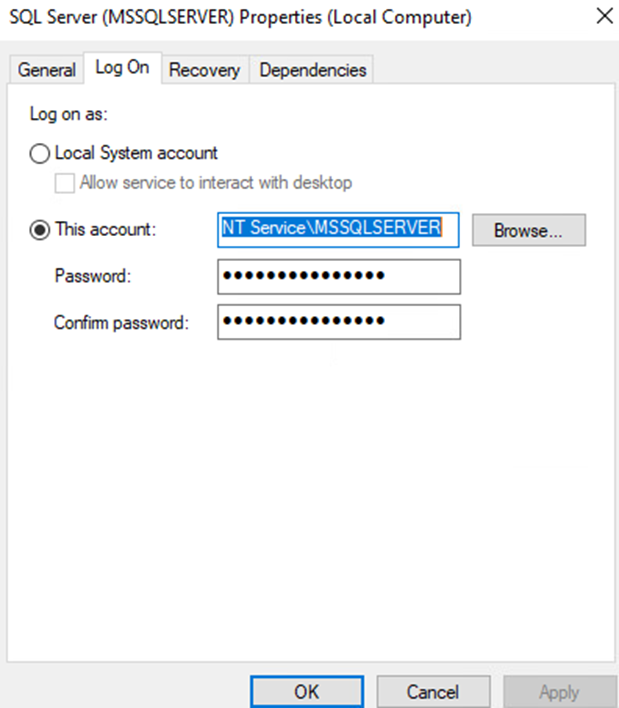
3. Ensure that this account has full permissions for the NetBackup Legacy Network Service temp directory: C:\Users\user\AppData\Local\Temp
Configuring a VMware backup policy to protect SQL Server:
- To configure a VMware backup policy to protect SQL Server.
- Create a new policy or open the policy you want to configure.
- Click the Attributes tab.
- From the Policy type list, select VMware
- In the Policy storage list, select a disk storage unit, do not use “Any available” option.
- Select the Use Accelerator option.
- On the Schedules tab, create a schedule for full backups.
- On the Clients tab, do the following:
- Click Select automatically through query
- Use the Query Builder to create the rules that select the virtual machines you want to back up.
- Select the VMware tab:
- Select the Primary VM identifier to “VM display name”.
- Select Enable file recovery from VM backup.
- Select Microsoft SQL Server
- Do not enable Truncate logs at this time. You must first perform a full backup without log truncation as described later in this procedure.
5. Click OK to save the policy.
If you do not want to truncate transaction logs, no further action is necessary.
6. Perform a full backup without log truncation.
When the backup completes, open the policy that you previously created.
7. Click the VMware tab and under Microsoft SQL Server, select Truncate logs.
For SQL Server, this option truncates the transaction logs when the VMware snapshot of the virtual machine is complete.
8. Click OK to save the policy.
Restore SQL Server databases from a VMware backup.
Note :- Restoration is Database Administrator responsibility.
There is no way to run MS SQL database recovery from the NetBackup WEBUI console. This option is not yet available.
Procedure:
Database team need to create MS MSQL restore script or use “Restore selected objects” option from NetBackup MS SQL Client to perform the restore.
The following steps describe how to restore a SQL Server database from a full VMware backup.
- To restore a SQL Server database from a VMware backup
- Open the NetBackup MS SQL Client using “Run as administrator” option.
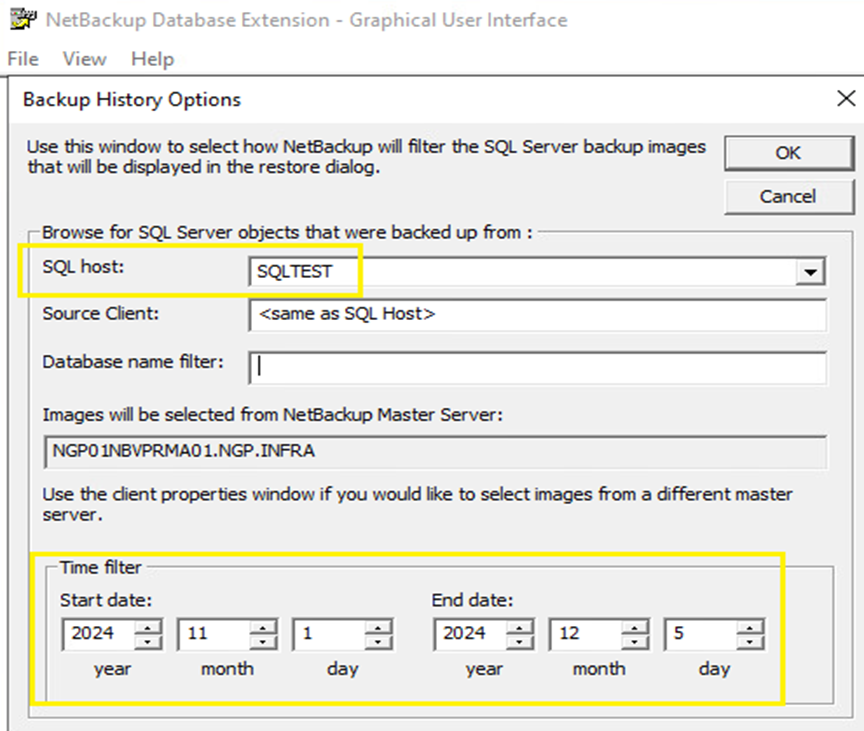
- Select File -> Restore SQL Server objects.
- Browse for the backup images you want to restore.
- Select the date range to search and click OK
5. Expand the database instance and the database.
6. Select the database image that you want to restore.
Only the Recovered recovery option is available for VMware backups of SQL Server.
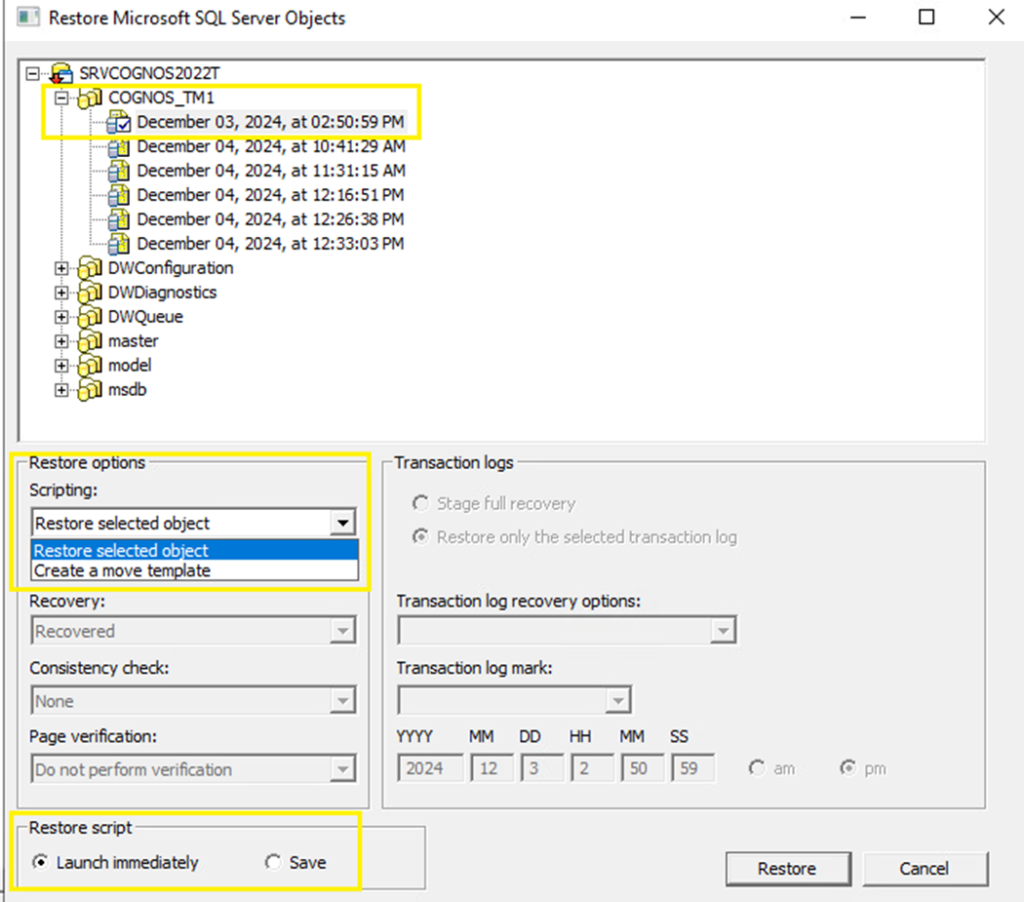
- These scripting options are available for restoring from a database image:
- Restore selected object
- Produce a script that performs a “In place” database restore. This script is the default option.
- This option will overwrite the existing database.
3. Click Restore.
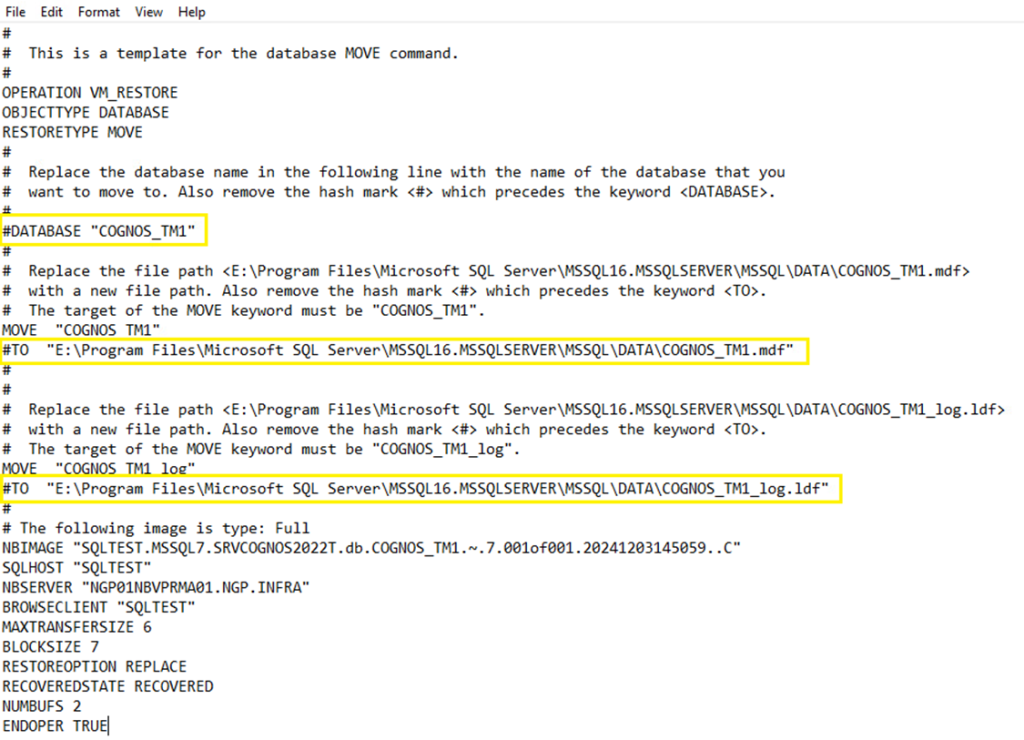
- Create a move template
- Create a script template for moving the selected database.
- This option will move selected database to the new one.

Open the created script template and change the highlighted lines as described for the sections.
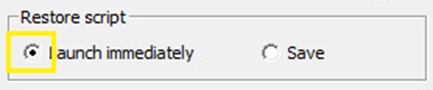
4. To run the script, select File -> Manage script files -> choose script file -> click Start.
Monitoring
- Backup and Restore job’s status can be monitored through NetBackup Web-UI Activity Monitor
- Restore job’s status can also be monitored through NetBackup MS SQL Client from View status window (File -> View status).
Agent-Level Backup & Restore
With Agent, Backup & Restore for different workloads can be managed
Prerequisites
Machine Side
Common Prerequisites :
Submit a SWAN request to ATQIOF to get the required entries of your Backup env to add them to the hosts file
If the firewall is activated on the OS level, make sure that the required ports are already opened in bi-direction
Firewall Ports
| Source/Desitnation | Destination/Source | Service Name | Port |
|---|---|---|---|
| Machine (VM/BMS) | Backup Env | BKP_TCP_bpcd | 13782 |
| BKP_TCP_bprd | 13720 | ||
| BKP_TCP_spad | 10102 | ||
| BKP_TCP_spoold | 10082 | ||
| BKP_TCP_veritas_pbx | 1556 | ||
| BKP_TCP_vnbmqbroker | 13781 | ||
| BKP_TCP_vnetd | 13724 | ||
| BKP_TCP_ portmapper | 111 | ||
| BKP_TCP_ nbfsd | 7394 |
For better performance, it is recommended that the MTU Size = 8872
Windows-Based OS Prerequisites :
No prerequisites, up-till-now
Linux-Based OS Prerequisites :
| The following libraries are needed: libnsl libnsl.so.1 | yum install libnsl yum install libnsl.so.1 | Needed for: RHEL CentOS |
Agent Installation
Windows-Based OS
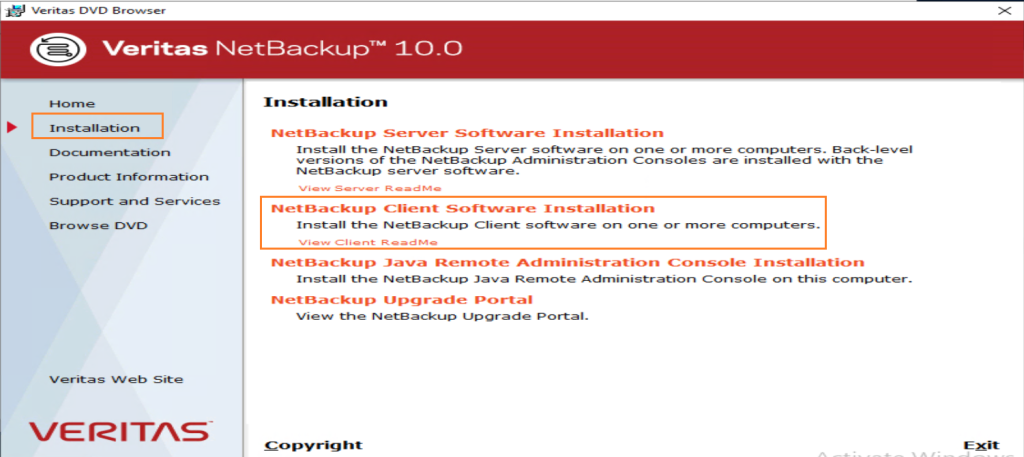
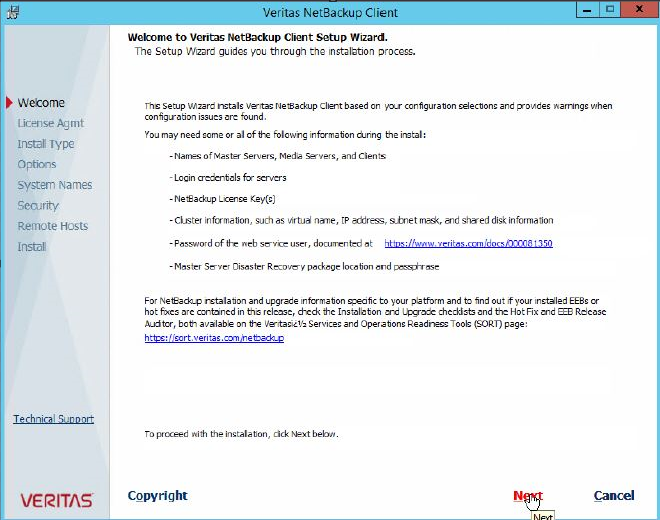
Agent Installation for Windows-Based OS
Mount the required ISO image
Click on Installation > Netbackup Client Software Installation
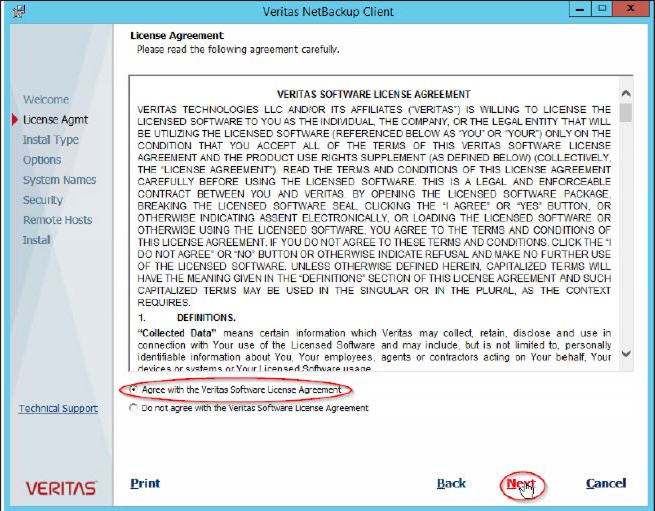
Click Next to Accept the Agreement and select Typical Installation
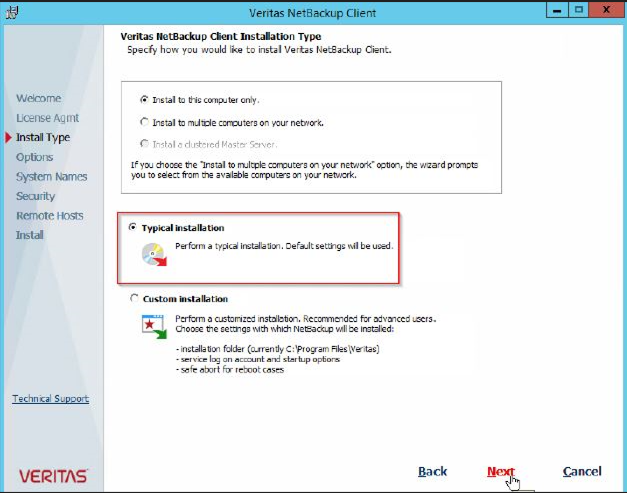
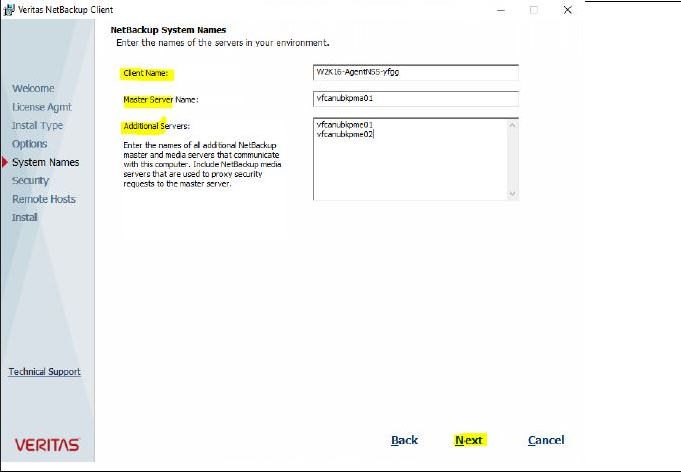
Enter the names of the servers in your environment, then click Next
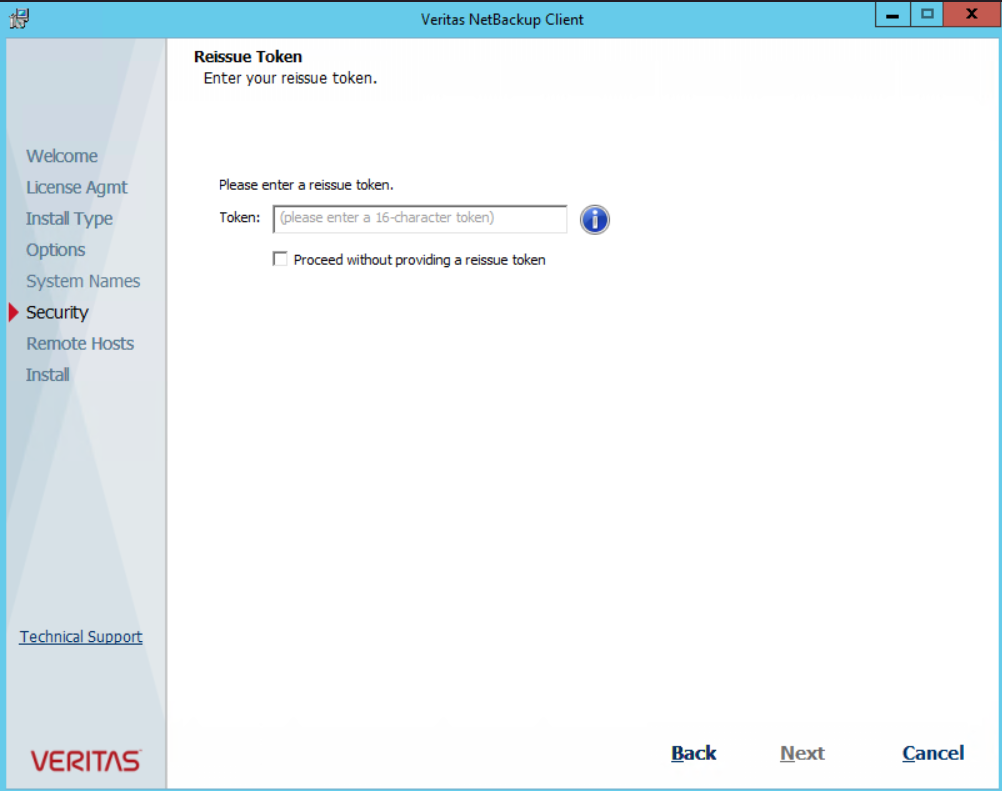
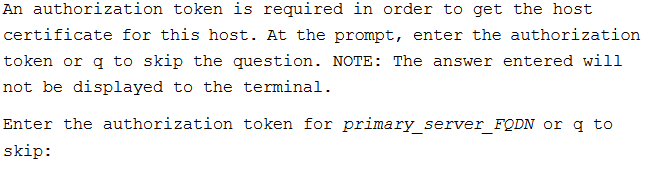
Contact the Service Desk (SD) to submit a SWAN or Ocean request to ATQIOF to generate and get the needed token
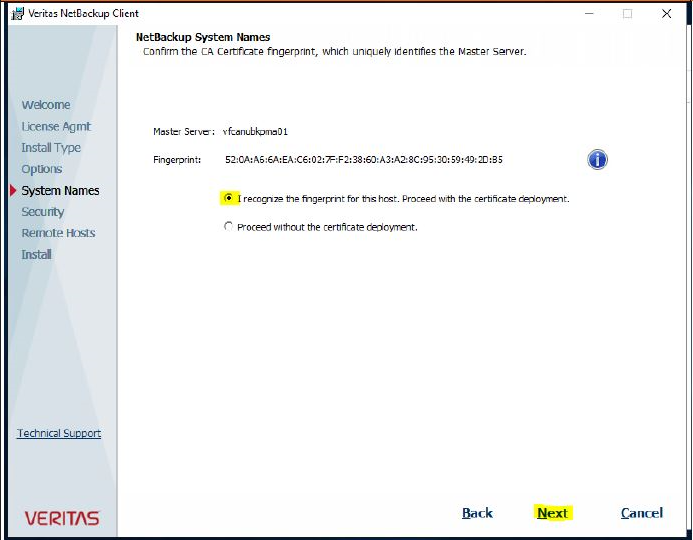
Confirm the CA certificate which has been retrieved from the Backup server, then click Next
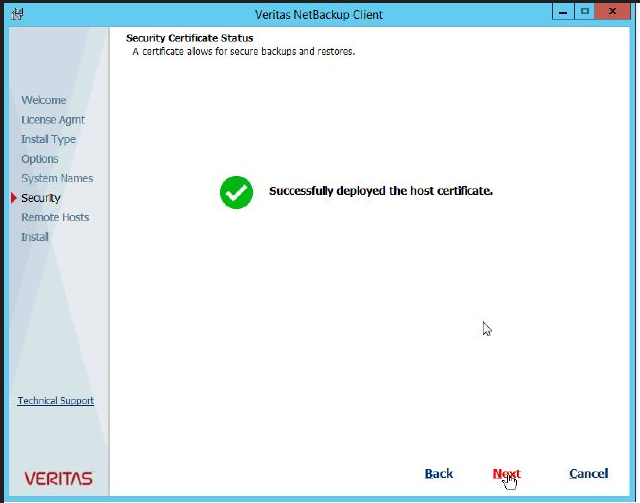
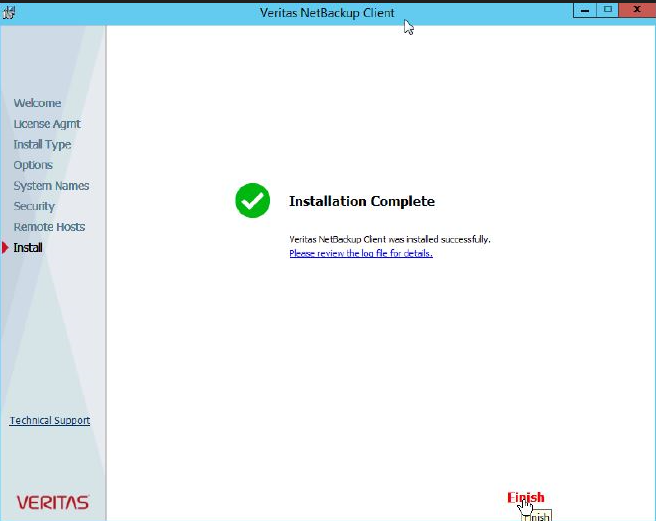
Select Install after reviewing the installation summary, then click Finish once the installation completed successfully
Linux-Based OS
Agent Installation for Linux-Based OS
Mount the ISO image
mount /dev/sr0 /iso
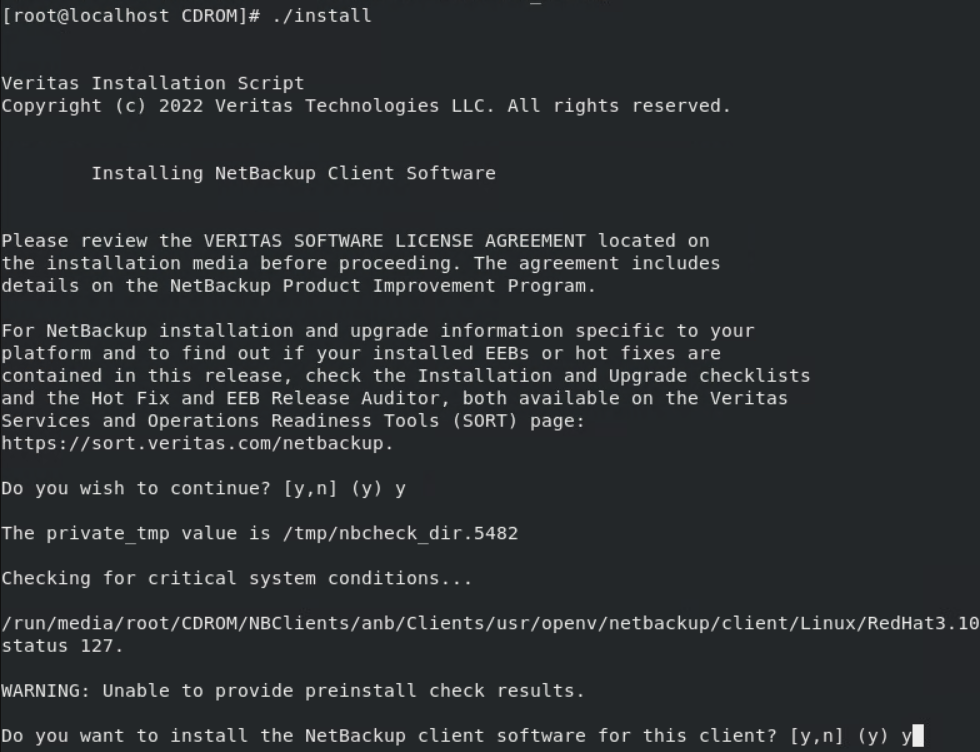
Open the extracted folder and run ./install

Answer by “Y” when prompting for the following questions:
- Do you wish to continue ?
- Do you want to install the Netbackup software on this client ?
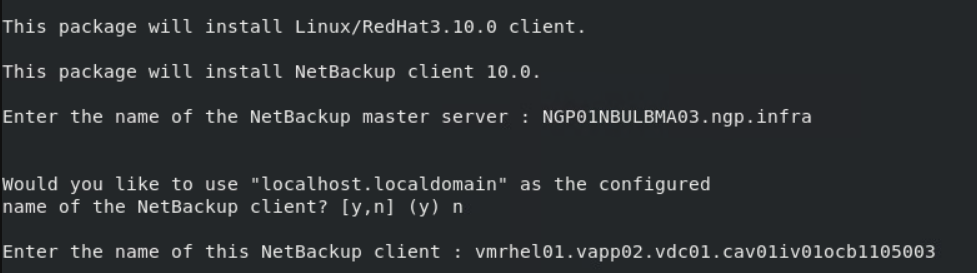
Enter the names of the servers in your environment
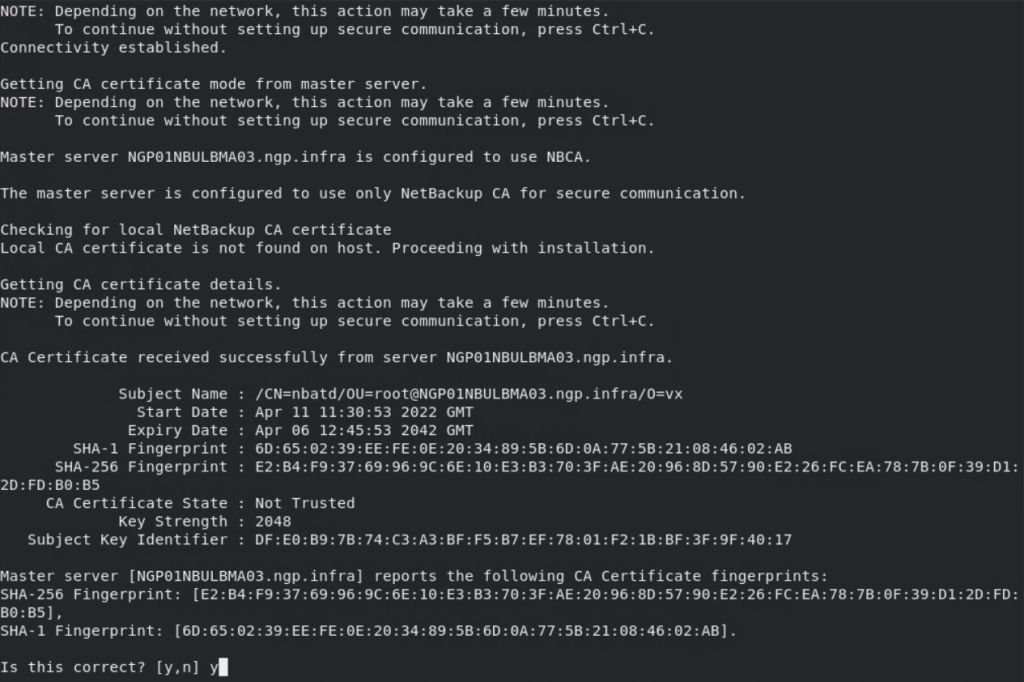
Answer by “Y” once the certificate has been retrieved from the Backup env
Contact the Service Desk (SD) to submit a SWAN or Ocean request to ATQIOF to generate and get the needed token
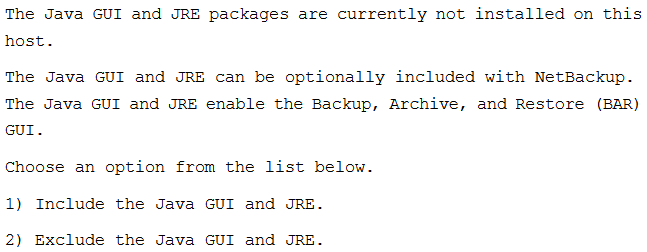
When prompted, specify 1 or 2options if you want Java and the JRE packages installed
- Include the Java GUI and JRE
- Exclude the Java GUI and JRE
Follow the prompts to complete the installation
After the installation is complete, select Exit from this Script
Use Cases
This section covers specific use cases which may help in case exists
Monster File Server
Oracle DB Backup
Prerequisites
- Prior to configuring the Oracle backup, make sure a dedicated user account must be created on the database end to perform the backup of the instance with sysdba and sysbackup roles.
- Install NetBackup client if it’s not installed on server, where Oracle is running. (Oracle database agent is installed as part of the NetBackup client installation, separate oracle agent installation is not required.)
- NetBackup client agent installation procedure mentioned above under section Agent-Level Backup & Restore
- Make sure communication between backup master server and Client is working on ports 13724 and 1556.
Configuration
Oracle Instance Discovery
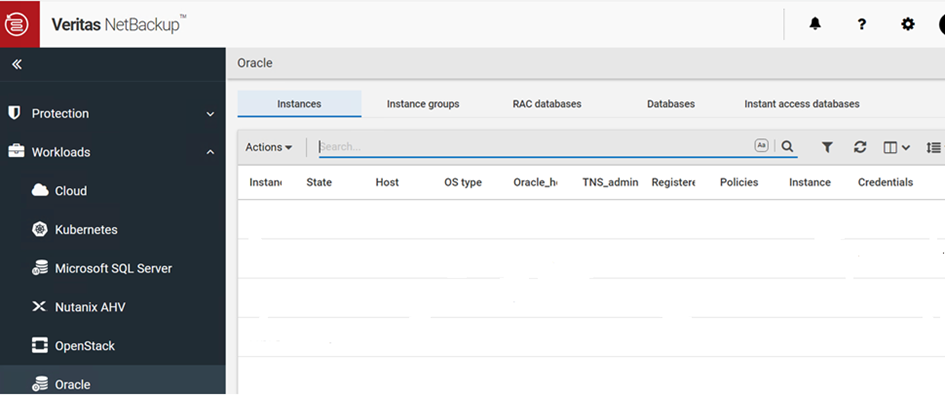
Log on to the NetBackup Web UI
From the left pan click on Workflows and select Oracle and then select instance
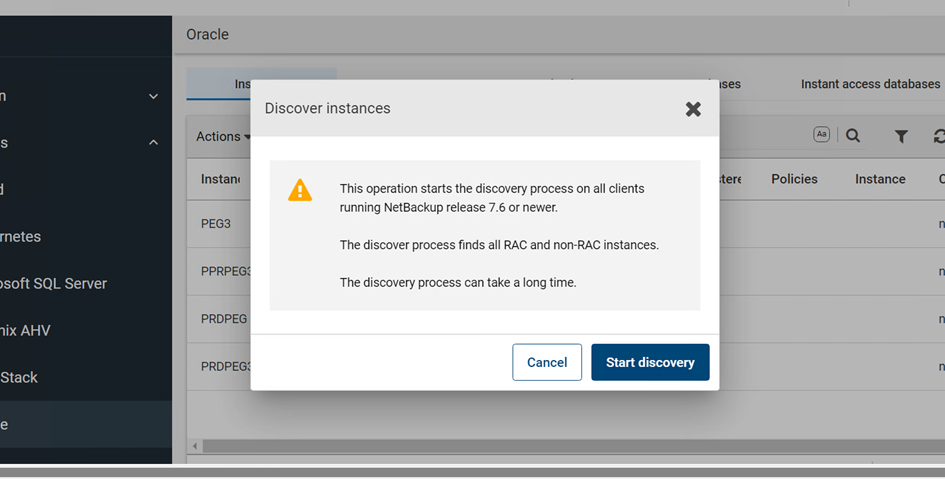
In the Instances tab, click on Actions and select Discover instances.
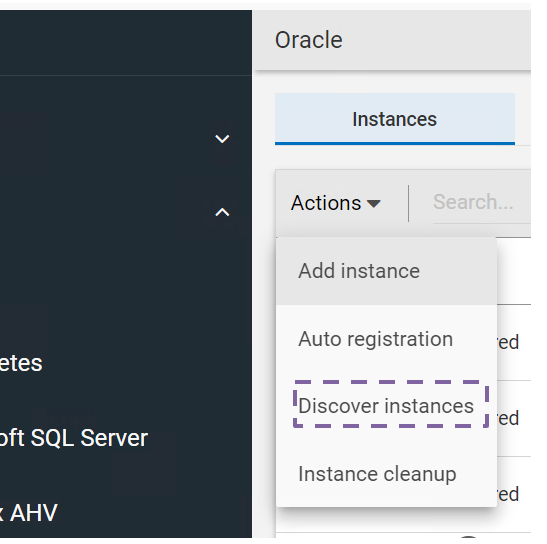
Discover Instances pop box will appear click on Start Discovery
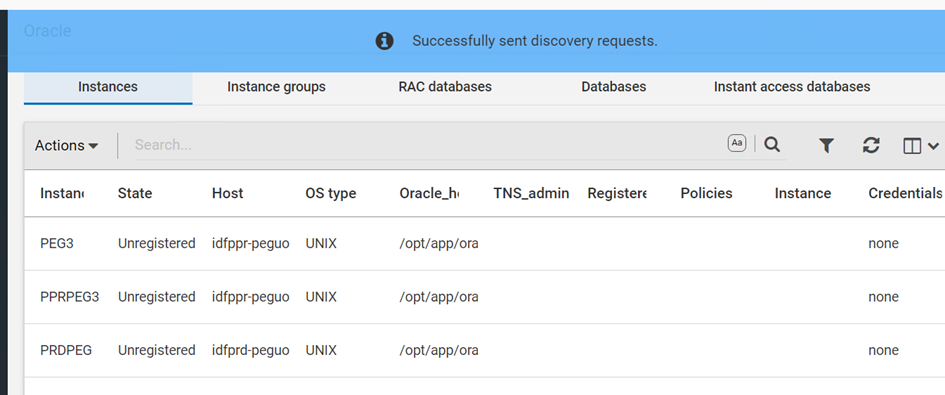
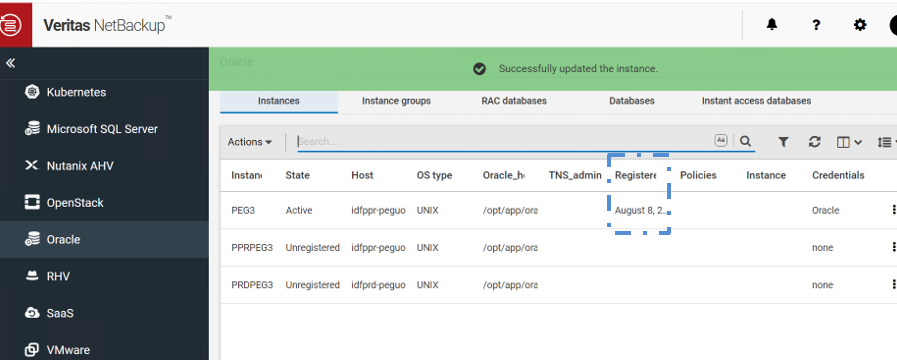
After completion of discovery task Discovered instances will start reflecting under instance tab.
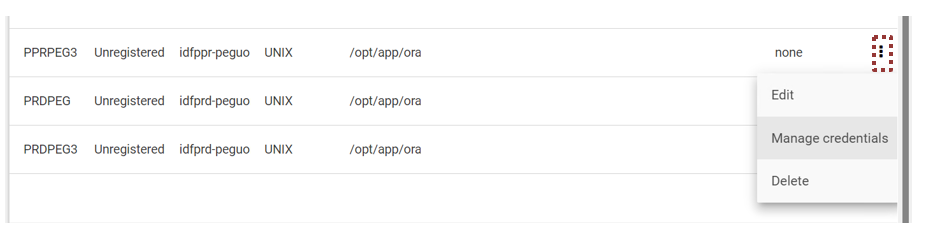
Click on the instance which you want to register and click on three dots button in left of instance and click on Manage credentials
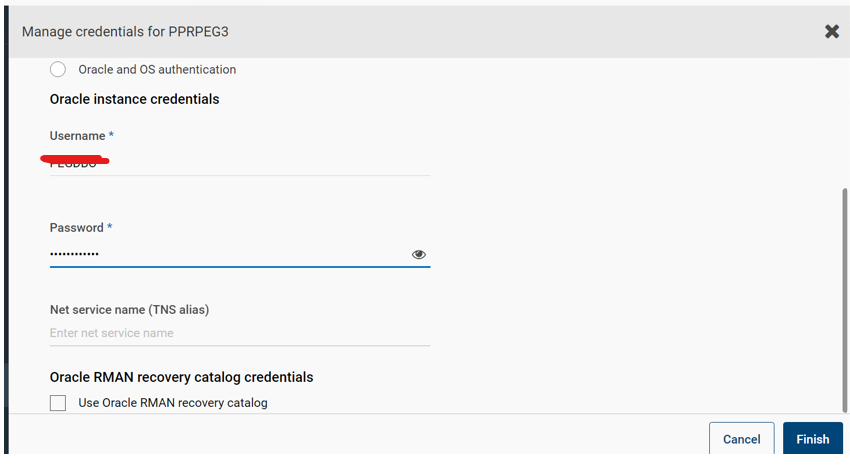
Select option User instance credentials and from Instance credentials choose option Oracle Authentication only
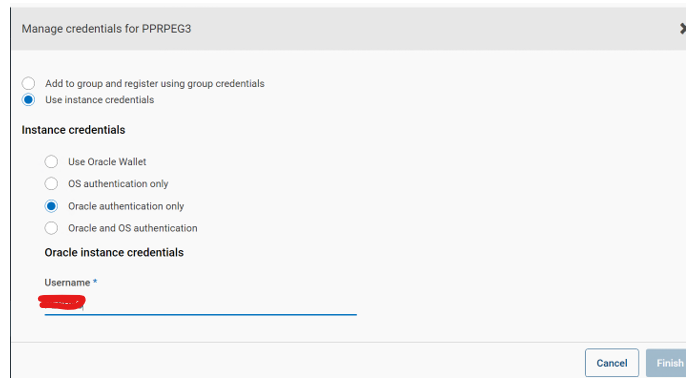
Enter Instance credentials. And click Finish.
If you want to use rman recovery catalog then tick on Oracle RMAN recovery catalog option before clicking on Finish.
Instance registration status will appear in instances list.
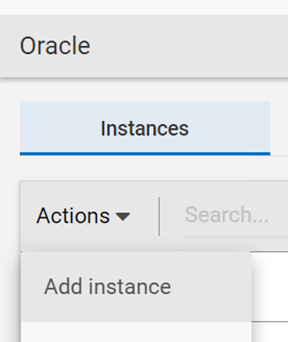
To manually add an instance
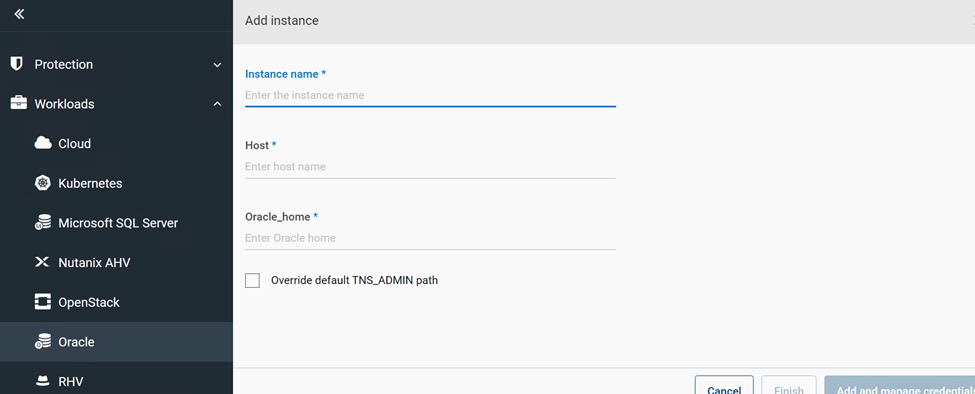
If you want to add any instance manually or discover instance option not able to search specific instance click on option ADD instance.
Provide Instance name hosts and credentials to add the instance.
Backup Policy
Create a new backup policy and choose policy type oracle.
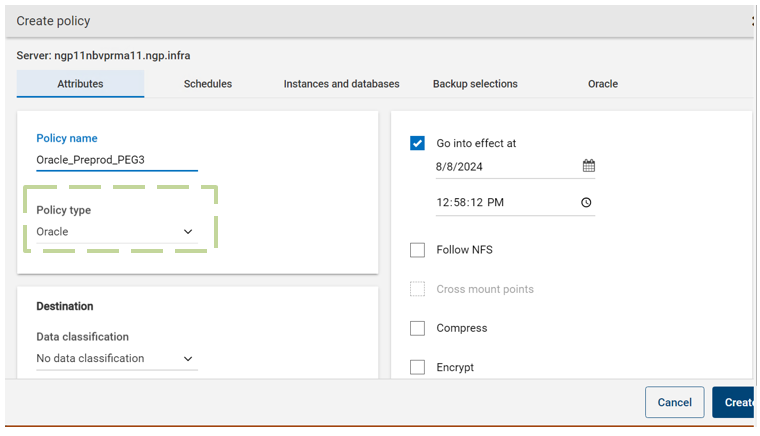
Set a backup schedule under Schedules tab.
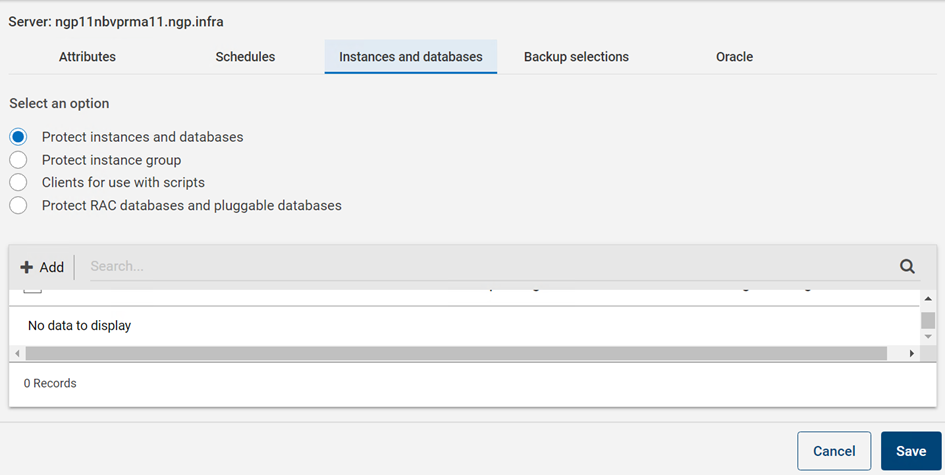
In Instance and database tab choose database protection option. Protect
instance and database
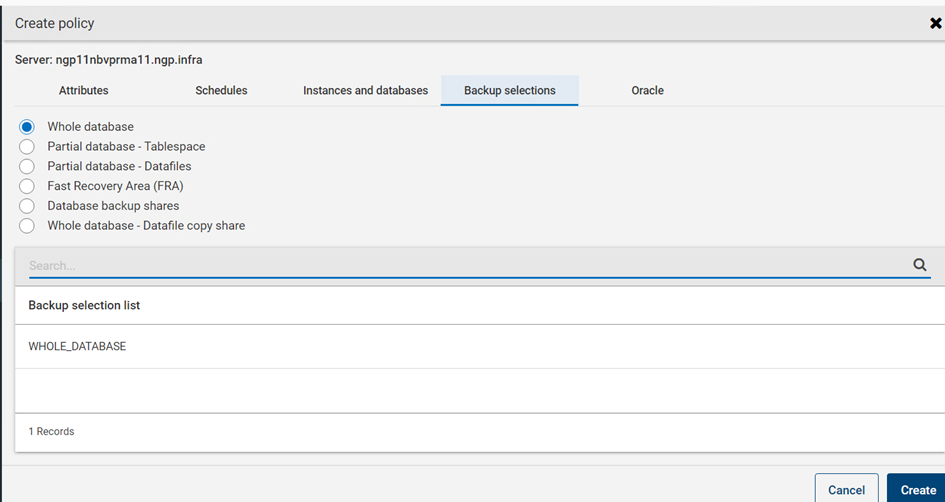
In backup selection tab choose DB component which need to be backed up.
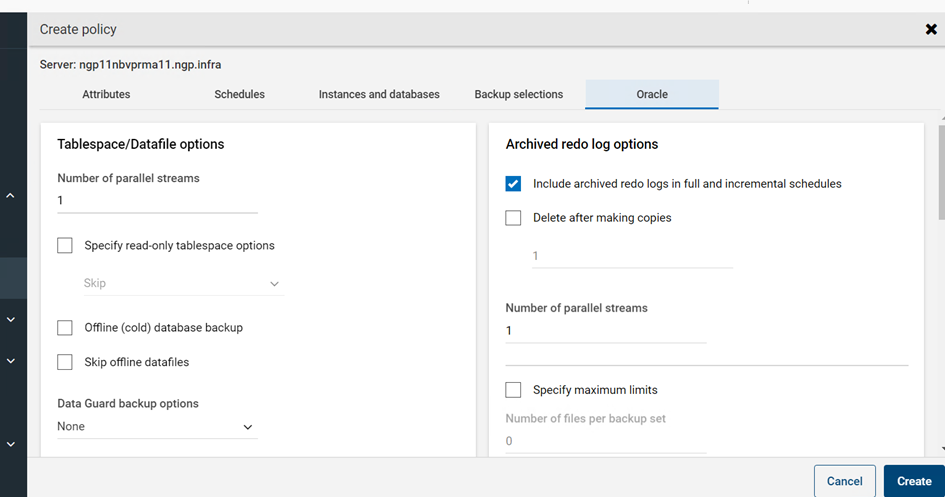
On Oracle tab choose desired options based on requirement. And click create.
Restore
Restoration is Database Administrator responsibility.
From NetBackup web end not possible to perform restore for databases/instances. Database team need to create RMAN restore script to perform the restore.
Backup team will provide backup date and backup image details if required for restoration.
Monitoring
Backup and Restore job’s status can be monitored through NetBackup web UI Activity Monitor.
Monitoring NetBackup
To monitor a job
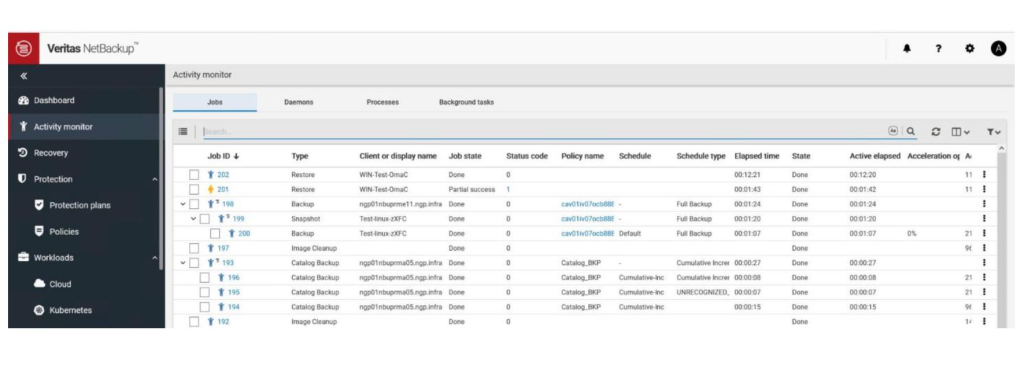
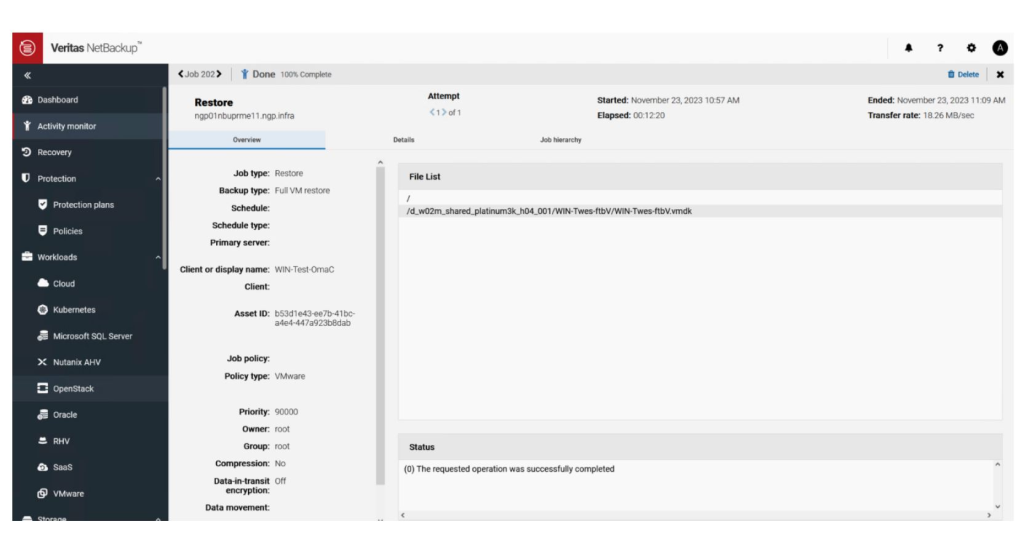
2. Click on a job ID that you want to view. On the Overview tab you can view information about a job.
- The File List contains the files that are included in the backup image.
- The Status section shows the status and the status codes that are related to the job.
3. Click the Details tab to view the logged details about a job. You can filter the logs by error type using the drop-down menu.
Delete a Backup Image
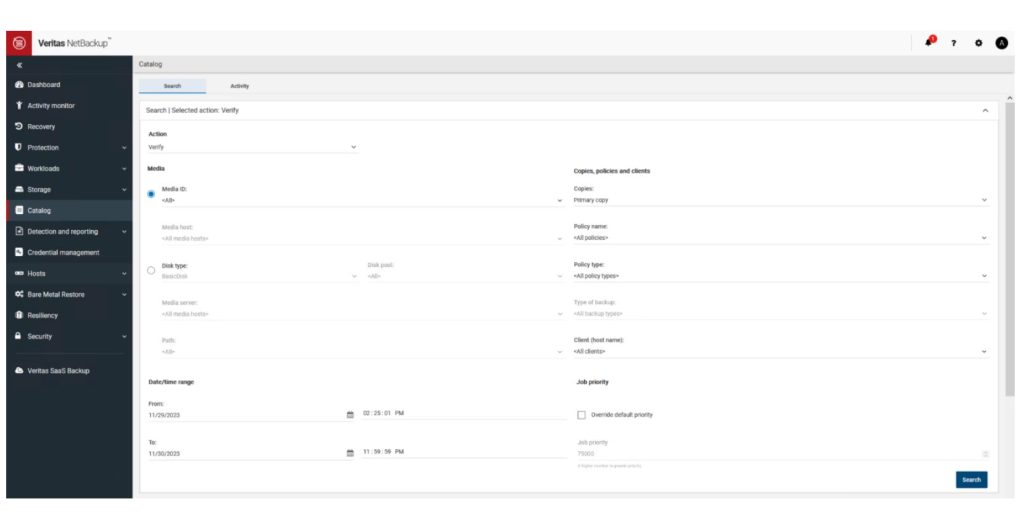
- On the left, click Catalog then in the Search tab select the backup Date/time range and Client (host name) and any other relevant attributes.
- Click on Search button to list the backup images that match your search criteria.
- Select the backup image to be deleted and click on Expire.

Troubleshooting NetBackup
The general guidelines to help you resolve any problems you may encounter while you use NetBackup are provided through the below links.
NetBackup™ Logging Reference Guide
The Veritas Technical Support website has a wealth of information that can help you solve NetBackup problems.
Access Technical Support at the following URL: