Restores
A restore operation is the way to lookup into the backup content and restore Files/Folders, Databases, or Applications at a given Recovery point, determined by the backup runs (schedule of your Backup Plan + on-Demand backups).
| Note: Restores are only possible when backups have run |
This chapter develops the Restores within FAB for each possibility offered.
- Recovery Point
- Restore Files & Folders
- Restore a Microsoft Exchange Database (DAG)
- Restore Virtual Machines
- Restore Databases
- Restore Hyperscalers Applications
- Restore of an Object storage
- Cross Company Restore
Recovery Point
There are 2 options for restoring data:
- Restore the latest backup (by default)
- Restore to a specific date
“Restore the latest backup” being the default option, the following section is to describe how to select a different point in time; and therefore how to restore to a different date:
During any restore process (detailed in following sections), you will access the Backup content page:
- Develop the Show latest backup menu
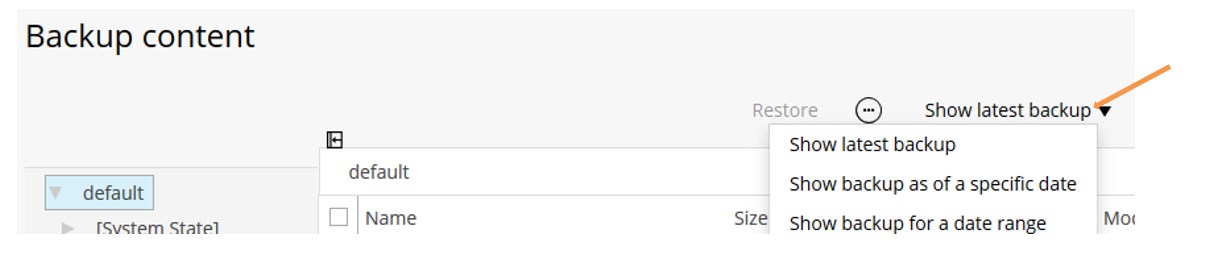
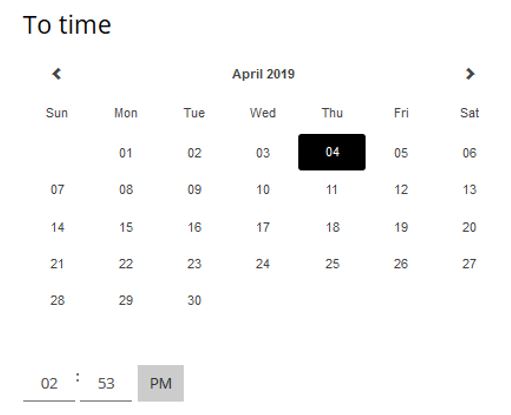
- if you know the date to restore to, select the Show backup as of a specific date option
- Select the date and press OK
- if you don’t know the date to restore to, select the Show backup for a date range option
- Select the date range for the restore and press OK
- Then follow the restore process detailed in the below sections, depending on the case
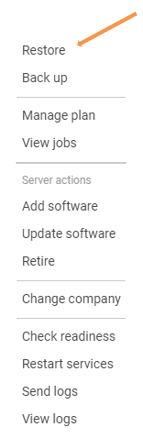
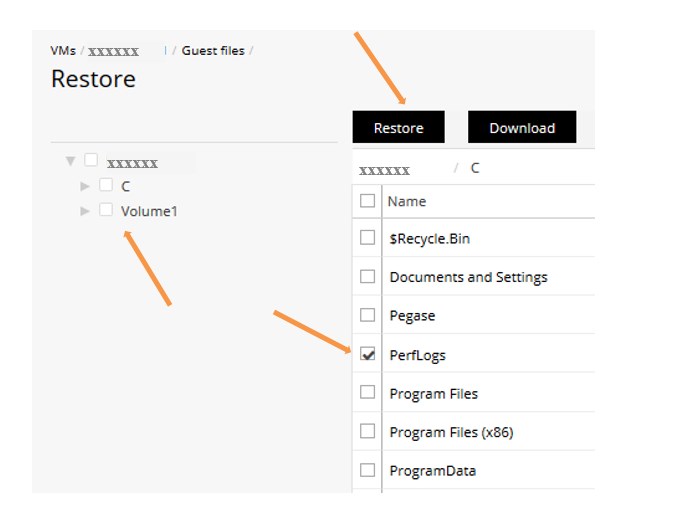
- In the FAB Backup console, Protect / File Servers section, determine the server on which the concerned files/folders were backed up, and click on the actions button

- Click on Restore
The Restore page opens:
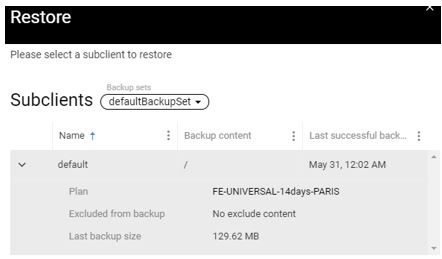
- Select the Backup Sets and Subclient (See backup definition section for detail) and click on Select content
The Backup content page opens:
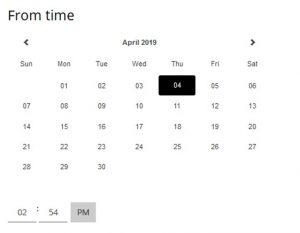
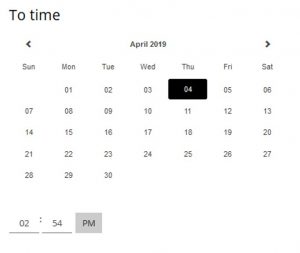
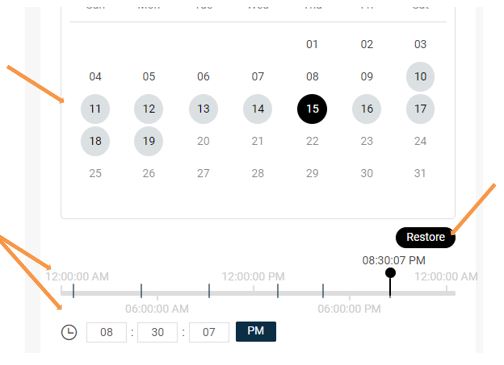
- Select the desired recovery point (see chapter “Recovery Point” for further detail on the date & time selection)
- Develop the content on the left and Select the content to restore by checking the required boxes, and click on Restore

Notes:
|
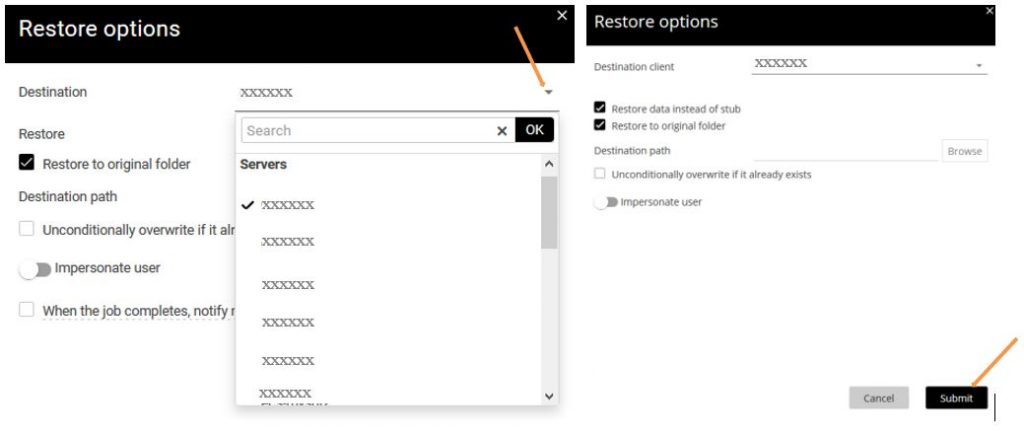
- Select the Restore Options and click on Submit to initiate the Restore

Notes:
|
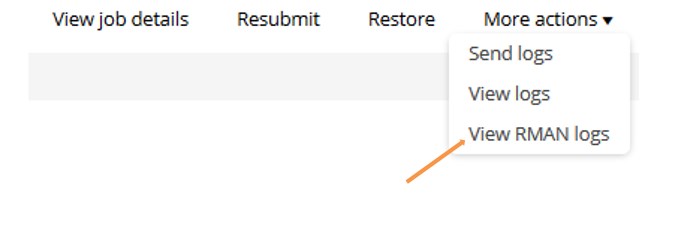
- if you require further detail, click on the view job details link
Restore a Microsoft Exchange Database (DAG)
- In the FAB Backup console, Protect / Appliactions / Exchange section, click on the Exchange Database you wish to restore

- In the Subclients section, click on the subclient to restore

- In the Subclient page, click on Restore database

- In the Backup content page, select the desired recovery point (see chapter “Recovery Point” for further detail on the date & time selection)
- Select the content to restore by checking the corresponding box and click on Restore
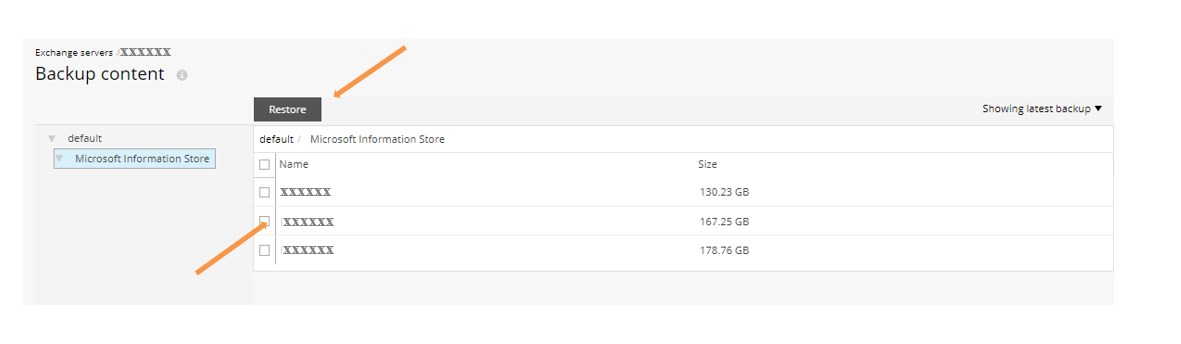
The restore job starts
- If you require further details, click on the View jobs link
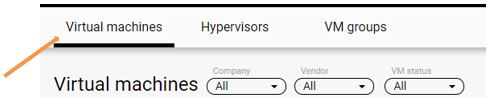
- In the FAB Backup console, under the Protect / Virtualization section, click on the Virtual machines tab
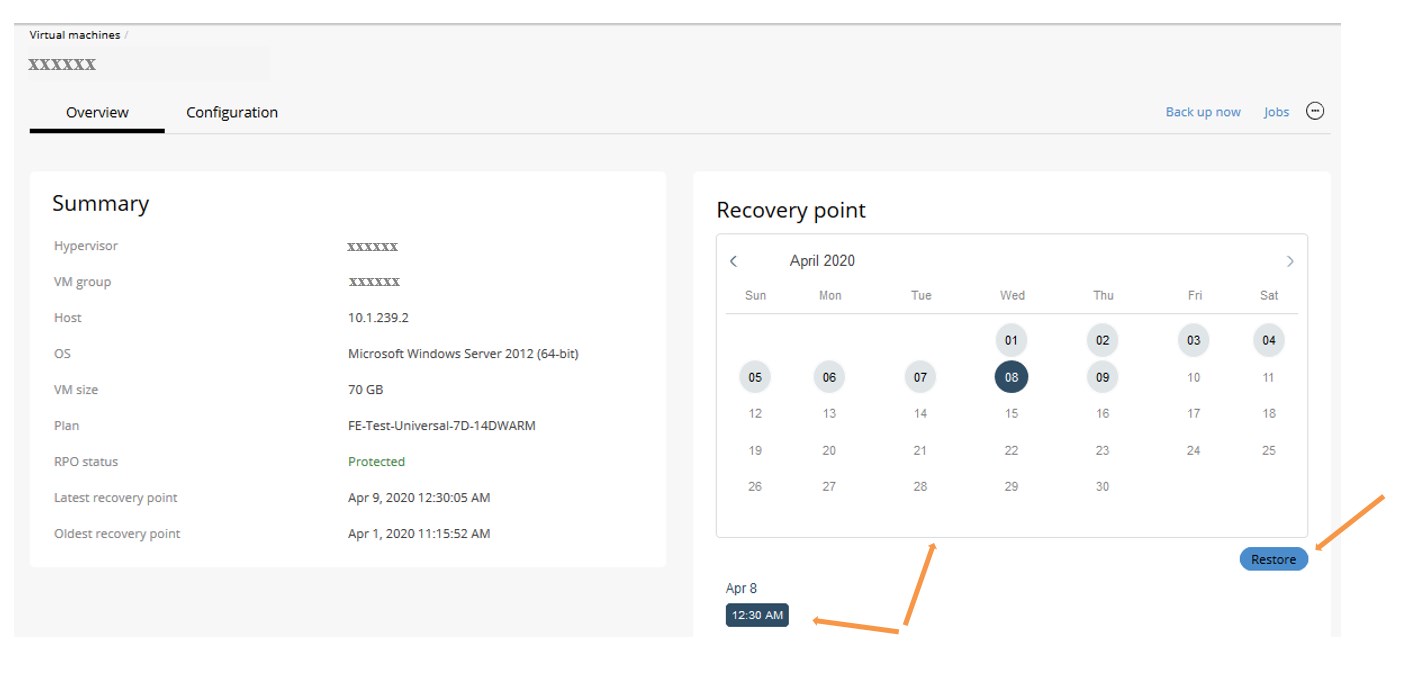
- from there click on the VM name you wish to restore
- Select the recovery point amongst the available backup occurrences ready for restore and then click Restore
- In the Select restore type window, click on the required restore type
- In the restore window, browse and select the files or folders to restore and click Restore
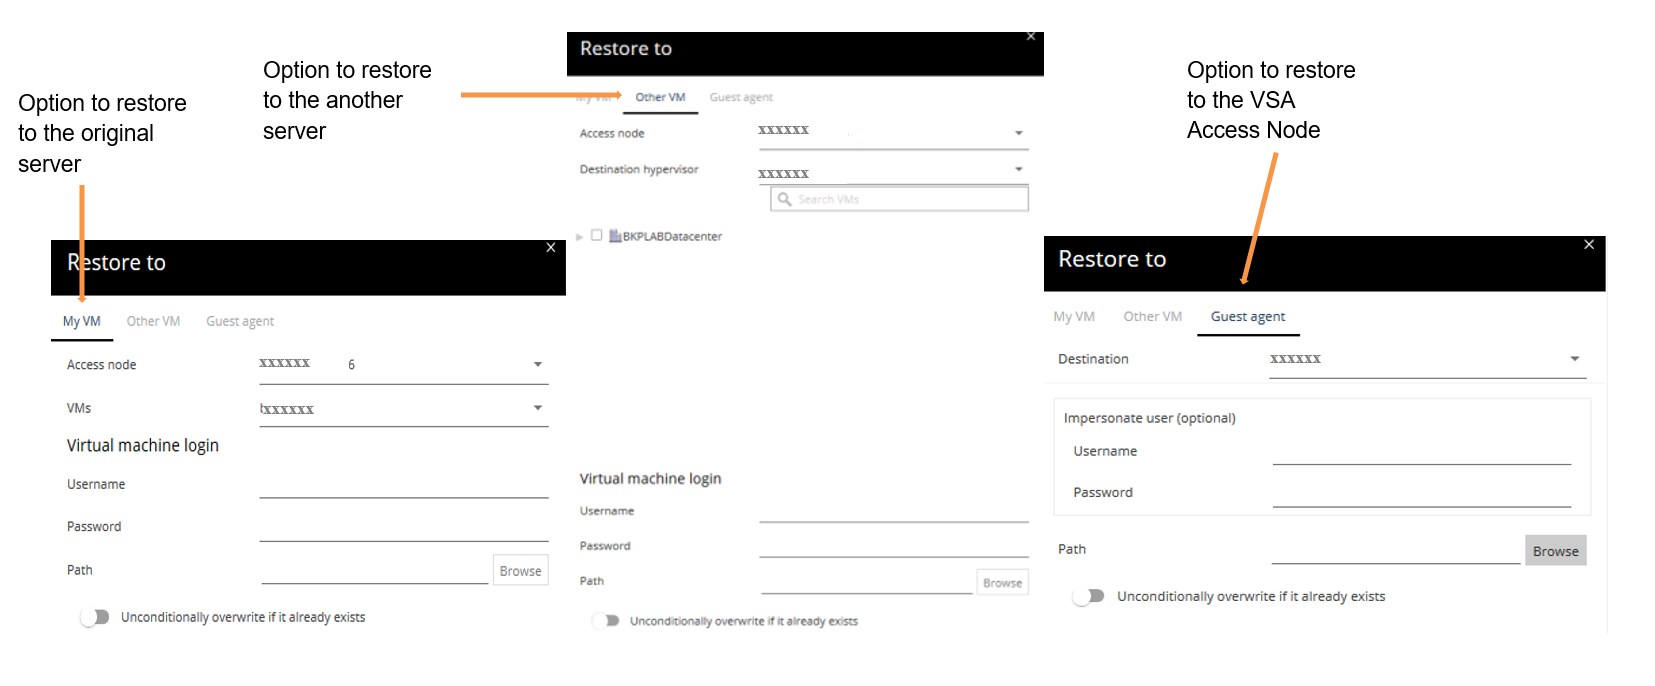
- In the restore to window, choose My VM (to restore to original server) or other VM (to restore to another VM) or Guest agent (to restore to the VSA Access Node), and provide the user credentials for that server. Then click Submit
- The restore job starts. For further details, click on the View jobs
- In the Restore window, browse and select the VM files and click Restore
- In the Restore options window, browse the destination path on the access node where the files would be restored, provide credential for the VM and click Submit
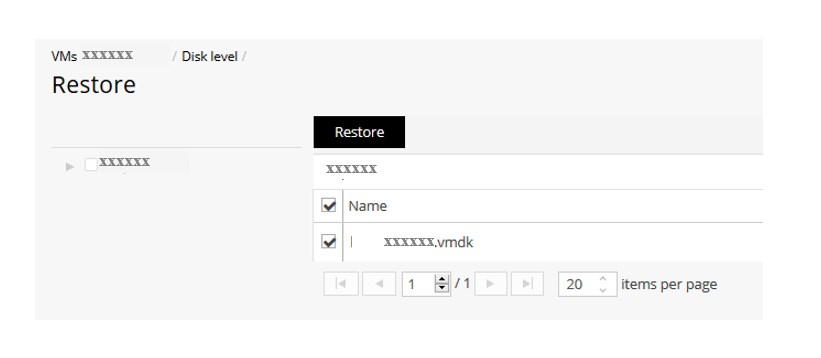
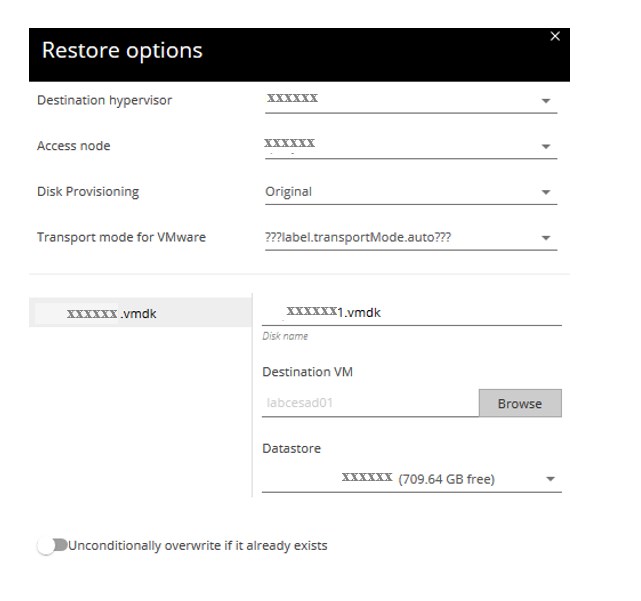
- In the Restore window, browse and select the disk and click Restore
- In the Restore options window, browse the Destination VM and Datastore (where the disk will be restored), and click Submit
- For further details, click on the View jobs
- In the Restore window, browse to select the VM</ and click on Restore
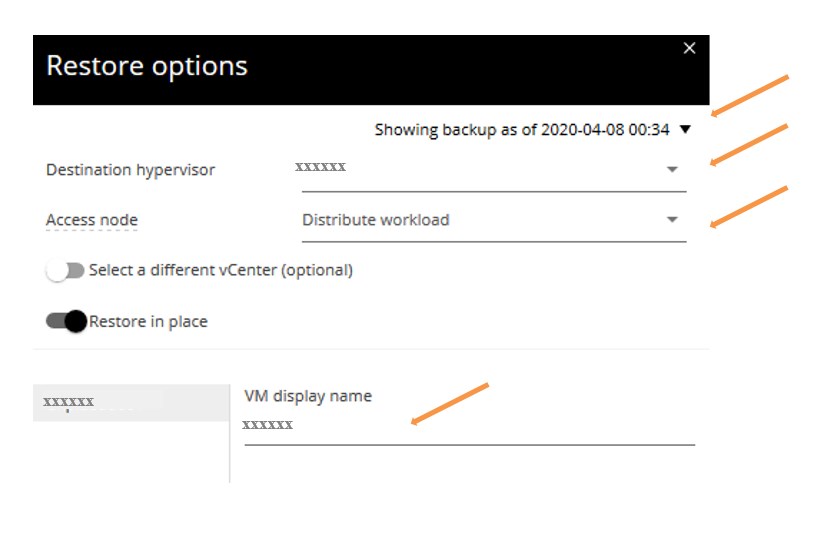
- In the first Restore options window, define the Destination hypervisor, Access node, the restored VM name (either same or different name) and the Recovery point ; then click Next
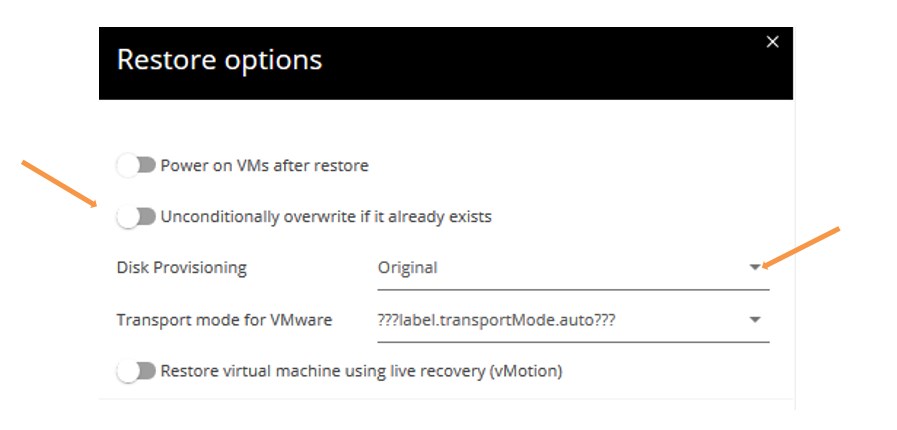
- In the second Restore options window, choose the Disk Provisioning type and the Overwrite VM condition you desire (overwrite existing VM or not) and click Submit
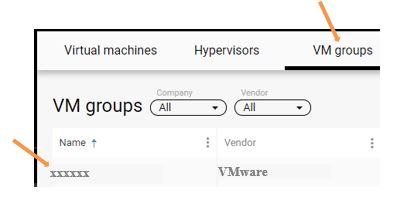
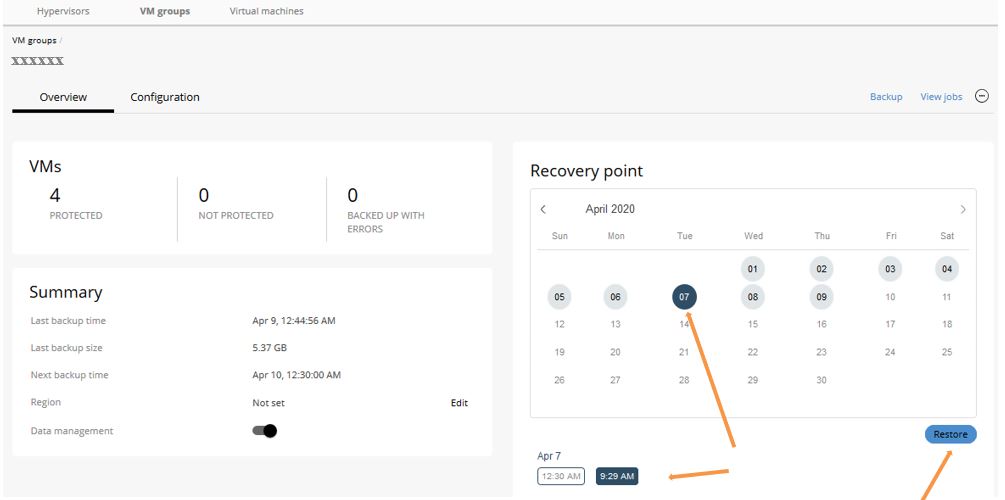
- In the FAB Backup console, under the Protect / Virtualization section, click on the VM groups tab, from there click on the VM group name to restore
- Select the recovery point (calendar date & backup time) and then click Restore
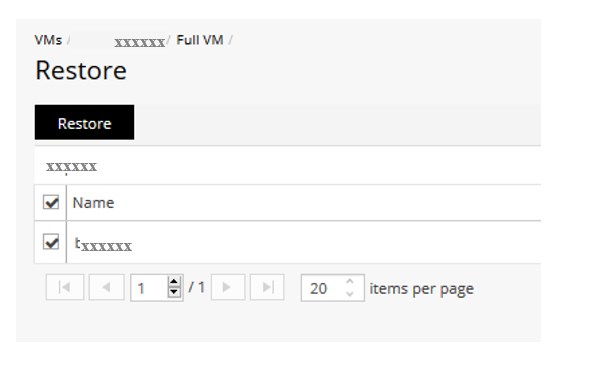
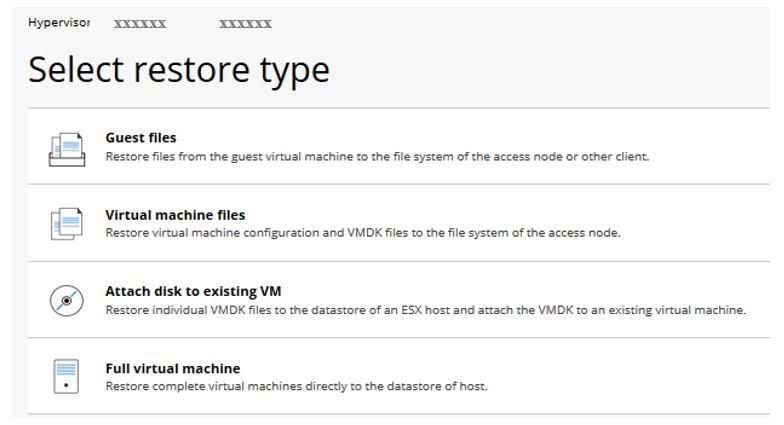
- In the Select restore type window, click on the Full virtual machine
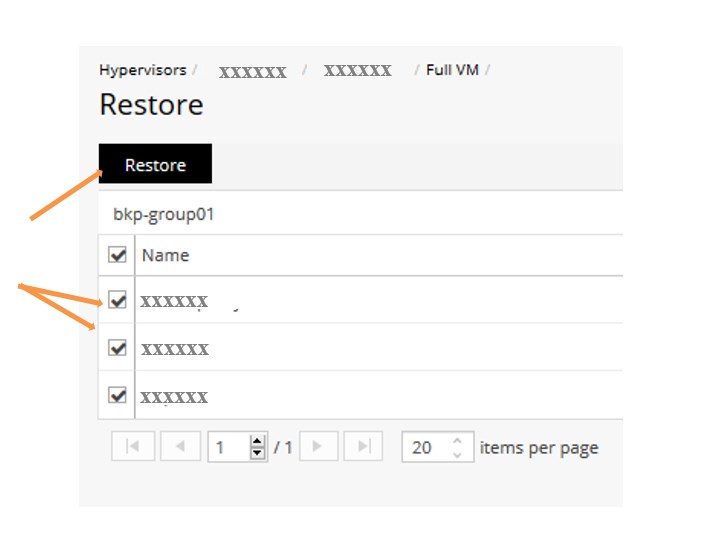
- In the Restore window, select the VMs to restore by checking their corresponding boxes, and click Restore
- For further details on the initiated restore job, click on the View jobs
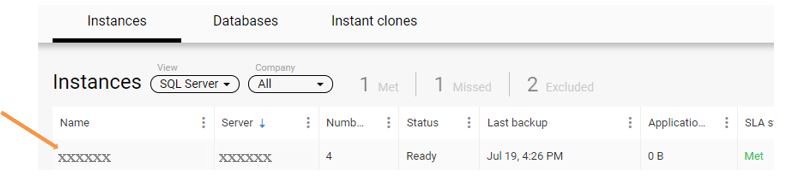
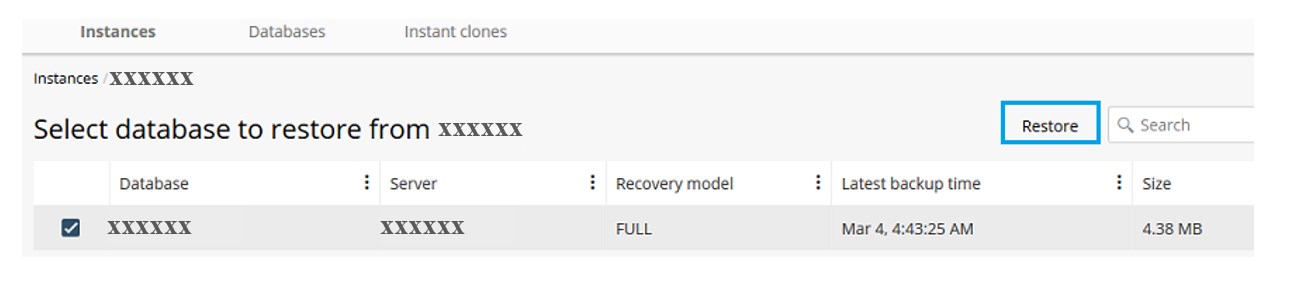
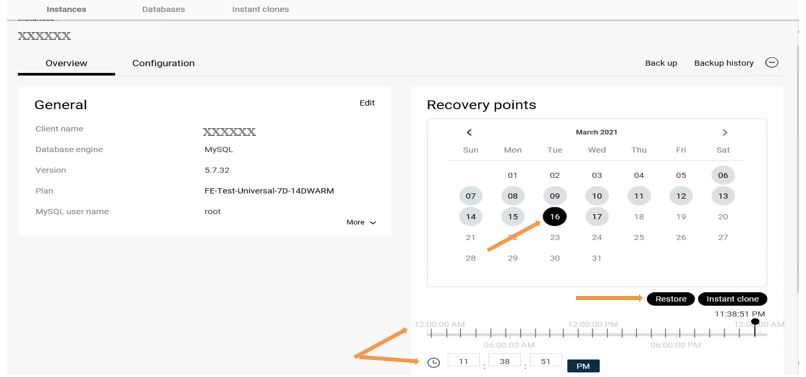
- In the FAB Backup console, Protect / Databases / Instances section:
- Find the DB Instance you wish to restore and click on its Name
- Select the Restore point and time (either by dragging the bar or specifying it) and click on Restore
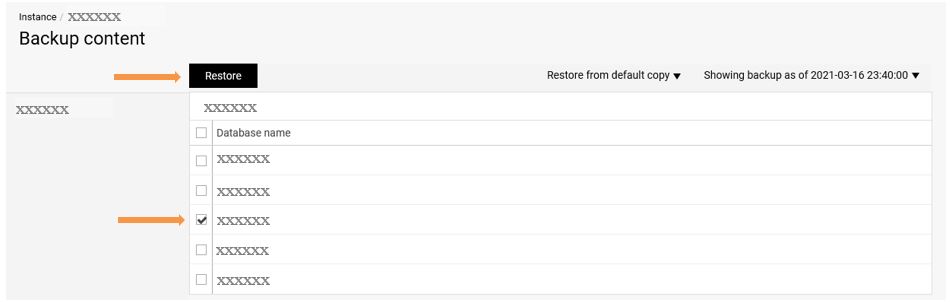
- In the database selection window, select the DB to be restored and click on the restore
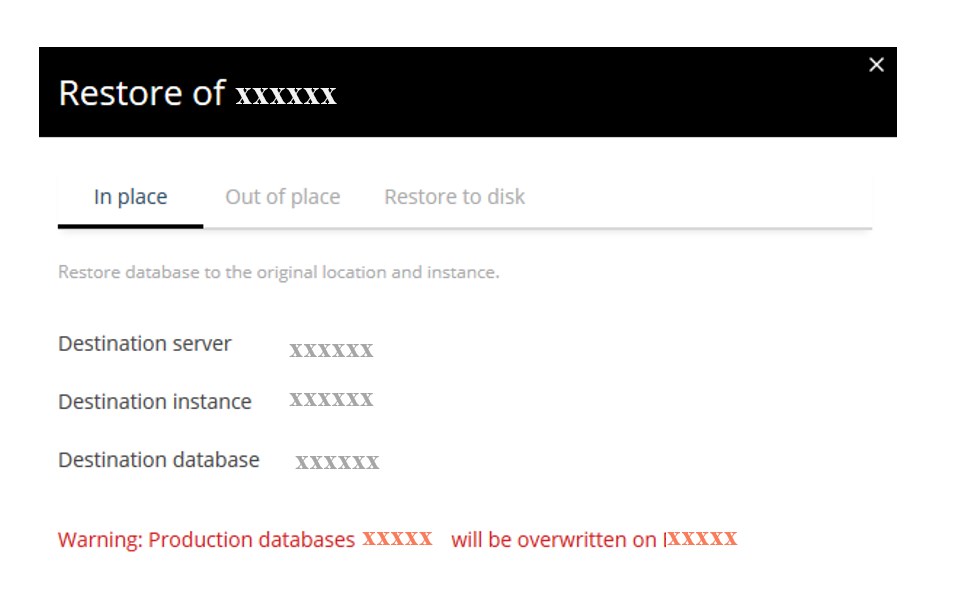
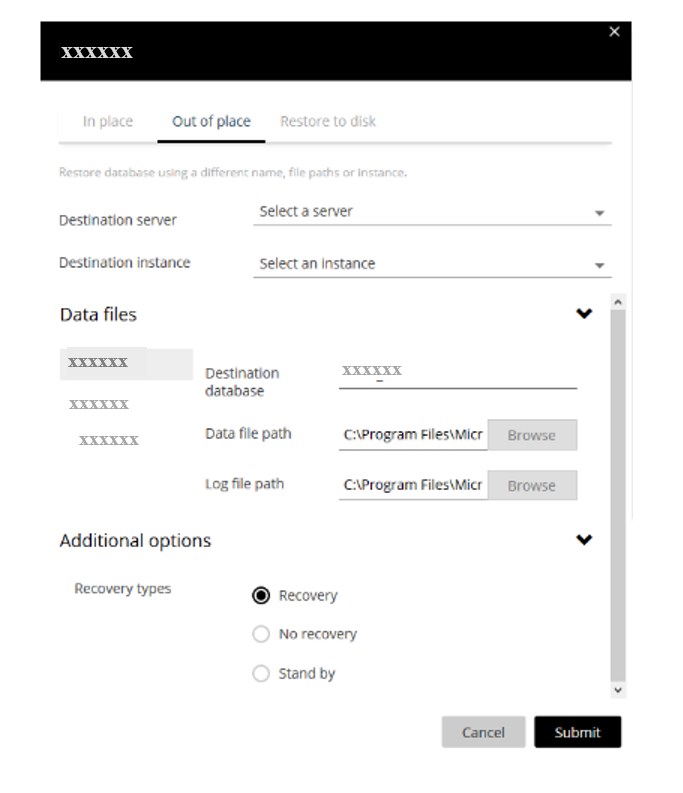
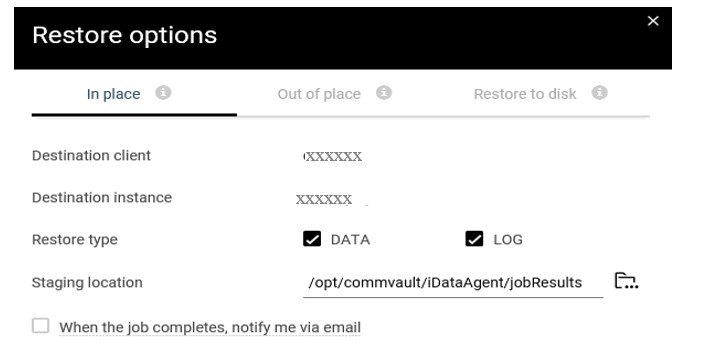
- Select the tab based upon the type of restore required (see below for explanations on each), provide the inputs and hit submit to start restoring
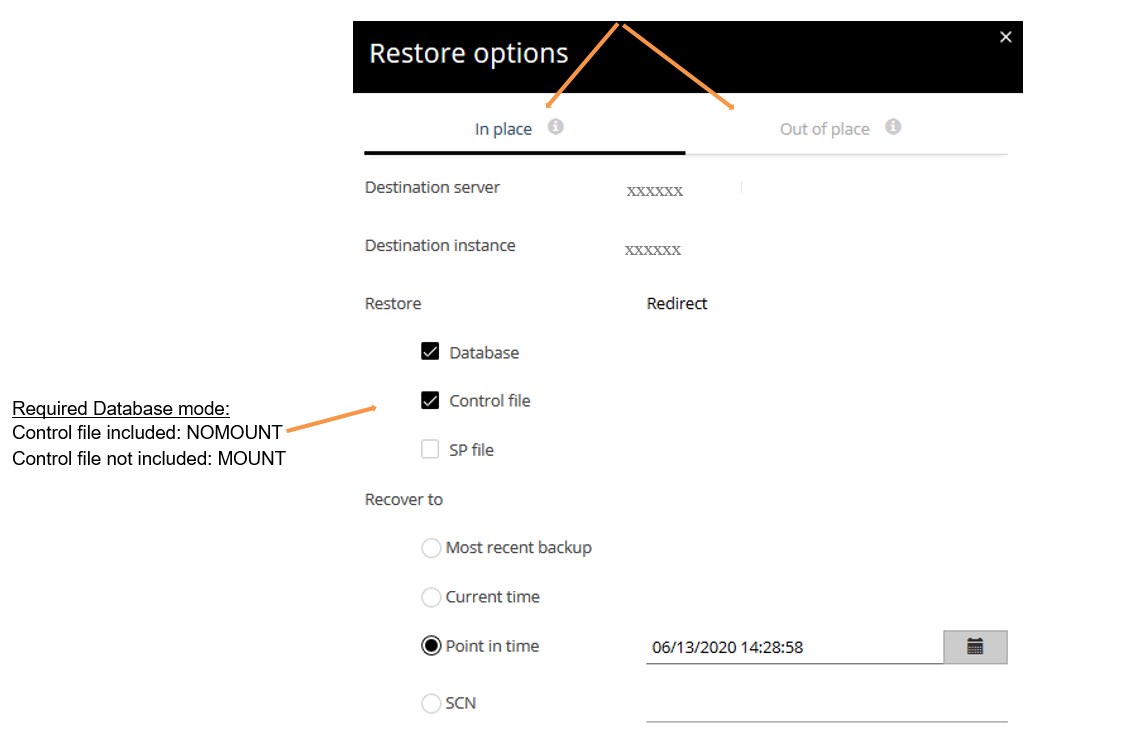
- In place restore – Restores the Database on the same server and existing database is overwritten
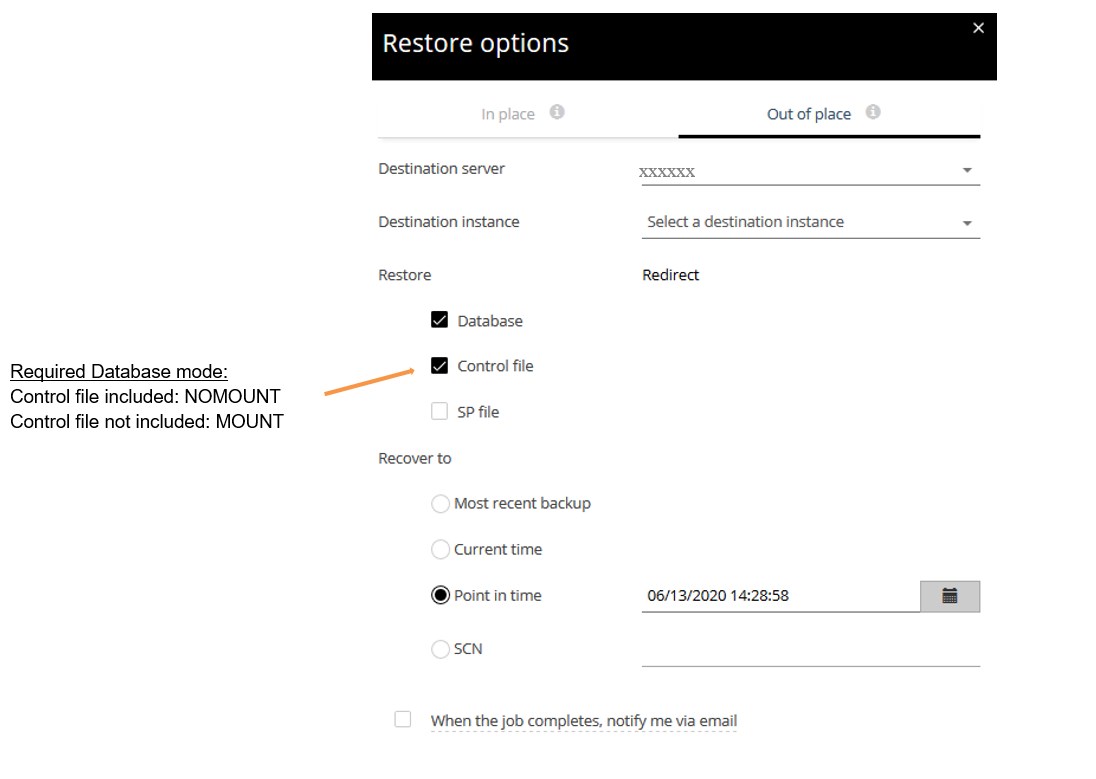
- Out of place restore – It allows to choose the destination SQL server, destination Instance, restored DB name, data file and log file location, and recovery state.
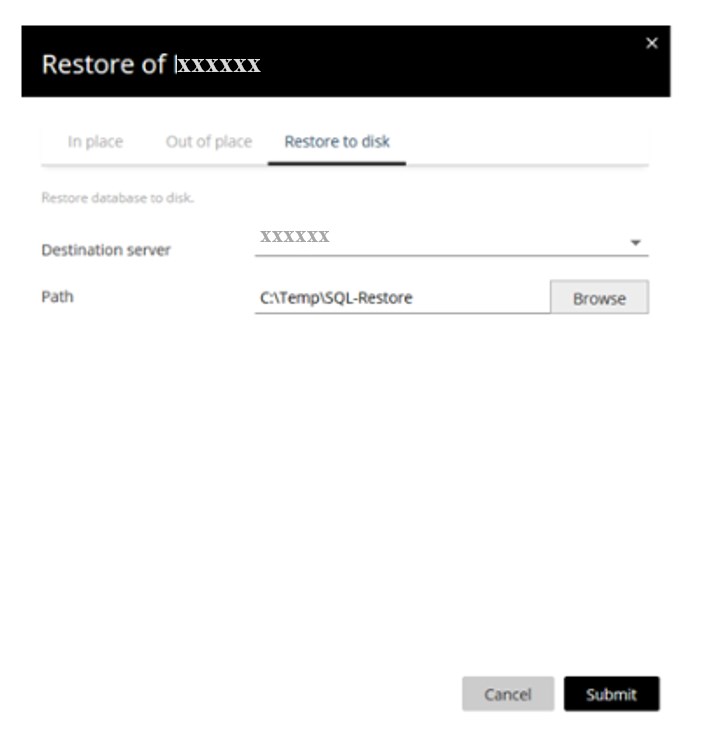
- Restore to disk – It allows restore of backed up data to a disk that is either on the same or on a different SQL Server. When you select this option, you can restore the data to the database by using third-party tools such as SQL Management Studio.
- If you require further details, click on the View jobs link
- Database
- Control file
- Individual tablespaces
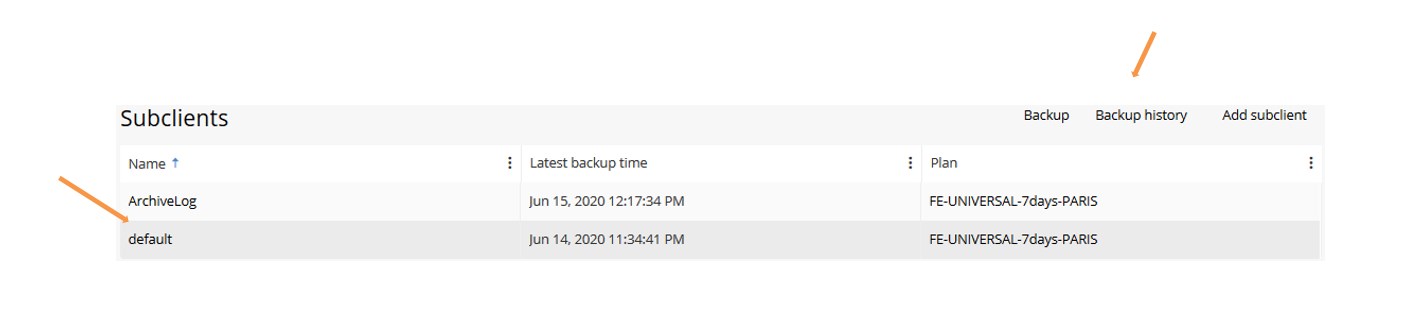
- In the FAB Backup console, under the Protect / Databases / Instances section, click on the DB Instance you wish to restore:
- select the Subclient to restore, and click on Backup history
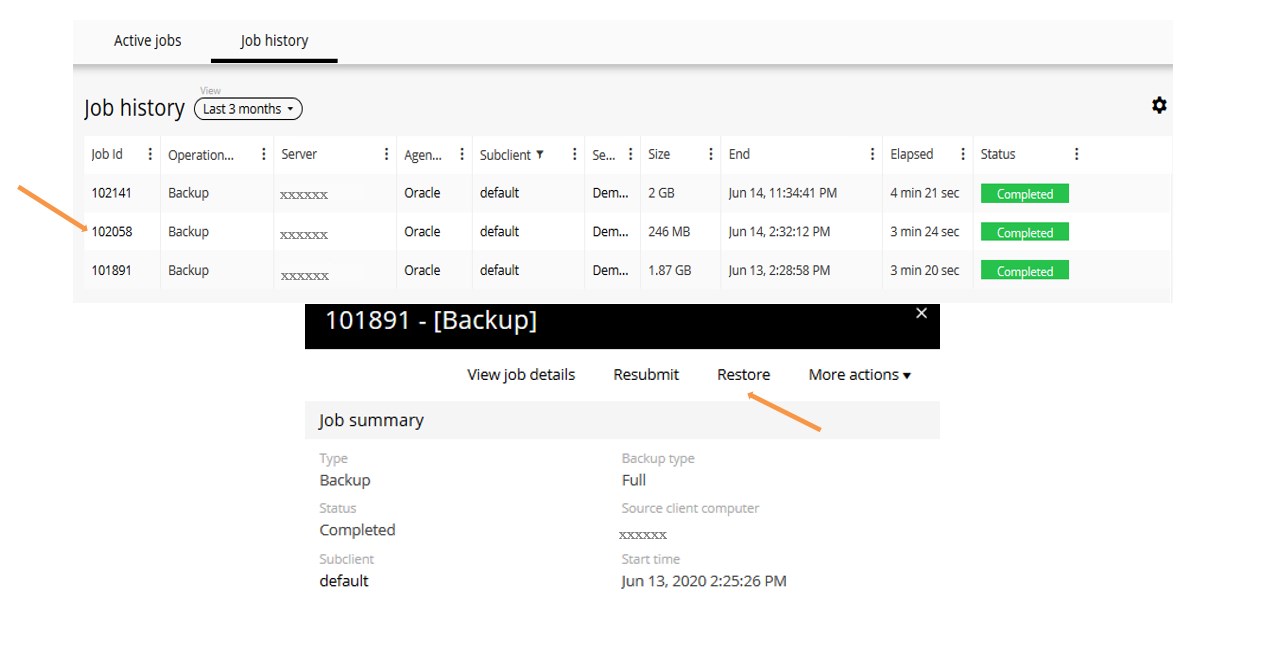
- Select the backup job to restore by clicking on its corresponding Job Id and then click Restore
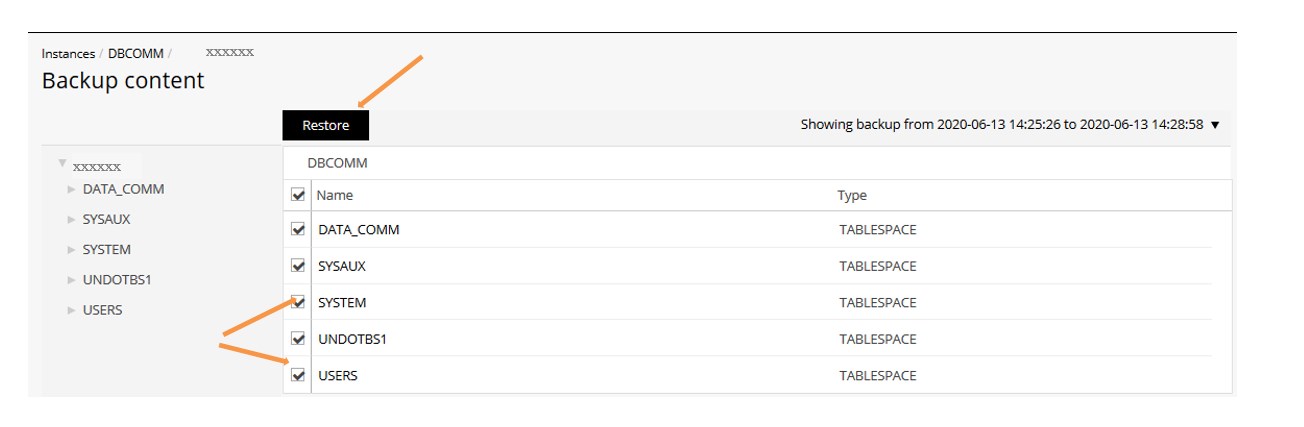
- Select the tablespace to restore and click on Restore
- Select the restore options “In place” or “out of place” (see below for explanation) to modify the rest of the procedure accordingly
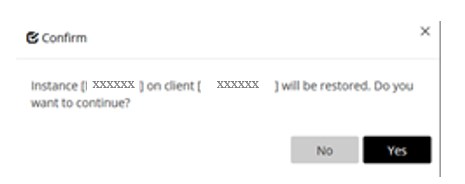
- Once the input has been provided click on Submit, and reconfirm the restore
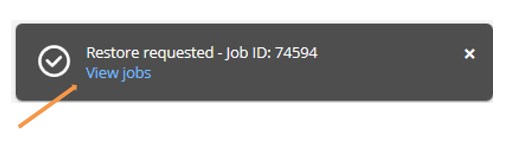
- The restore job starts. For further details, click on the View jobs
- In the job history (see the Jobs section) further details on the job can be presented by clicking on the job id. From there RMAN logs can be shown as well.
- Full database
- Control File
- Multiple stream
- Tablespace point-in-time restore
- Redirected restore using SET NEWNAME
- Put the database in MOUNT mode.
- On the RMAN command line, run the following sample script, substituting any required or optional Oracle SBT parameter
- Put the database in NOMOUNT mode.
- On the RMAN command line, run the following sample script, substituting any required or optional Oracle SBT parameter
- Include the CvClientName or CvInstanceName environment variables for the source client name in the following RMAN restore script
- Use a unique backup piece format to avoid conflicting backup piece names
- Clear the Oracle Flashback area so that RMAN uses the Commvault objects when performing the restore
- Using the FAB Backup console, the following data may be recovered:
- Database
- Logs
- For Master-slave restore: Replication between Master-slave needs to be stopped before running restore. After restore, start the replication
- In the FAB Backup console, under the Protect > Databases > Instances section, click on the DB Instance you wish to restore:
- Select the Restore point and time (either by dragging the bar or specifying it) and click on Restore
- Select the database to restore from list and click on Restore
- Select the restore options:
- Click on Submit to start the restore.
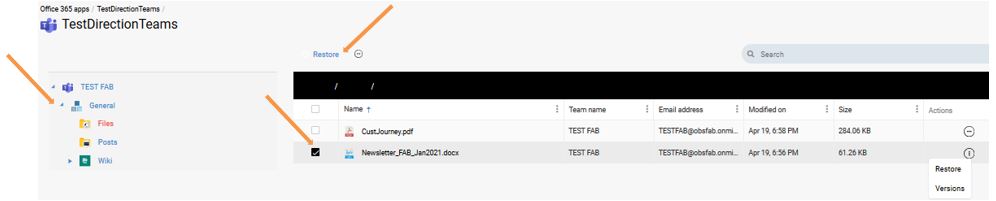
- Restore Exchange Online Mailbox
- Restore SharePoint Online sites
- Restore OneDrive user environment
- Restore a Teams environment
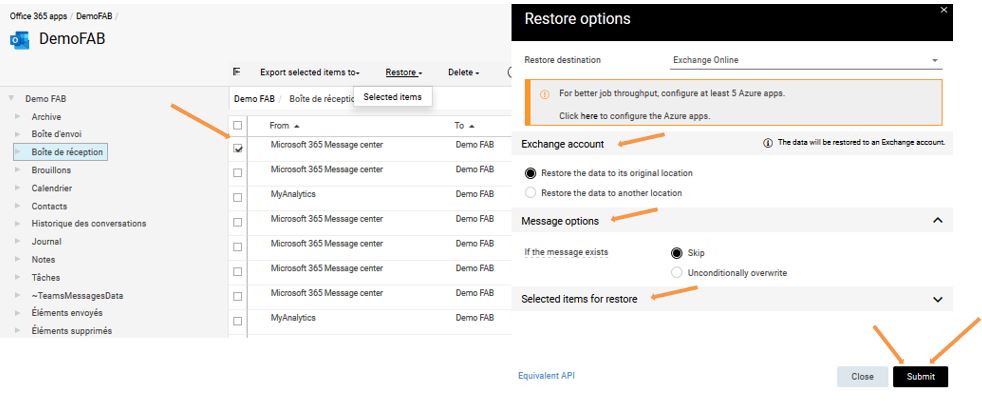
- In the FAB Backup console, Protect / Applications / Office 365 section, click on the MS 365 App name
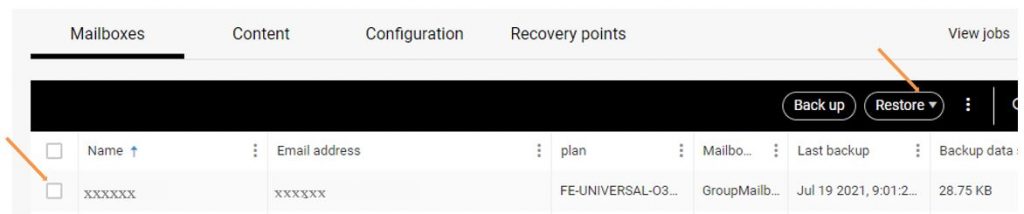
- Select the mailbox to recover, click on Restore, and select the restore type (mailbox or messages)
- For the Messages restore type, select the items (mails, folders, tasks, contacts etc.) to recover, click on Restore, then on Items in current page
- In the Restore Option window, select the required options
- Click on Submit
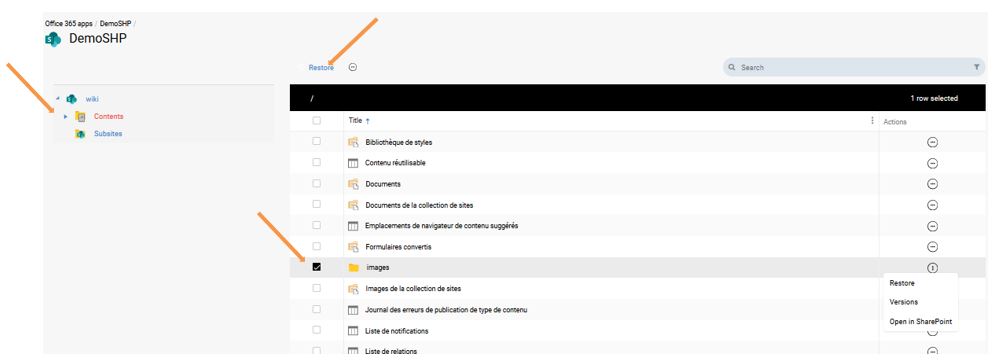
- In the FAB Backup console, Protect / Applications / Office 365 section, click on the MS 365 App name
- Select the sites you want to restore, then click Restore and choose either Restore documents or Restore sites
- If you chose the Restore documents option, Browse & Select the items to recover and click on Restore
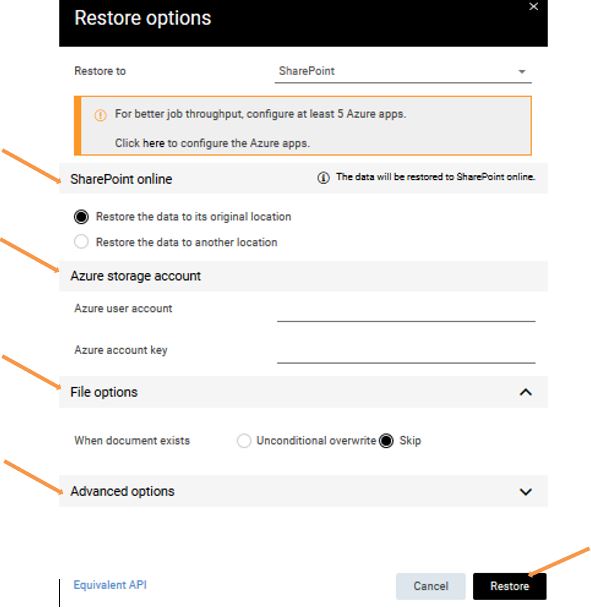
- In the Restore Option window, select the required authentication & restore options and and click on Restore
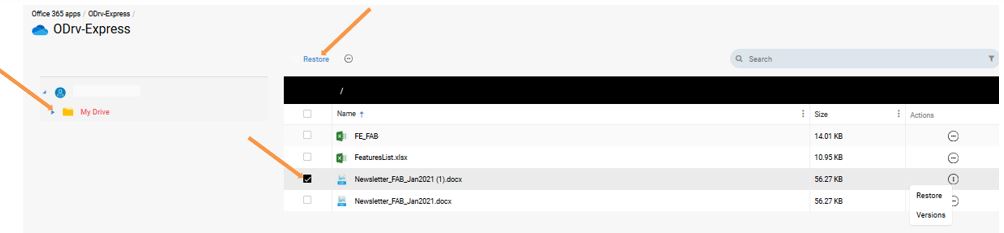
- In the FAB Backup console, Protect / Applications / Office 365 section, click on the MS 365 App name
- Select the onedrive user environment to recover, click on Restore and choose either Restore files or Restore user
- If you chose the Restore files option, Browse & Select the items to recover and click on restore
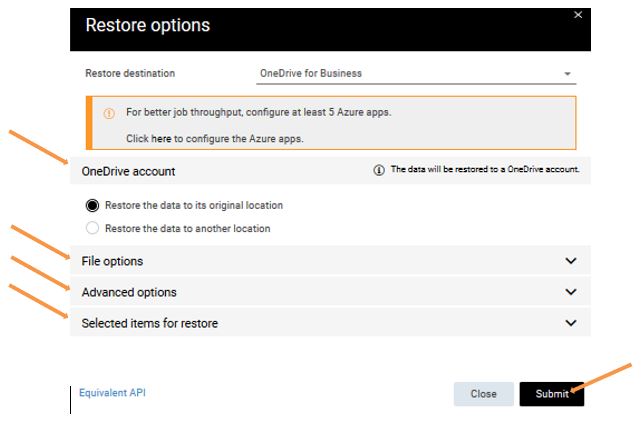
- In the Restore Option window, select the required options and click on Submit
- In the FAB Backup console, Protect / Applications / Office 365 section, click on the MS 365 App name
- Select the Teams environment to recover, click on Restore and choose either Restore item or Restore team
- If you chose the Restore item option, browse and select the items to recover and click on Restore
- In the Restore Options window, select the required options and click on Submit
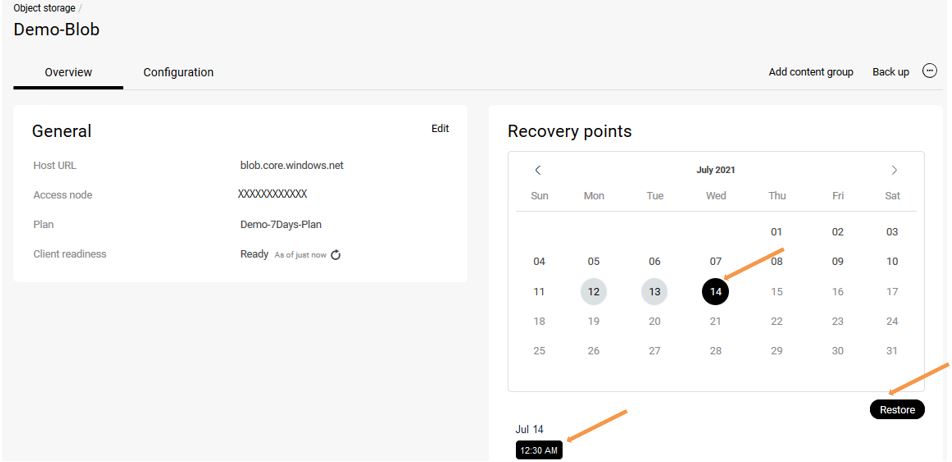
- In the FAB Backup console, Protect / Object storage section, click on the Object storage client name
- In the overview page select the Recovery point (date and time for restore) and click on Restore
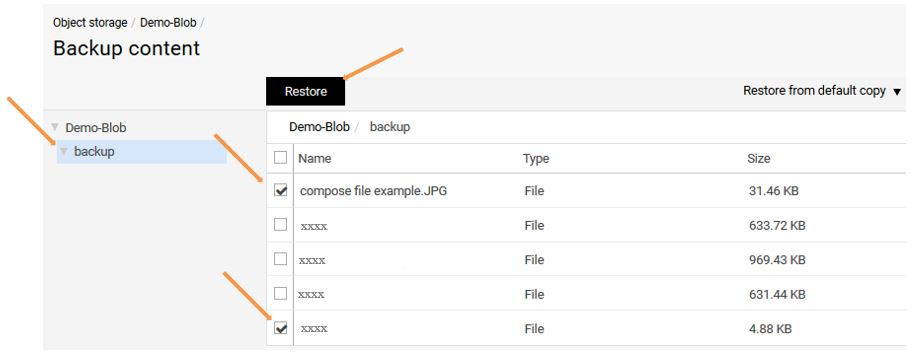
- Browse & Select the content to restore by checking the required boxes, and click on Restore
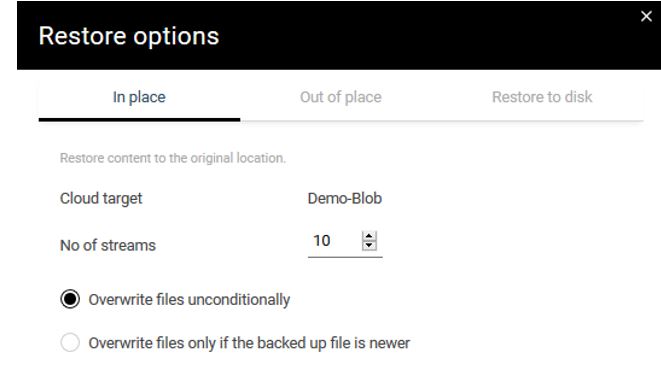
- Select the Restore Options and click on Submit to initiate the Restore
- In Place option restores to the original location (folder, bucket or container) with an overwrite policy to choose
- Out of Place option restores to a different path or to a different cloud target if configured
- Restore to disk option restores to any configured server
- If you require further details, click on the View jobs link
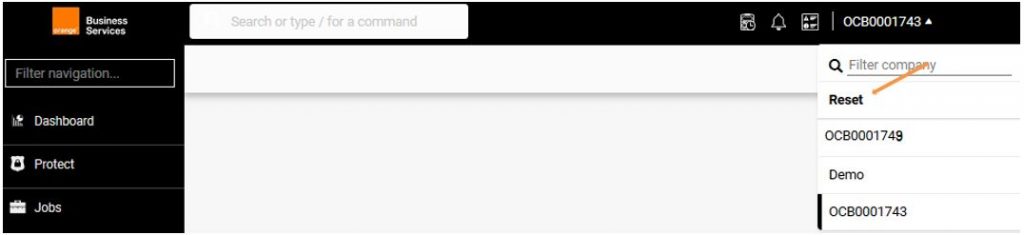
- You must have the Cust_Admin role assigned to your profile (refer to the Identity & Access Management section)
- You must have at least two Companies assigned to your FAB account
- In the FAB Backup console, Verify that no company is selected
- Perform the restore as detailed in previous sections until you are asked for Restore Options
- In the Restore Options window from the drop down menu choose the Destination client, the restore options, and click on Submit
- If you require further details, click on the View jobs link
Single VM Restore
To perform a manual restore of a single VM:
Each option is described below to guide you in the selection process:
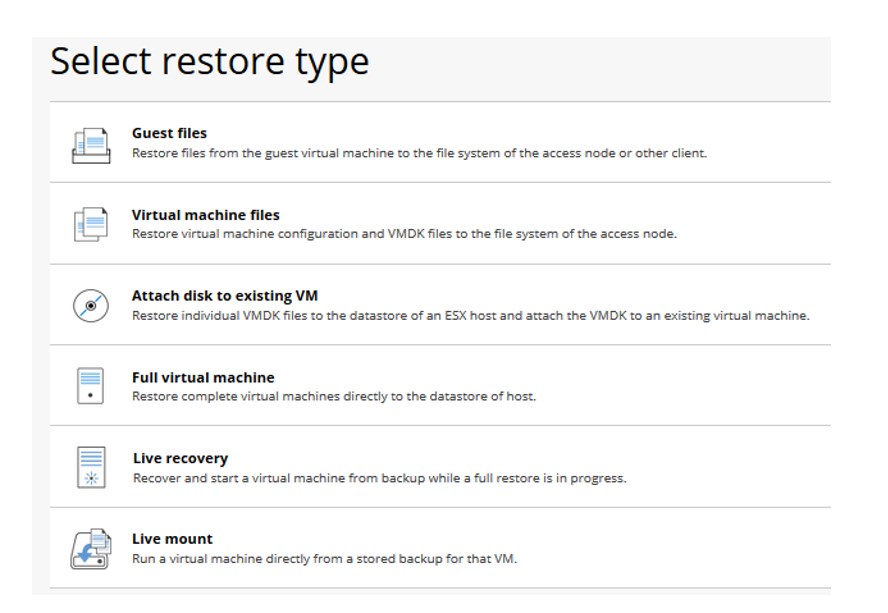
Guest files:
Restore files or folders from a virtual machine either to the original VM or to another one.
| Note: Windows VSA server can only restore windows VM files |
Virtual machine files:
Restore VMware files of a virtual machine.
| Note: Useful when a VM is running but one of its disks reports errors or some configuration has changed… |

Attach disk to existing VM:
Restore a disk from one VM to either the original VM or to another
Full Virtual Machine:
Restore complete virtual machine.
VM Groups Restore
To perform a restore of multiple VMs use the VM groups Restore as follows:
| Note: Multiple VM restores may require an adequate network bandwidth as the volume of data to transfer may be important |

Restore Oracle Database Instances
2 possibilities are given to you in order to restore your Oracle DB environment:
Restore Oracle DB via the FAB Backup console
| Notes:
Using the FAB Backup console, the following data may be recovered:
|

In Place – restore to the original server
Out of place – Restore to another server and another instance.
| Prerequisite for Out of place restore:
The destination Oracle server must already have an instance to overwrite with the data to restore
|
Restore via RMAN in command line
Oracle Recovery Manager Interface can be used to perform restores when the Commvault interface does not support the RMAN commands or options you require. This section helps you configure an RMAN restore by presenting you some possible use cases:
| Note: Using the RMAN command line, the following restores are supported:
|
SBT parameters example – PARMS=”SBT_LIBRARY=/opt/commvault/Base/libobk.so, BLKSIZE=1048576 ENV=(CV_mmsApiVsn=2,CV_channelPar=ch1,ThreadCommandLine= -cn <your server name> -cs pbaasfepacs1)”
Some restore scenarios:
Oracle Full Databases
|
run { allocate channel ch1 type ‘sbt_tape’; allocate channel ch2 type ‘sbt_tape’; restore database ; recover database; sql “alter database open”; } |
Oracle Control Files
|
run { set DBID ; allocate channel ch1 type ‘sbt_tape’; restore controlfile from autobackup ; } |
Cross-Machine or Duplicate Restore
|
allocate channel ch1 type ‘sbt_tape’ PARMS=”SBT_LIBRARY=/Base/libobk.so,BLKSIZE=1048576, ENV=(CvClientName=clientname,CvInstanceName=instance_name,CvSrcClientName=sourceclientname)”; |
Multiple Stream Oracle Restores
|
run { allocate channel ch1 type ‘sbt_tape’ PARMS=”SBT_LIBRARY=/opt/Base/libobk.so,BLKSIZE=1048576″; allocate channel ch2 type ‘sbt_tape’ PARMS=”SBT_LIBRARY=/opt/Base/libobk.so,BLKSIZE=1048576″; allocate channel ch3 type ‘sbt_tape’ PARMS=”SBT_LIBRARY=/opt/Base/libobk.so,BLKSIZE=1048576″; restore database ; recover database ; sql “alter database open”; } |
Oracle Individual Tablespace Point-in-Time restore
|
RMAN> CONFIGURE CHANNEL DEVICE TYPE ‘sbt_tape’ PARMS=”SBT_LIBRARY=/opt/Base/libobk.so, BLKSIZE=1048576″; RMAN> RUN {recover tablespace test1 until time = “TO_DATE(’02/12/2013 16:58:43′,HH24:MI:SS’)” auxiliary destination ‘/u01/tspit/’; } |
Restore MySQL Database Instances
| Notes:
|

In Place: To Restore the database to its original location:
Out of Place: To restore the database to a different MySQL server. Is needed to select the Destination instance:
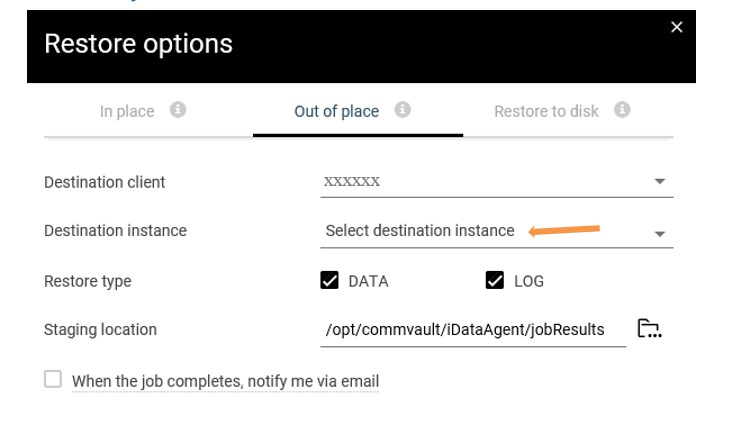
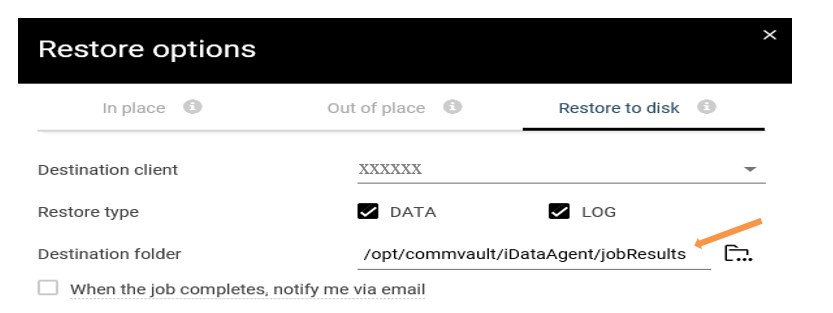
Restore to disk: To restore the database to any disk/folder on a server of yours. You can browse and define the destination folder:
| Note: For Master-slave restore: Replication between Master-slave needs to be restarted following the restore. |
Restore Hyperscalers Applications
Restore Exchange Online Mailbox
Restore SharePoint Online sites

Restore OneDrive user environment


| Note: You may restore a complete container / bucket , or select each file |
| Notes:
|

Cross Company Restore
This section describes how to perform a restore from a given client in one FAB Company to another client in another FAB Company
| Prerequisites:
|

If a company is selected then click Reset from the drop down menu and wait for the page to refresh