Cloud Avenue Wiki
-
Overview
-
Practical sheets
-
- Add a NetBackup User
- Backing up a VM
- Backup : Agent-Level B&R via NSS for IAAS offer
- Checking Backup Prerequisites
- Daily Reporting
- Deleting a VM Backup
- Identifying Your Backup Master Server
- NetBackup Portal
- NSS Home Page
- NSS Swagger APIs
- Restoring a VM
- Troubleshooting Netbackup Errors
- VM Agent Restoration Mode
-
-
- Aucun article
-
-
- Aucun article
-
-
-
- Backup : Agent-Level B&R via NSS for IAAS offer
- Backup : Create VCOD Backup
- Backup : Netbackup Agent Installation for Linux
- Backup : Netbackup Agent Installation for Windows
- Backup : Overall Design for VCOD Offer
- Backup : User's Guide for VCOD Offer
- NSX-T : Configuring a Distributed Firewall
- NSX-T : Create VPN Ipsec
- NSX-T : Creation of T1
- NSX-T : DNAT configuration
- NSX-T : How to configure a Gateway Firewall
- NSX-T : SNAT configuration
- NSX-T: Create and Configure a Geneve Overlay Segment
- NSX-T: How to configure an IPSEC solution
- vCenter : Clone a VM
- VCenter : Create a new VM
- VCenter : Create a snapshot of a VM
- VCenter : Reset cloudadmin password
- VCenter : Storage Vmotion on a VM
- VCenter : Upgrade Vmware tools on a VM
-
-
Q & A
-
Services
-
-
- Aucun article
-
- Aucun article
-
- Aucun article
-
- Aucun article
-
- Aucun article
-
- Aucun article
-
- Aucun article
-
-
-
- Aucun article
-
- Aucun article
-
- Aucun article
-
-
-
- Aucun article
-
- Aucun article
-
-
NSX-T : SNAT configuration
- Configuration of SNAT in NSX-T to access internet from Tenant VM.
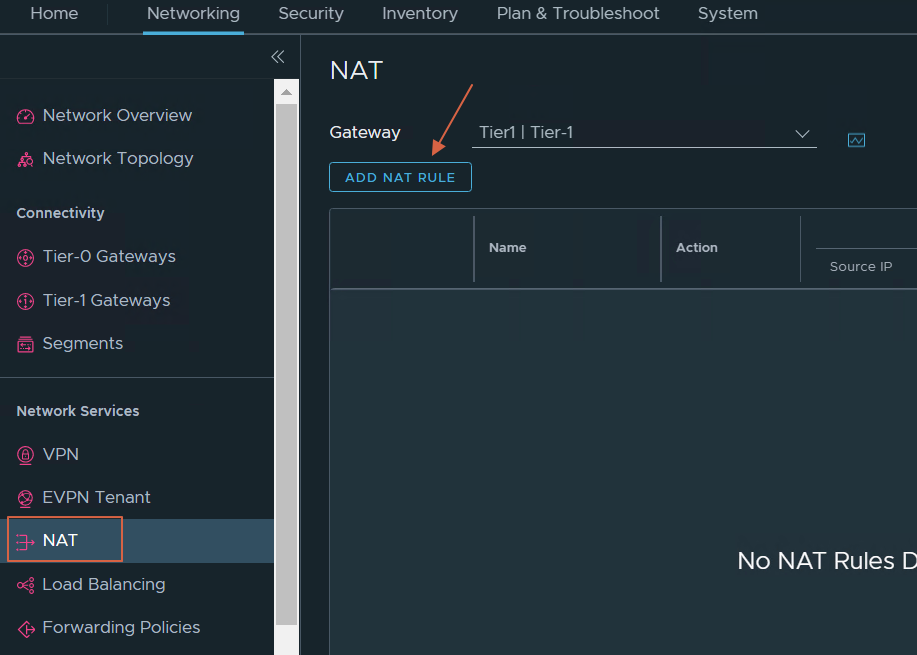
- Login to NSX Manager and select “Networking” from Top Menu.
- Select the NAT sub menu under Network Services from the left Hand side.
- Select Gateway(Tier-1) on which the NAT rule need to be applied.
- Click on “ADD NAT RULE” from the right hand side Menu.
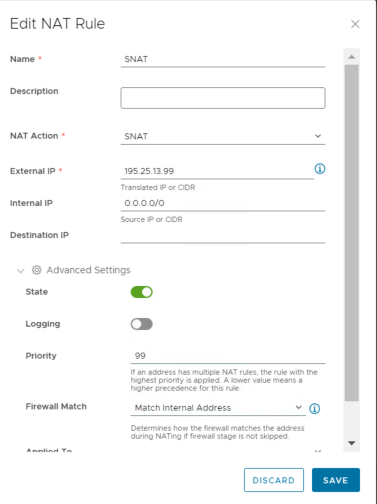
- Now fill the mandatory fields to create SNAT.
- Provide Name, Action, Source/Destination/Translated IP for SNAT.
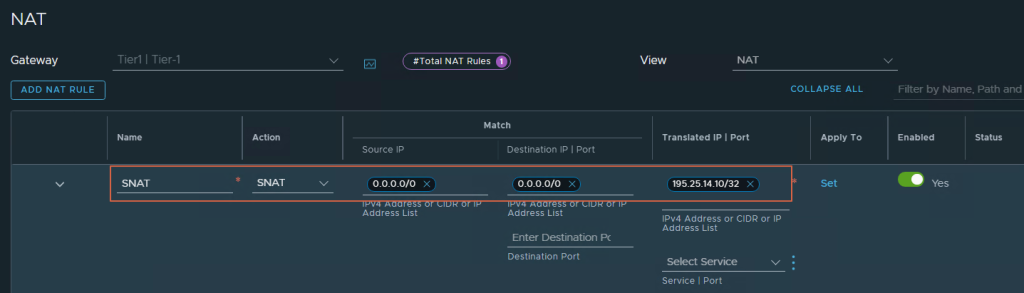
- Click Save.
- Below are the steps for Configuration of SNAT from VCD(vCloud Director) to access internet from Tenant VM.
- Login to VCD tenant as org admin.
- Go to “Networking” Menu Click “Edge Gateways” sub Menu.
- Select the Edge Gateway on which SNAT need to be configured.

- Now click on “NAT” under “Services” Menu on the left hand side.
- Click “NEW“.

- Provide the name for NAT rule.
- NAT Action as SNAT.
- External IP would be the public IP.
- Internal IP would be the Internal range/subnet/IP of Tenant.
- You may provide Destination IP if applicable.
- To make the rule active, leave the State to default.
- You may optionally modify rest of the options as per the need or leave it to default.
- Now click “SAVE”.
- SNAT rule is now created successfully.