Protect your website with Dedicated WAF
Introduction
In this document, we will describe how to protect a website hosted on Flexible Engine using the following components :
-
ECS – To host the website (using NGINX)
-
DNS – Public zone to bind certificate
-
-
Dedicated WAF – Protect web site from attack
Create Dedicated Web Application Firewall
On flexible Engine homepage select : Dedicated WAF Application Firewall
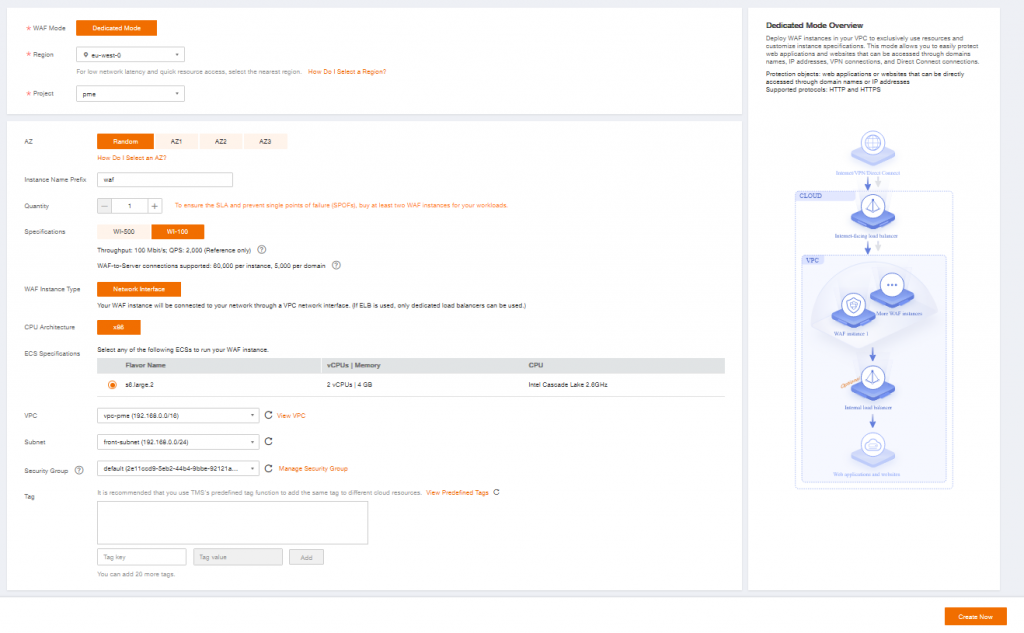
Apply for a Dedicated Engine
To keep high availability, it is recommended to use at least 2 WAF instances on 2 different AZ. For our example we will only configure one. Others can be added on demand later.
Specifications will depend on the traffic and the expected load
| For 1 WAF | WI-500 | WI-100 |
| Throughput | 500 Mbit/s QPS: 10 000 | 100 Mbit/s QPS: 2 000 |
| WAF-to-Server connections supported | 60 000 per instance 5 000 per domain | 60 000 per instance 5 000 per domain |
Add instance name prefix
Select your VPC, Subnet and Security Group
Then click on Create now
Once your WAF instance is created, go to Instance Management and note the IP Address (ex : 192.168.0.165), it will be needed to configure the listener of the Elastic Load Balancer.
Please note that Access Status should be Inaccessible as no website and load balancer are configured yet.
Create Dedicated Elastic Load Balancer
To expose our service on Internet and add resiliency we will created a Dedicated LoadBalancer
On Flexible Engine homepage, In Network, Select Elastic Load Balancer
Created Elastic Load Balancer and select Dedicated
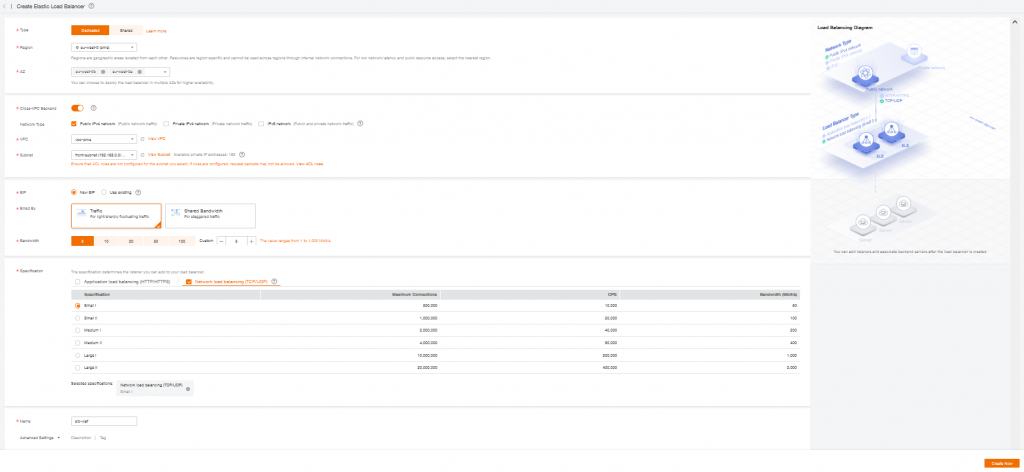
Select one or more AZ for higher availability
Enable Cross-VPC Backend
Select your VPC and Subnet where Dedicated WAF is deployed
Create or used an Existing Elastic IP (public IP)
Select Network Load Balancing, and choose specifications regarding your network needs.
Add a Name and finally click “Create Now”
Once your Elastic Load Balancer instance is created, go to Instance Management and note the Elastic IP Address (ex : 90.168.1.165), it will be needed to configure the DNS records later.
Add a listener
In Network Console, Select your Elastic Load Balancer
Add a Listener and select your Frontend Protocol (port which the ELB will listen on).

Create a new Backend Server Group, Enable Health Check then click on Finish.

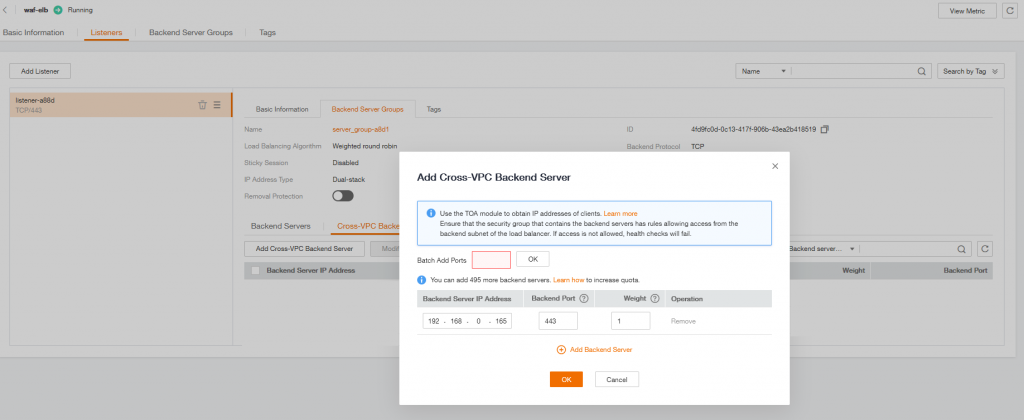
Add WAF instance to Backend Server Group
In your Backend Server Group select Cross-VPC Backend Servers
and your WAF Intance IP and Backend Port (which corresponds to your client protocol on WAF).
Configure Domain Name Service
Generate Certificate with Certbot on ECS
On an Elastic Cloud Server

First install Certbot on an Ubuntu (or other OS) server :

sudo apt install certbot python3-certbot-apache

more information about Certbot here : https://certbot.eff.org/instructions

Generate a certificate for our DNS Service

sudo certbot -d api.fe.cloud101.fr --manual --preferred-challenges dns certonly
Deploy DNS TXT record
After entering the previous command you will be provide a DNS TXT entry to add to your DNS :
Saving debug log to /var/log/letsencrypt/letsencrypt.log
Plugins selected: Authenticator manual, Installer None
Obtaining a new certificate
Performing the following challenges:
dns-01 challenge for api.fe.cloud101.fr
- - - - - - - - - - - - - - - - - - - - - - - - - - - - - - - - - - - - - - - -
NOTE: The IP of this machine will be publicly logged as having requested this
certificate. If you're running certbot in manual mode on a machine that is not
your server, please ensure you're okay with that.
Are you OK with your IP being logged?
- - - - - - - - - - - - - - - - - - - - - - - - - - - - - - - - - - - - - - - -
(Y)es/(N)o: Y
- - - - - - - - - - - - - - - - - - - - - - - - - - - - - - - - - - - - - - - -
Please deploy a DNS TXT record under the name
_acme-challenge.api.fe.cloud101.fr with the following value:
I5pZYMm4hIriogbvysKnh7jY0JjmpNOavqmQGSpX1iM
Before continuing, verify the record is deployed.Let’s go back to Flexible Engine Console :
-
in Domain Name Service
-
Select public zone
-
Edit your Domain Name
-
Add Record Set
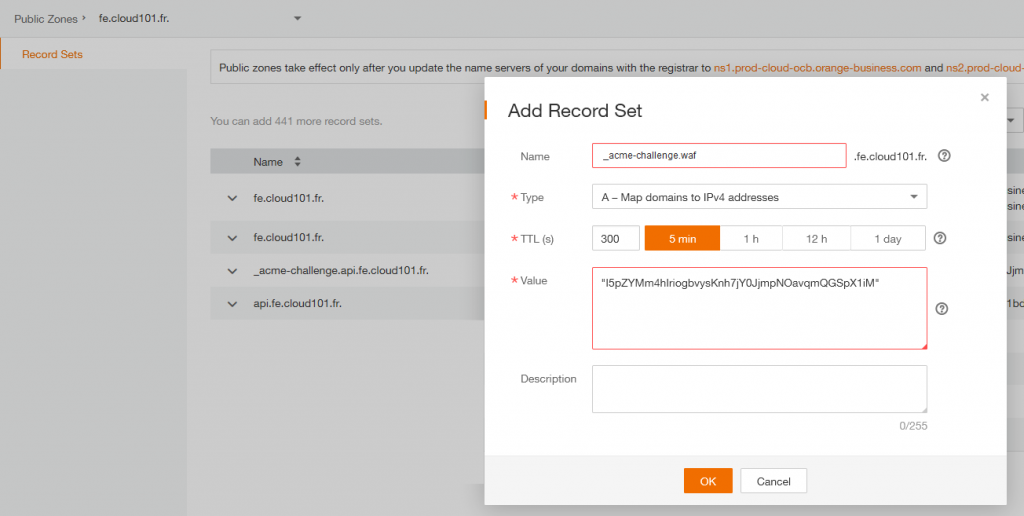
Name : _acme-challenge.api.fe.cloud101.fr
Value : “I5pZYMm4hIriogbvysKnh7jY0JjmpNOavqmQGSpX1iM”
Important : you need to add quotes to the value
Now that the record is set, we can go back to your ECS and certbot to continue the procedure and press “Enter” to continue.
Note the folder were the certificates are store, we will need it to add the certificate to the API Gateway Domain Name.
IMPORTANT NOTES:
-
Congratulations! Your certificate and chain have been saved at: /etc/letsencrypt/live/api.fe.cloud101.fr/fullchain.pem Your key file has been saved at: /etc/letsencrypt/live/api.fe.cloud101.fr/privkey.pem Your cert will expire on 2022-10-11. To obtain a new or tweaked version of this certificate in the future, simply run certbot again. To non-interactively renew all of your certificates, run “certbot renew”
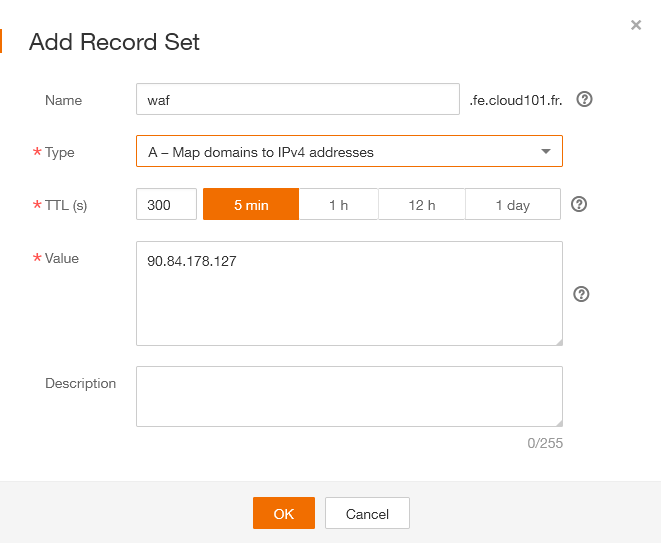
Add A record
As we are configuring the DNS, we will add a A record to map the URL to the Elastic IP of our Load Balancer
Configure Dedicated WAF certificate
Add SSL Certificate
Object -> Certificates -> Upload Certificate
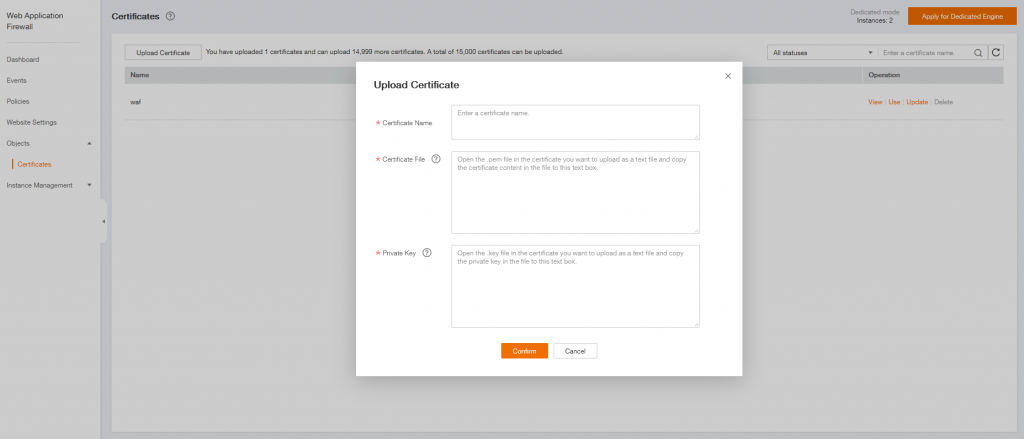
Add a Certificate Name

on your ECS server, display the content of the Certficate file :

sudo cat /etc/letsencrypt/live/waf.fe.cloud101.fr/fullchain.pem

and past it to Certificate content on Dedicated WAF

then do the same for the Private Key

sudo cat /etc/letsencrypt/live/waf.fe.cloud101.fr/privkey.pem

and past it to Certificate content on Dedicated WAF
Create Website Settings
Click on Website Settings and Add Website
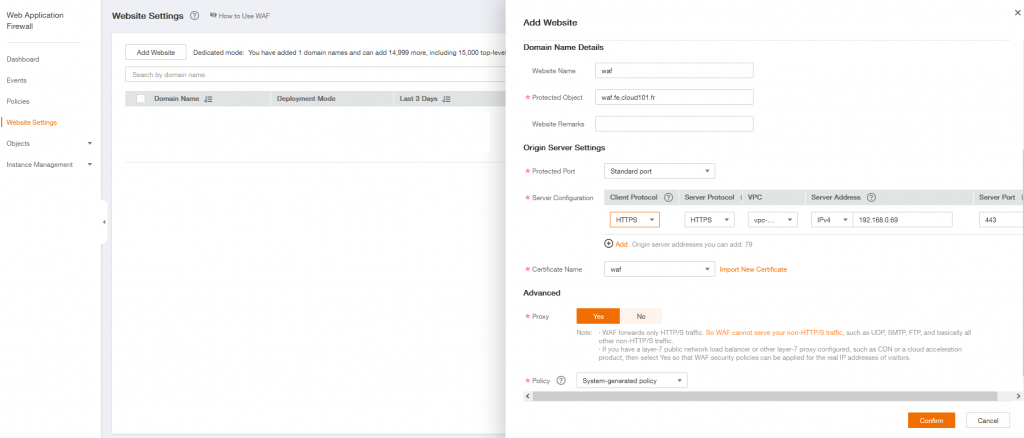
Add a Website Name
Add your website URL in Protect Object
In Server Configuration :
Client Protocol correspond to the protocol used when a client requests access to the origin server.
Server protocol is used when WAF forwards client requests to the origin server.
In the previous example, we use HTTPS for both protocols and Server Address is the ECS Private IP address which will host our website.
And finally Confirm your configuration
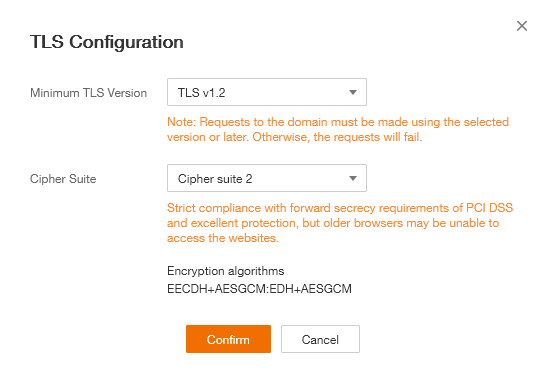
TLS Configuration
To be compliant with the latest security standard now let’s customize the TLS configuration.
In Website Settings, click on your Domain Name, ex : waf.fe.cloud101.fr
Edit TLS Configuration and Select TLS v1.2 and Cipher Suite 2
Configure Webserver
On your ECS, copy the certificate files generated with certbot to a new directory :
mkdir /etc/ssl/nginx
sudo cp /etc/letsencrypt/live/waf.fe.cloud101.fr/fullchain.pem
sudo cp /etc/letsencrypt/live/waf.fe.cloud101.fr/privkey.pem

Edit NGINX default site configuration file and add the following files :

server {
        listen 80 default_server;
        listen [::]:80 default_server;
        listen 443 ssl;
        ssl_certificate /etc/ssl/nginx/fullchain.pem;
        ssl_certificate_key /etc/ssl/nginx/privkey.pem;

Restart NGINX service :

sudo systemctl restart nginx
Test
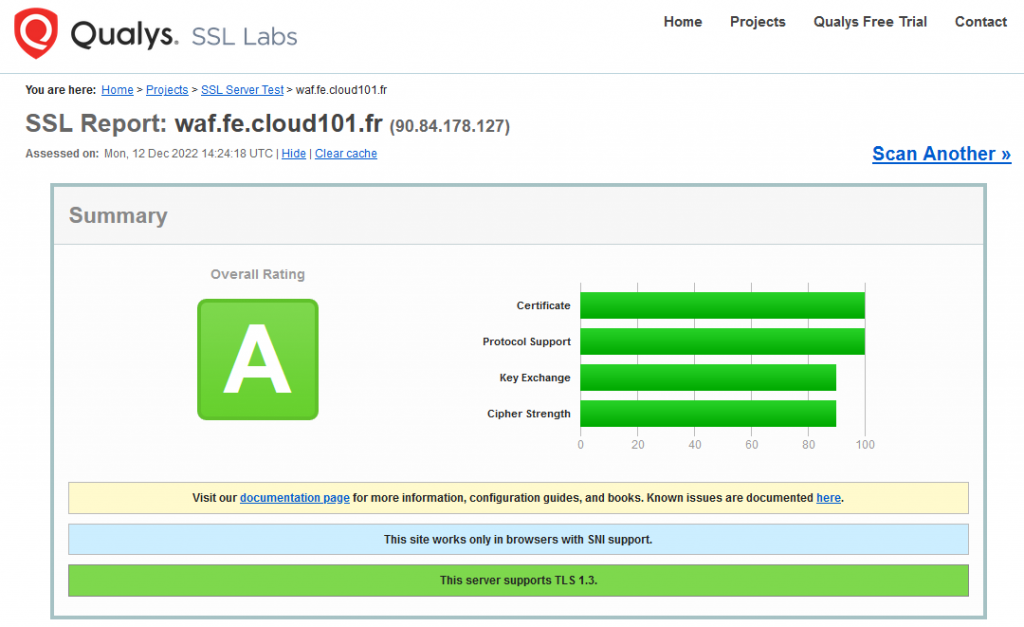
Verify your SSL, TLS & Ciphers implementation
SSL verification is necessary to ensure your certificate parameters are as expected. There are multiple ways to check the SSL certificate; however, testing through an online tool provides you with much useful information listed below.
is one of the most popular SSL testing tools to check all the latest vulnerabilities & misconfiguration.
-
Certificate issuer, validity, algorithm used to sign
-
Protocol details, cipher suites, handshake simulation
Go on SSL Labs site and test your URL, you should get A rating.