Migration guide for ECS using local disks
Context
Usually, ECS rely on Elastic Volume Service (EVS) to provide System disk & Data disk
There is some exceptions where some local disk are used for some specific use case.
The subject of that article is to handle that situation from a migration point of view.
List of ECS using local disks
| Service | Type |
Name |
Local disk configuration |
For |
| ECS | Disk Intensive |
d2 d3 d6 |
From 2 to 24*1.8TB From 2 to 28*1.8TB From 2 to 36*7.4TB |
Data disk Data disk Data disk |
| ECS |
Ultra-high I/O |
i3 | From 1 to 12*1,8TB | Data disk |
Limitations
In such case,
- ECSs cannot be migrated when the physical server becomes faulty,
- ECSs do not support specifications modification.
- ECSs do not support local disk snapshots or backups.
- ECSs can use local disks, and can also have EVS disks attached to provide a larger storage size. Note the following when using the two types of storage media:
- Only an EVS disk, not a local disk, can be used as the system disk of ECS.
- Both EVS disks and local disks can be used as data disks of ECS.
How to migrate ECS (d & i series) with local disks
There is many way to initiate ECS to ECS migration in such situation. In any case, because local disk of the ECS is not EVS based
- User can’t rely on a one step action through a full ECS backup/restore with CBR Server backup, nor with some ECS resizing feature.
- User should adapt the proposed process below, integrating some operation inside the ECS, ate the Operating Syetem level, depending on it (mainly Windows versus Linux)
We can consider some Flexible Engine services to help for the migration. Mainly 2 services are scoped for that
- Server Migration Service SMS, design to migrate any workload from on VM (on premise or in the cloud) to an ECS can be used
- Cloud Backup & Recovery CBR, the Flexible Engine backup service can be useful, for any EVS of the ECS (mainly the system disk)
Migrating ECS with SMS
Server Migration Service (SMS) helps user migrate applications and data from x86 physical or virtual servers on premises or in another cloud to Elastic Cloud Servers (ECSs) on Flexible Engine. SO the source Virtual Machine can be an ECS as well.
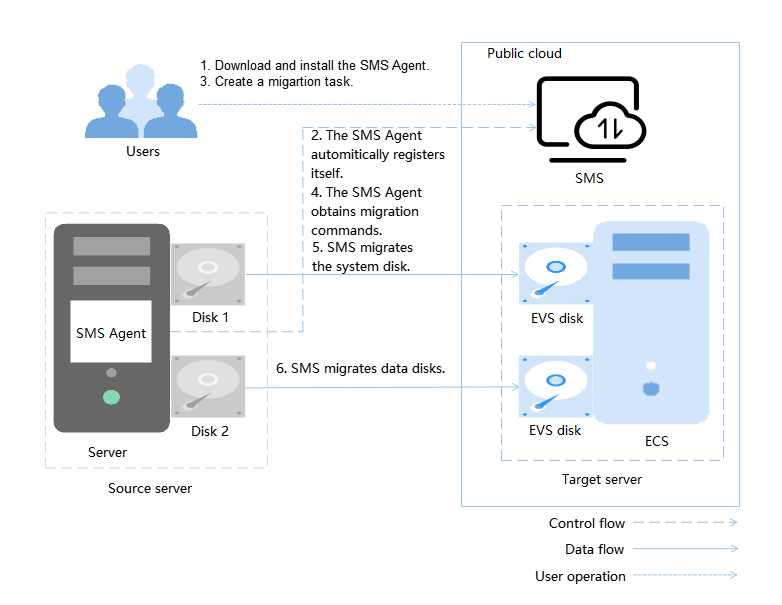
The SMS concept is to install in the source machine an SMS Agent to replicate the full disk (system & data disks) to a target server
As illustrated on the diagram, the source server is an ECS & some EVS disks (for system & Data), so the proposed process will :
- replicate the source EVS disk for system to EVS system disk
- replicate all the source EVS disks for Data if any exist, to EVS data disks
- replicate all the source local disks for Data if any exist, to EVS data disk
Note that the SMS migration will not provide an iso situation for local disk, since SMS is not able to replicate source local disk to target local disk
Then, after using SMS to replicate the ECS, Admin user shoud add a step to replicate locally to the target ECS the EVS data disk to loca disk, as it was configured in the source ECS.
So let consider the following situation : as user, I want to migrate my ecs-i3-source ECS from eu-west-0c to eu-west-0a

So the proposed migration path to do that is as follow
| Step 1 |
Install SMS agent onto the current ECS
Connect Flexible Engine to check the status of ICAgent. After started ICAgent, the SMS Console should show the ECS as a possible source to replicate
|
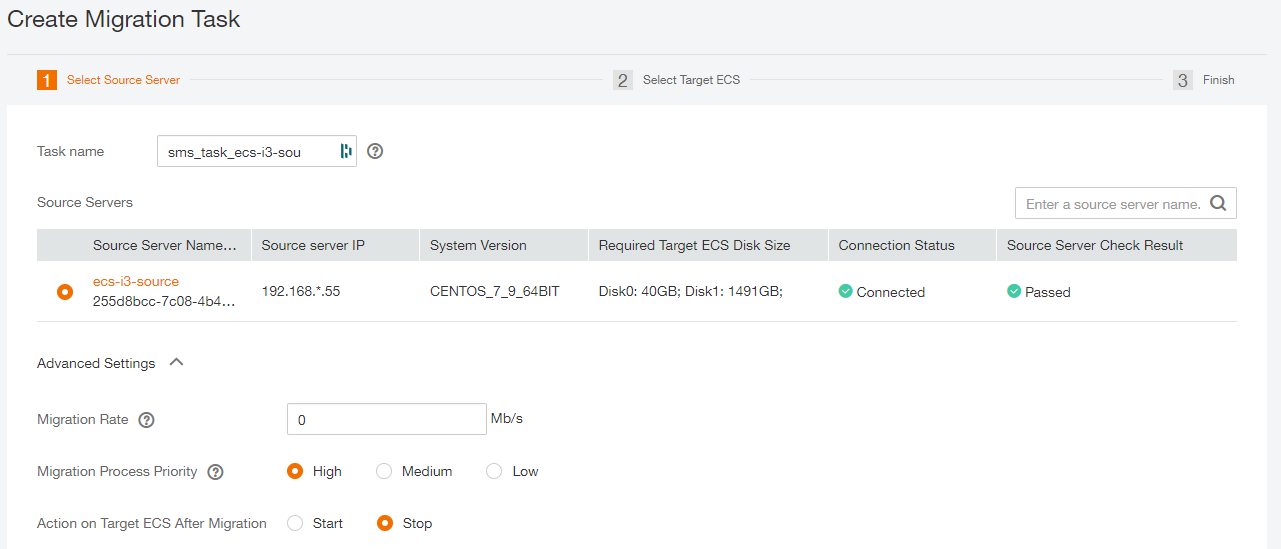
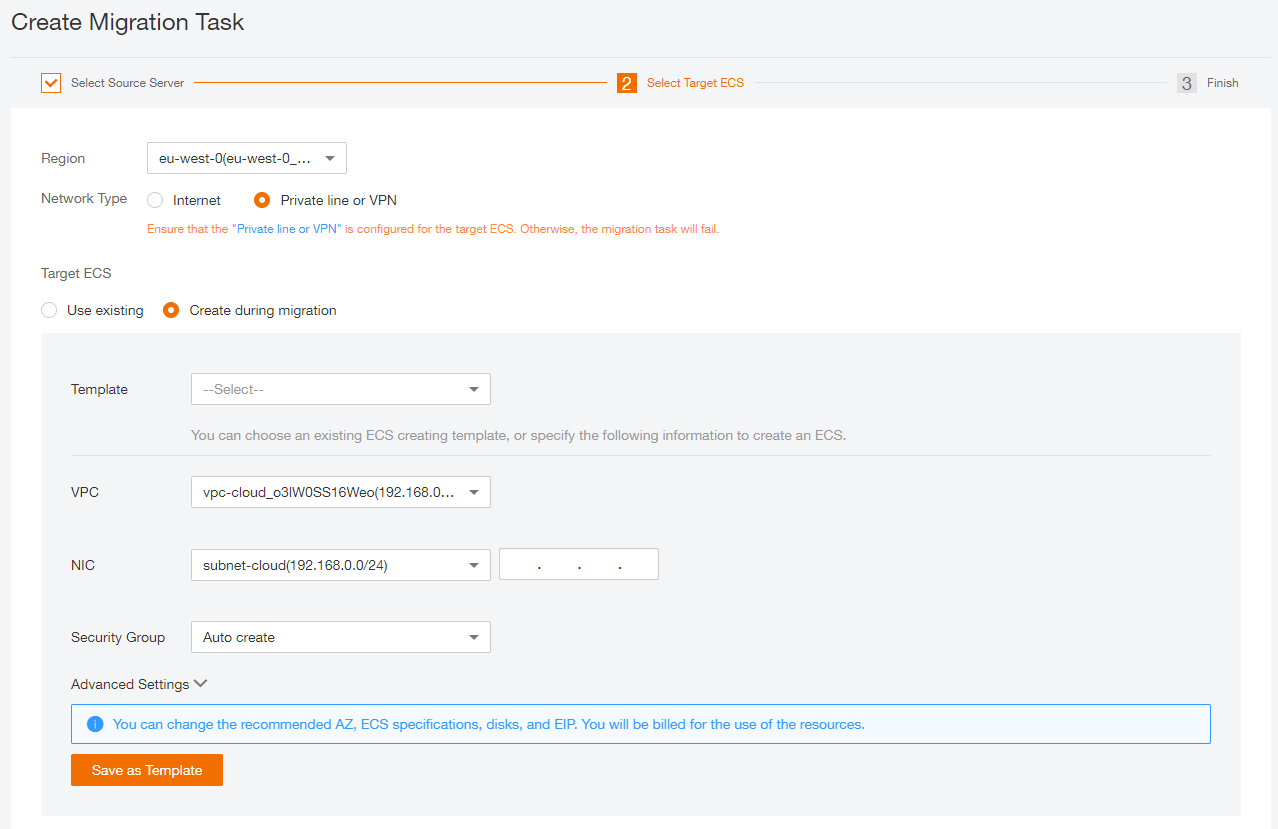
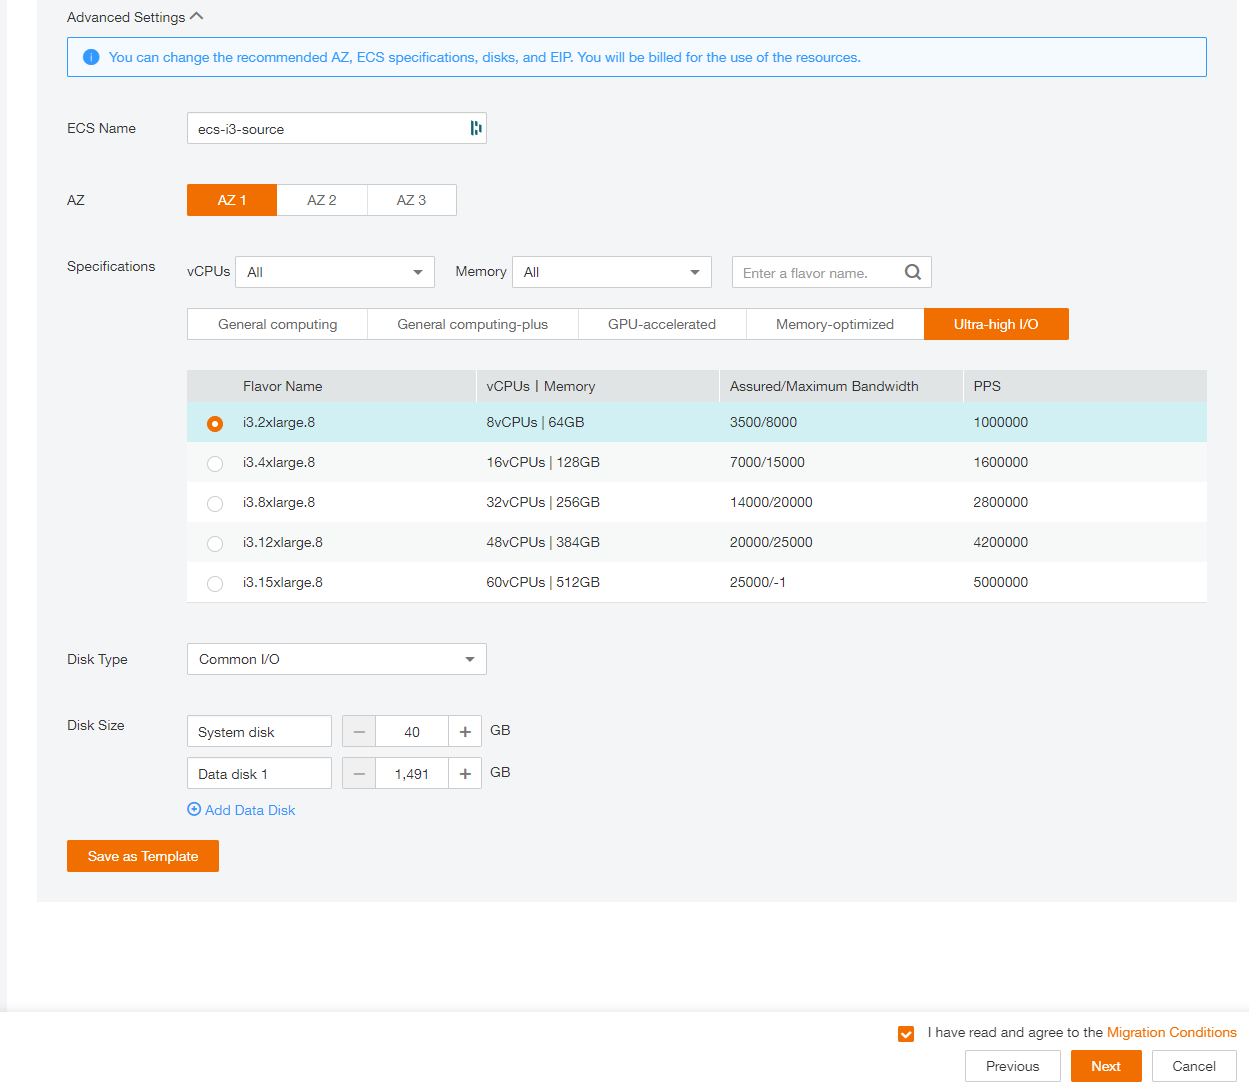
| Step 2 |
Create the migration task, targeting an equivalent ECS configuration to create during the process (creation by SMS directly is possible)
|
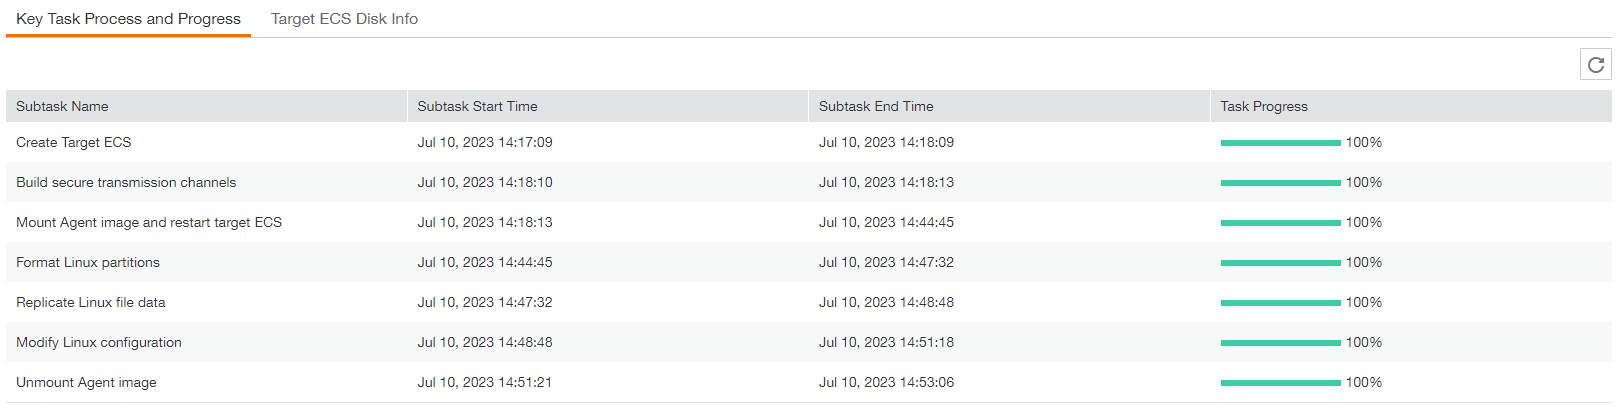
| Step 3 |
Run the task and wait until it’s fully completed
Nota bene : to limit the downtime on the source server, you can use the “incremental synchronisation” of SMS |
| To replicate the source local disk data to the target ECS, remember SMS replicate local disk to attached EVS disk. For that reason, the Admin System of the ECS should Connect the ECS target | |
| Step 4 |
To Arrange the network setting (Security group setting) in order for the target ECS (newly created) to be accessible |
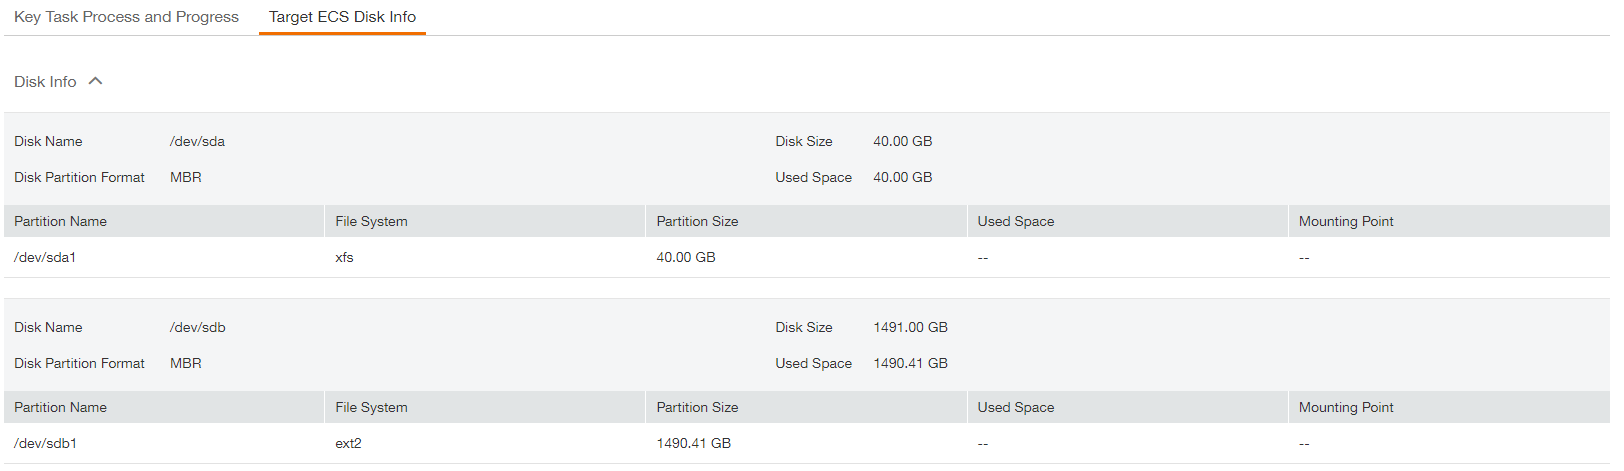
| Step 5 |
To configure the local disk according to the Operating System and the size of the partition. Check the Online Help for any information https://docs.prod-cloud-ocb.orange-business.com/usermanual/evs/evs_01_0038.html Partitioning Operation GuideNote the device name of a local disk depend on the flavor
For a disk smaller than 2 TiB, see the following sections :
For a disk larger than 2 TiB, see the following sections :
|
| Step 6 |
To Copy data from the EVS Data volume of the target ECS to the local disk newly configured Warning : be sure any application accessing the Data disk is stoped before starting the copy For Windows Operating Server, there is many way to replicate a full volume. One of the more robust tools usefull in any Windows version is robocopy. Check https://learn.microsoft.com/en-us/windows-server/administration/windows-commands/robocopy for help For Linux Operating Server, you can use rsync or dd command to replicate any Data partition. Check https://manpages.org/rsync man pages for rsync Nota bene : to limit the downtime on the source server, you can run an “incremental synchronisation” when your selected Sys Admin tools can do (rsync & robocopy can) |
| Step 7 |
Then stop the source server |
| Step 8 |
Review the network configuration of the new ECS (target server) and of all VPC network settings |
| Step 9 |
If any rollback is required, you just need to stop the Target server & restart the source one |