Building highly available web server clusters with HAproxy, Virtual IP and Keepalived
Scenario
This document outlines the steps for building a highly available web server cluster using HAproxy, Keepalived and Virtual IP on Flexible Engine Cloud.
HAproxy:
HAproxy is a free, open-source load balancer that distributes incoming traffic across multiple servers. It is highly reliable, fast, and has a small footprint.
Using a VIP allows you to access your Web service through a single, consistent IP address, rather than having to remember the IP addresses of individual servers. This can make it easier to manage your services, as you only need to update the VIP mapping if the servers hosting your service change. VIPs are typically used in conjunction with a load balancer, such as HAProxy, to distribute traffic across multiple servers and improve the availability and performance of your services.
Keepalived:
Keepalived is an open-source software used to build highly available clusters by providing failover capabilities to network resources such as web servers. In a web server cluster, multiple servers are connected together and share the load of serving client requests. If one server goes down, the other servers in the cluster can take over and serve client requests. This ensures that the web service remains available even if one of the servers fails.
Keepalived works by implementing the Virtual Router Redundancy Protocol (VRRP) to provide failover capabilities to the cluster. It works by having one server designated as the “Master” server, and the other servers designated as “Backup” servers. The Master server is responsible for serving client requests, while the Backup servers monitor the Master server and take over if it goes down.
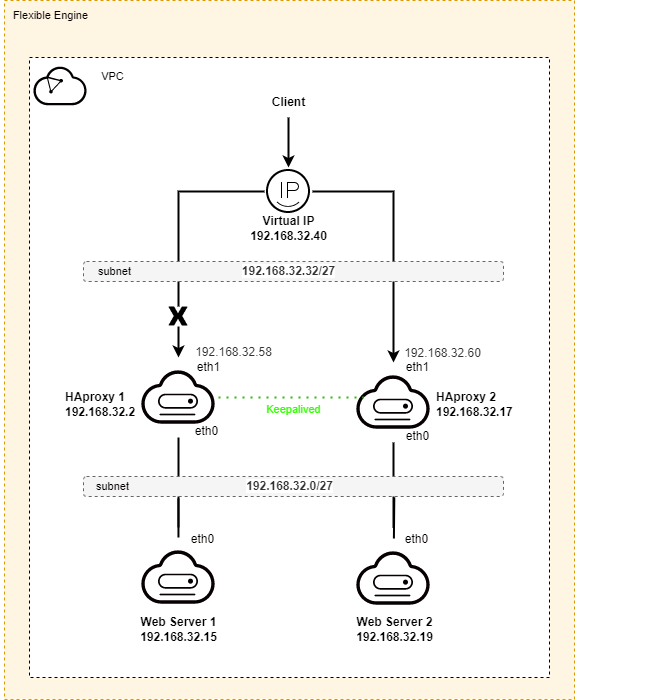
Topology diagram:
Prerequisites
- a VPC and two subnets.
- Four or more ECS running a Linux operating system (such as CentOS or Ubuntu). These servers will be used as HAproxies and web servers in the cluster.
- a Virtual IP address
Please note that the prerequisites for this tutorial may vary depending on your needs.
Step 1: Install and Configure Nginx
Nginx will be installed on Backend servers, and accessible from HAproxies.
To install Nginx, use the following command:
sudo apt install nginx
Once the installation is complete, start the Nginx service and enable it to start at boot time:
sudo systemctl start nginxsudo systemctl enable nginx
You can verify that Nginx is running by visiting your server’s IP address in a web browser. You should see the default Nginx welcome page.
Step 2: Install and Configure HAproxy
For this scenario, we need to create another NIC “Network interface card” and attach it to the second subnet that we created. (see diagram above).
The second subnet will be exposed to clients via a Virtual IP address.
Update the package manager’s package list:
apt update
Install HAproxy:
apt install haproxy
Once the installation is complete, start the HAproxy service and enable it to start at boot time:
sudo systemctl start haproxysudo systemctl enable haproxy
Now that HAproxy is installed on both servers, we need to configure it to balance traffic between the web servers.
On both servers, open the HAproxy configuration file using your favorite text editor:
frontend www bind 192.168.32.40:80 default_backend servers
backend servers balance roundrobin mode tcp server server1 192.168.32.15:80 check server server2 192.168.32.19:80 check
This configuration file sets up HAProxy to listen for HTTP connections on Virtual IP on port 80 and forward them to a backend web servers at ‘192.168.32.15:80' and '192.168.32.19:80'.
Note that this is just an example, and your actual configuration may differ depending on your specific needs.
Step 3: Install and Configure Keepalived
On each of the HAproxy servers in the cluster, install Keepalived using the package manager for your Linux distribution.
On Ubuntu, you can use apt to install Keepalived:
sudo apt install keepalived
After installing Keepalived servers, you need to configure it to work with your web server cluster.
On the Master server, create a configuration file for Keepalived at /etc/keepalived/keepalived.conf with the following content:
global_defs {
router_id haproxy1
}
vrrp_script chk_haproxy {
script "killall -0 haproxy"
}
vrrp_instance VI_1 { state MASTER interface eth0 virtual_router_id 100 priority 100 advert_int 1
mcast_src_ip 192.168.32.2
unicast_src_ip 192.168.32.2
unicast_peer { 192.168.32.17
}
authentication {
auth_type PASS auth_pass password } virtual_ipaddress { 192.168.32.40/27 dev eth1 }}
This configuration sets the server as the Master server, sets the interface to eth0, and assigns a virtual IP address of ‘192.168.32.40’ to the cluster. The advert_int value determines how often the server sends VRRP messages to the Backup servers. The authentication section sets a password that the Backup servers will use to authenticate with the Master server.
On the Backup servers, create the same configuration file with the following content:
global_defs {
router_id haproxy2
}
vrrp_script chk_haproxy {
script "killall -0 haproxy"
}
vrrp_instance VI_1 { state BACKUP interface eth0 virtual_router_id 100 priority 100 advert_int 1
mcast_src_ip 192.168.32.17
unicast_src_ip 192.168.32.17
unicast_peer { 192.168.32.2
}
authentication {
auth_type PASS auth_pass password } virtual_ipaddress { 192.168.32.40/27 dev eth1 }}
This configuration sets the server as a Backup server and uses the same virtual_router_id, virtual_ipaddress, and authentication credentials.
Save and close the configuration file.
The “killall -0 haproxy” command sends a signal to the haproxy process asking it to terminate. The -0 option specifies that no signal should be sent, so the command will not actually kill any haproxy processes. It is used to check if a process is running without actually killing it.
Step 4: Assign Virtual IP Address
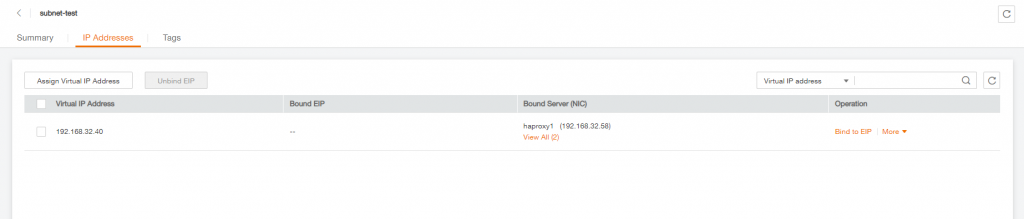
From VPC Flexible Engine Console, Select the subnet that will be exposed to clients, and Assign to it a Virtual IP.
To assign a Virtual IP (VIP) address to an Elastic Cloud Server (ECS) on Flexible Engine Cloud, you will need to follow these steps:
- Log in to the Flexible Engine Cloud Console.
- Navigate to the “Virtual Private Cloud” and click the “Subnets“.
- Select the subnet, and then switch to “IP Addresses” tab.
- Click the “Assign Virtual IP Address” button to allocate a new private IP address.
- Select either “Automatic” or “Manual” option.
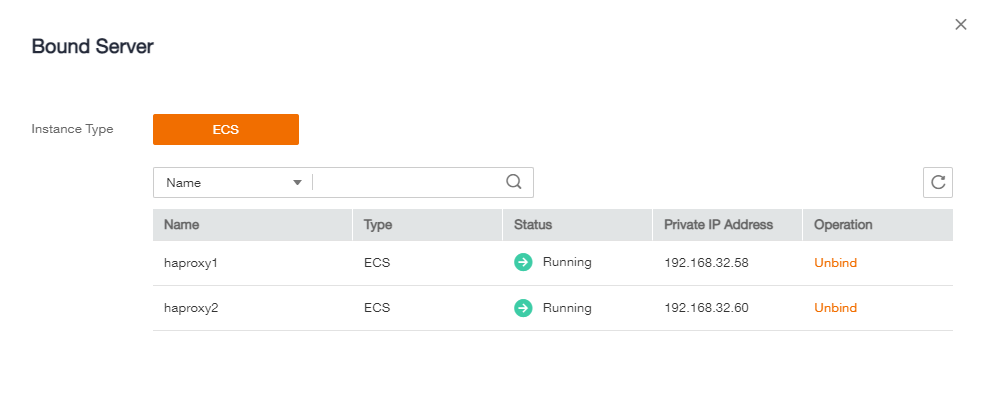
- Click the “More” button, then click “Bind to server” to associate the VIP with the ECS instance.
- Once the VIP has been associated with the two ECS instances, you can access the ECS instance using the VIP’s IP address.
Note that you may need to configure the ECS instance’s security group to allow inbound traffic to the ports that you want to access through the VIP.
For more details, Please refer to documentation about creating a VIP: https://docs.prod-cloud-ocb.orange-business.com/usermanual/vpc/vpc_vip_0001.html
Step 5: Test the failover
To test the failover, you can either shut down the master HAproxy or disconnect it from the network. Keepalived will notice the backup HAproxy server to take the control, by sending Gratuitous ARP on broadcast, as a way to announce the update.
The Virtual IP should switch to the other HAproxy, and clients should still be able to access the web servers through the HAproxy using the Virtual IP.
Conclusion
By following these steps, you should now have a highly available web server cluster using HAproxy, Keepalived, and Virtual IP on FlexibleEngine Cloud. This setup allows for load balancing and failover of the web servers, ensuring that the service is always available to clients even if one of the servers goes down.