Benchmark Cloud Container Engine Storage
Version Supported
This document is based on Cloud Container Engine version 1.21
Performance test run on an ECS : c6.2xlarge.2 (8 vCPUs | 16 GiB)
benchmark tool based on dbench : https://github.com/leeliu/dbench
Introduction
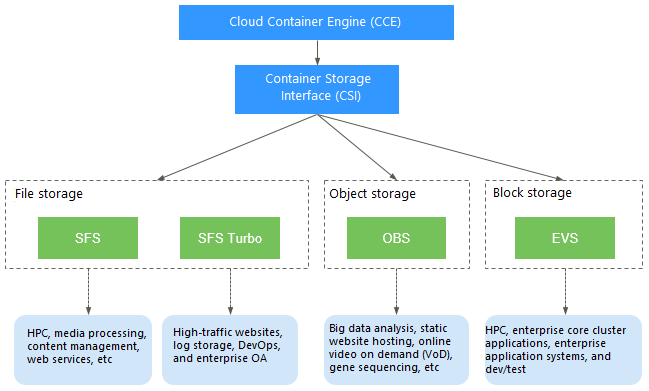
As a reminder : Cloud Container Engine support four storage class :
- EVS (Elastic Volume Service) : bloc storage (High and Ultra High I/O profile)
- SFS (Shared File System) : File system
- SFS Turbo : Performance optimized File system
- OBS (Object Storage Service) : Object Storage
You can find below more detail about Container Storage in CCE :
https://docs.prod-cloud-ocb.orange-business.com/usermanual2/cce/cce_01_0042.html
Tools
To benchmark our storage solution, we simulate an application workload and measure the results.
We will run tests directly against storage volumes using fio (Flexible I/O Tester) running in a POD and mounting a PVC on each of our storage classes.
As said in introduction this project is a fork of dbench where we customized the Flexible Engine storage class and benchmark profiles.
Profiles
The script uses five profile types:
- Read/write IOPS – a measure of performance capability using 4KB block size.
- Read/write bandwidth – a measure of throughput using 128KB block size.
- Read/write latency – a measure of I/O response time with 4KB block size.
- Read/Write Sequential – a measure of throughput with 1MB block size.
- Read/write Mixed – a 75%/25% split of I/O with 4KB block size.
With each test, the I/O queue depth is varied using a value of 4 with IOPS and latency tests and 16 with the remaining tests. Queue depth is varied to put load pressure onto media and systems to see how well solutions cope with a backlog of work. This process is important for sequential I/O but less relevant for random I/O, where requests have to be processed in order.
Testing Volume Performance
Our testing script follows the dbench model but with some changes:
- Ramp Time – we this value to 10 seconds to ensure that any file system pre-seeding had completed during testing.
- Run time – this was increased to 60 seconds to ensure that the underlying storage devices weren’t caching I/O in DRAM or benefiting from on-device caching
- Large volumes – tests were run with a typical volume size of 1TB, much larger than the available system DRAM.
How to use
Download yaml files
You can download the yaml file using git clone :
git clone https://github.com/melnottp/dbench
There is one file per storage class, all files are ready to use as is, except SFS Turbo where you will need to customize the settings with your own (see below).
Deployment
Deploy Dbench using any of the predifined files, example for EVS Ultra High I/O profile :
kubectl apply -f evs-ultra.yaml
Once deployed, the Dbench Job will:
- provision a Persistent Volume of
1000Gi(default) using the selectedstorageClassName (csi-diskhere) - run a series of
fiotests on the newly provisioned PVC - currently there are 9 tests, 60s per test – total runtime is ~10 minutes
Follow benchmarking progress using: kubectl logs -f job/dbench-evs-ultra (empty output means the Job not yet created, or storageClassName is invalid, see Troubleshooting below)
At the end of all tests, you’ll see a summary that looks similar to this:
==================
= Dbench Summary =
==================
Random Read/Write IOPS: 33.5k/22.6k. BW: 349MiB/s / 349MiB/s
Average Latency (usec) Read/Write: 530.66/659.46
Sequential Read/Write: 358MiB/s / 361MiB/s
Mixed Random Read/Write IOPS: 21.2k/7058
Once the tests are finished, clean up using: kubectl delete -f evs-ultra.yaml and that should deprovision the persistent disk and delete it to minimize storage billing.
SFS Turbo
CCE allows you to mount a volume from an existing SFS Turbo file system to a container to store data persistently. So before running this test you need to create your own SFS Turbo file system in the same VPC as your CCE Cluster.
Regarding the SFS Turbo yaml file, you will need two edit the following annotations with your own :
everest.io/share-export-location: x.x.x.x:/sfsturbo/
everest.io/volume-id: a47d0d91-011b-42ce-8c2f-eec5ce1e2a25
And finally run the job as previously :
kubectl apply -f sfs-turbo.yaml
All at once
You can also deploy all the benchmarks all at once using the kustomize file :
kubectl apply -k ./