-
Overview
-
Practical sheets
-
-
- Aucun article
-
- Aucun article
-
- Aucun article
-
- Aucun article
-
- Aucun article
-
- Aucun article
-
-
-
-
- Aucun article
-
- Aucun article
-
-
- Aucun article
-
- Aucun article
-
-
-
- Aucun article
-
-
- Backup : Agent-Level B&R via NSS for IAAS offer
- Backup : Create VCOD Backup
- Backup : Netbackup Agent Installation for Linux
- Backup : Netbackup Agent Installation for Windows
- Backup : Overall Design for VCOD Offer
- Backup : User's Guide for VCOD Offer
- NSX-T : Create a VPN Ipsec
- NSX-T : Creation of T1
- NSX-T : DNAT configuration
- NSX-T : How to configure a Gateway Firewall
- NSX-T : SNAT configuration
- NSX-T: Create and Configure a Geneve Overlay Segment [FR]
- NSX-T: How to configure an IPSEC solution
- VCenter : Create a new VM
- VCenter : Create a snapshot of a VM
- VCenter : Reset cloudadmin password
- VCenter : Storage Vmotion on a VM
- VCenter : Upgrade Vmware tools on a VM
-
-
- Aucun article
-
- Aucun article
-
-
- Aucun article
-
Q & A
-
Services
- Backup
- Bare metal server
- Bare Metal Server GPU
- Block Storage
- BVPN access
- Dedicated Cluster
- DRaaS with VCDA
- HA Dual-Room
- Internet access
- Licenses
- Loadbalancer As a Service
- Network
- Network Storage
- Object storage
- QoS Appliance
- Security
- Shared colocation switch option (Cross connect)
- Support and Coaching
- VCenter On Demand
-
-
- Aucun article
-
- Aucun article
-
NSX-T : Create a VPN Ipsec
1. Login to NSX Manager and Goto “Networking” Menu on Top.
2. Select “VPN” from “Network Services” from left side sub Menu.
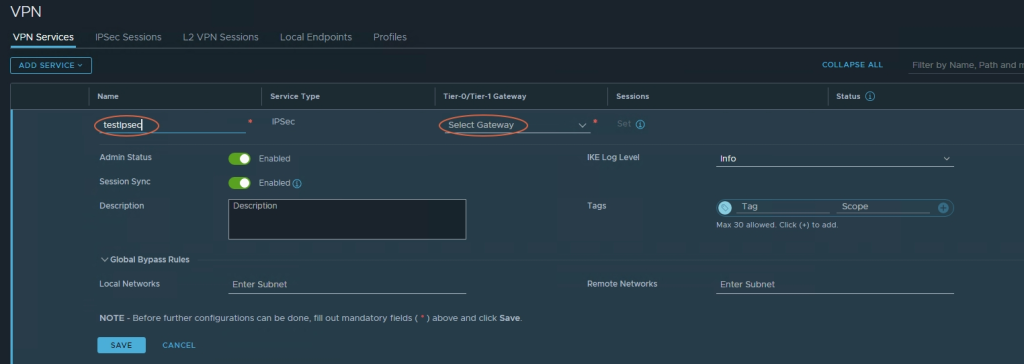
3. Click on “ADD SERVICE” from “VPN Services” Menu on the right side.
4. Click on “IPSec” option.

5. Provide Name in IPSec field.
6. From the Tier-0/Tier-1 Gateway drop-down menu, select the Tier-0 or Tier-1 gateway to associate with this IPSec VPN service.
7. Keep other options to Default.
8. Click Global Bypass Rules if you want to allow data packets to be exchanged between the specified local and remote IP addresses without any IPSec protection. In the Local Networks and Remote Networks text boxes, enter the list of local and remote subnets between which the bypass rules are applied.
9. Click SAVE.
10. New IPSec VPN service will be created successfully, now a dialog box will ask whether you want to continue with the rest of the IPSec VPN configuration. If you click Yes, you are taken back to the Add IPSec VPN Service panel. The Sessions link is now enabled and you can click it to add an IPSec VPN session.
11. Next steps are to configure IPSec sessions and Local Endpoints.
