NFS Server cross AZ HA
Introduction
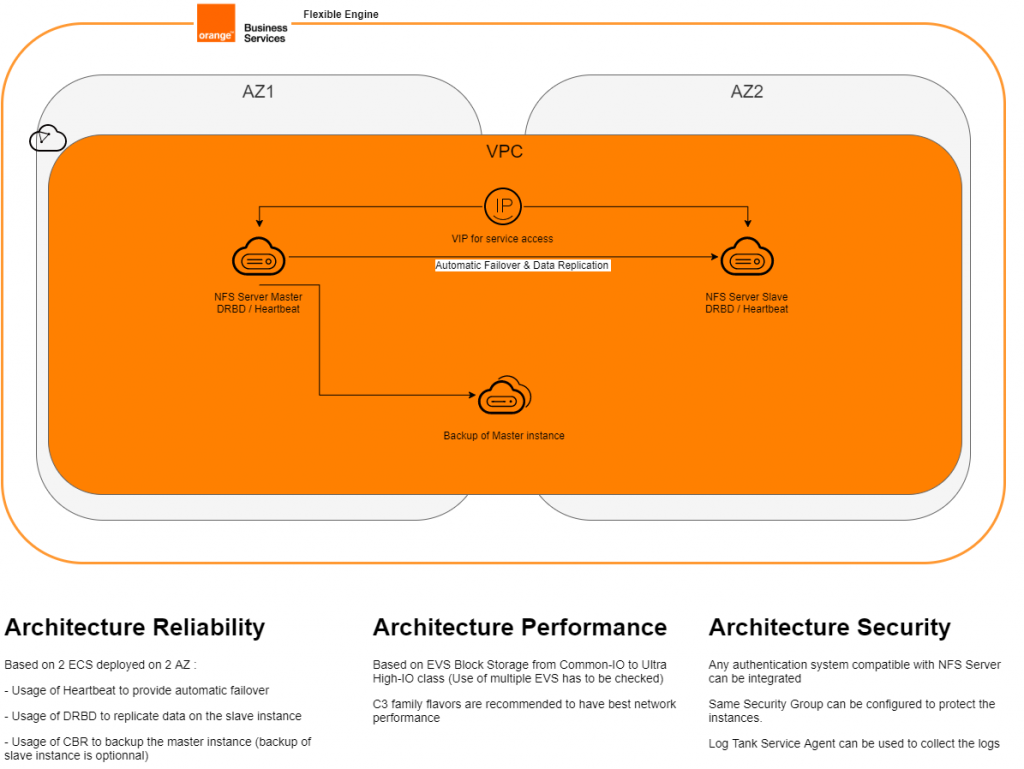
The goal of this tutorial is to propose an NFS server with resiliency accross mutliple availability zone. It should support the loss of one node or one availability zone
Architecture
Auto-deployment Script (WIP)
Terraform Script to deploy the infrastructure : To be started
Bash Script to install & configure the software stack : Work In Progress
Step By Step How-to
ECS Deployment
Deploy 2 ECS with at least following specs :
- C3 Family flavors
- Choose the latest Ubuntu LTS distribution
- Attach a data disk and select the performance class that fit your requirements
- Dispatch the ECS on 2 different AZ to lever multi AZ resiliency
On the following guide, each command have to be typed on both master & slave ECS unless specific instructions are told
Template ECS configuration
Format the data disk
List the disks to select the data disk previously created
sudo fdisk -lThen search for your data disk, for me, it is mounted under /dev/vdb
Then format it
sudo fdisk /dev/vdbThen type n to create new partition
Then type p to create a primary partition
Keep the default parameters for the others questions
When the partition is created, type w to write the modifications.
Packages installation
Install the packages
sudo apt-get install drbd-utils
sudo apt-get install nfs-kernel-server
sudo apt-get install heartbeat
Select no configuration for the postfix configuration
DRBD Configuration
Enable the package DRBD
sudo modprobe drbdThen go in directory etc/drbd.d
cd /etc/drbd.dAnd create a new file name drbd0.res
sudo nano drbd0.resThen paste this inside :
resource r0 {

     startup {
                   wfc-timeout 30;
                   degr-wfc-timeout 15;
         }

     disk {
         on-io-error   detach;
     }

    syncer {
       rate 320M;
    }

         on ecs-nfs-master {
                 device /dev/drbd0;
                 disk /dev/vdb;
                 address IP@ecs-nfs-master:7788;
                 meta-disk internal;
         }
         on ecs-nfs-slave {
                 device /dev/drbd0;
                 disk /dev/vdb;
                 address IP@ecs-nfs-slave:7788;
                 meta-disk internal;
         }
    }
Explainations :
- The rate refer to the max throuput supported by your disk. I choosed Ultra High-IO class so it’s 320M
- don’t forget to adapt it to the name of your ECS (here its ecs-nfs-master and slave) + to mount path of your disk (here it /dev/vdb)
- Adapt the IP adresses of your ECS (you can make a plan to define later the IP of the slave)
- I choose to store the metadata directly on the disk
Then initialise and start your drbd configuration
sudo drbdadm create-md r0
sudo drbdadm up r0
Private Image creation & Slave ECS deployment
Now shutdown the master instance then, in the ECS console, click on more then Manage Image / Disk and Create Image
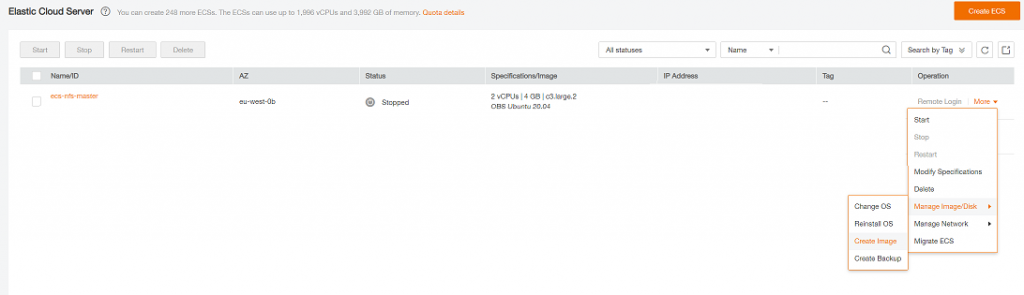
Then create a Full ECS Image
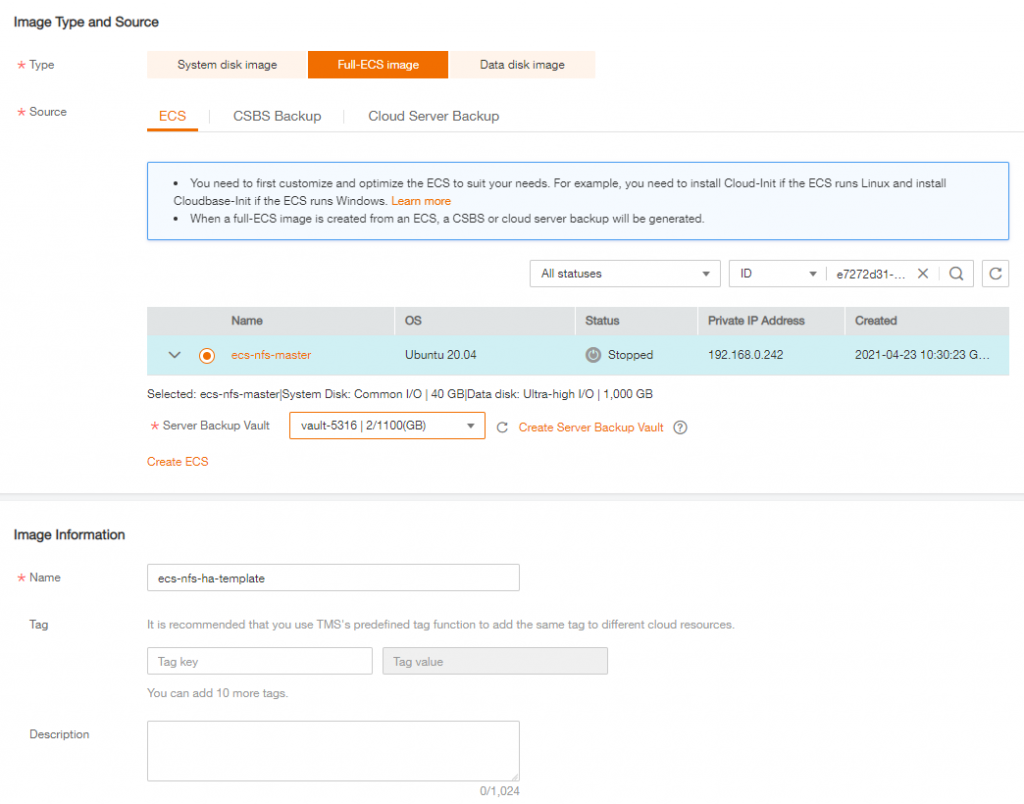
After image is created, in the ECS console create a new ECS based on this private image then name it ecs-nfs-slave
Don’t forget to select the deployment on a different AZ than the master + select a C3 family flavor
Master & Slave ECS configuration
VIP Creation
Now you have the 2 ECS created, you have to create a VIP for Heartbeat in the Flexible Engine Console
- Go in the VPC Console, then in the Subnet select the subnet where the 2 ECS are, then click on Assign Virtual IP click on manual assignation and note the VIP you set
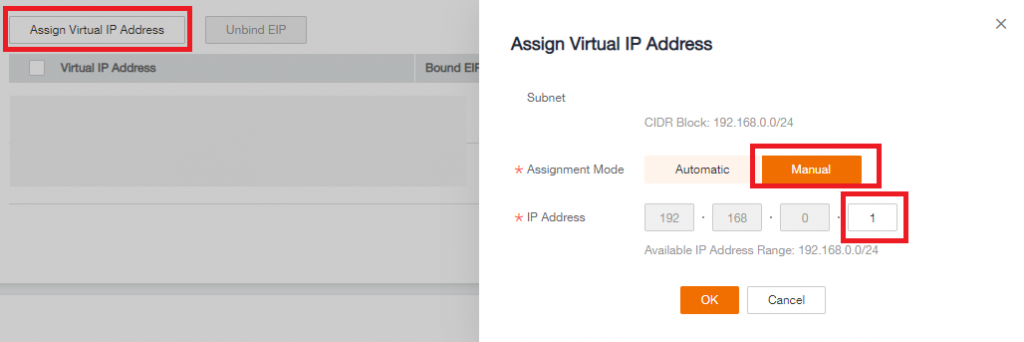
- Once the VIP is created, click on more next to it then Assign to Server attach the VIP to the 2 ECS (You can attach 1 server at once)
DRBD Synchronisation and Filesystem creation
Now launch the initialisation synchronisation of the disk with DRBD
On the master node only :
drbdadm -- --overwrite-data-of-peer primary r0On the slave node only :
drbdadm secondary r0This can take a very long time (up to 1day depending on the disk size)… You can monitor the status with
cat /proc/drbd
When the first synchronisation is finished, create the filesystem only on the master node
mkfs.ext4 /dev/drbd0NFS Server configuration
Create a directory that will host the NFS share then mount it under the DRBD partition:
sudo mkdir /data-nfs
sudo mount /dev/drbd0 /data-nfs
df -h
Edit the file /etc/exports with :
/data-nfs 0.0.0.0/0(rw,sync,fsid=0,no_root_squash,no_subtree_check)Details :
- /data-nfs : folder shared
- 0.0.0.0/0 : IP Range allowed to connect to the NFS Share
- rw : Read/Write rigth sync : standard synchronisation mode of NFS protocol
- no_root_squash : root mapping method (no root account access here)
- no_subtree_check : sub folder shared rigth verification. It’s disabled here, we assume that the subfolder under /data-nfs has to be shared.
Disable the autolaunch of NFS-Kernel-Server
sudo systemctl disable nfs-kernel-serverHeartbeat configuration
Create & edit the file named ha.cf under /etc/ha.d/
mcast eth0 239.0.0.10 694 1 0
warntime 4
deadtime 5
initdead 15
keepalive 2
auto_failback on
node ecs-nfs-master
node ecs-nfs-slave
Create & edit the file named haresources under /etc/ha.d/
ecs-nfs-master IPaddr::IP@VIPcreatedinFEconsole/eth0 drbddisk::r0 Filesystem::/dev/drbd0::/data-nfs::ext4 nfs-kernel-serverDon’t forget to put the IP of the VIP created in Flexible Engine Console
Create & edit the file named authkey under /etc/ha.d/
auth 3
3 md5 Pa$$word_of_your_choice
Then type chmod 600 /etc/ha.d/authkeys
Services starting
On ECS-NFS-MASTER first then ECS-NFS-SLAVE
/etc/init.d/heartbeat startDon’t forget that you can check the status of DRBD replication with cat /proc/drbd
Access to your NFS share directly through the IP of VIP
Interconecting NFS Server with CCE Cluster
Guide in progess