Cloud Container Engine
Demos with Cloud Container Engine
Rocket.chat
Github: https://github.com/RocketChat/Rocket.Chat
The goal of this demo is to deploy a rocket.chat server on CCE using various FE services.
Rocket.Chat is a Web Chat Server, developed in JavaScript, using the Meteor fullstack framework. It is a great solution for communities and companies wanting to privately host their own chat service or for developers looking forward to build and evolve their own chat platforms. Rocket.chat use mongoDB as database.
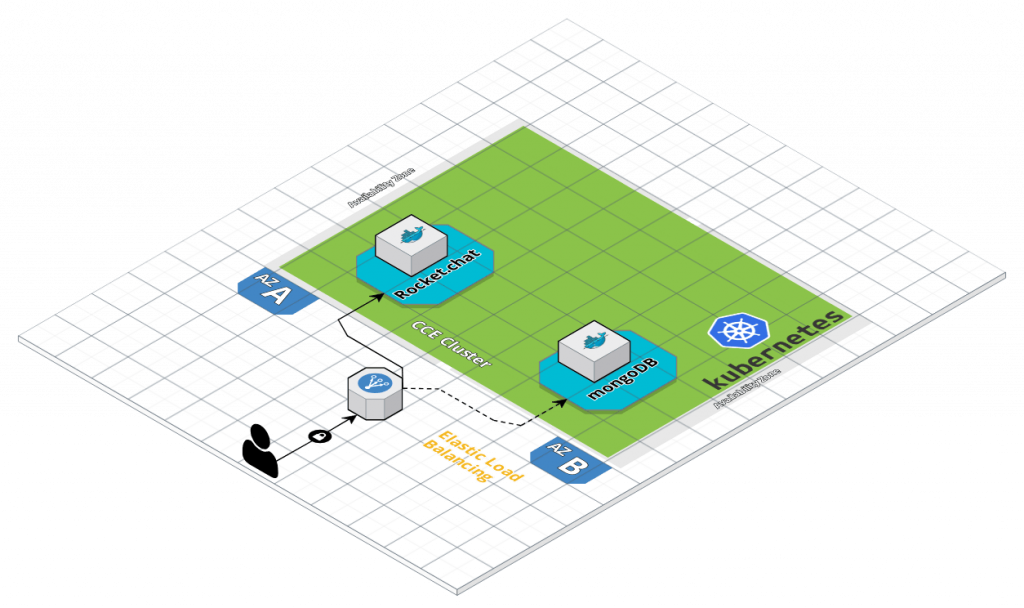
Architecture
The CCE cluster is deployed on 2 availability zones (AZ) and contains 2 nodes (based on Elastic Cloud Servers (ECS)). 1 instance of rocket.chat and 1 instance of mongoDB database will be deployed on nodes. Note that it is not the best pratice as there is no data persitence for mongoDB, for production use it is recommended to use aaS solution (Document Database Service), the point here is to deploy a basic rocket.chat thatt can be used for demo or training sessions.
Service used
- Cloud Container Engine: to deploy Rocket.chat server and mongoDB database
Step by step deployment guide
- Create mongoDB CCE component template
CCE -> Create Template
- – Template Name: mongodb
- – Container Image: External Container Image.
- It will use DockerHub registry by default: (https://hub.docker.com/) and we want to use the official mongoDB image (https://hub.docker.com/_/mongo/) so value on the text box will be “mongo”
- – Network: TCP / Port : 27017
- – Memory/CPU:
default value(no ressources caping) - – Volumes: default
- – Environment Variables: none
2. Create rocket.chat CCE component template
CCE -> Create Template
- – Template Name: rocketchat
- – Container Image: External Container Image.
- It will use DockerHub registry by default: (https://hub.docker.com/) and we want to use the official Rocket.chat image (https://hub.docker.com/r/rocketchat/rocket.chat/) so value on the text box will be “rocketchat.rocket.chat”
- – Network: TCP / Port : 3000
- – Memory/CPU:
default value(no ressources caping) - – Volumes: default
- – Environment Variables:
- MONGO_URL : mongodb://mongo/mydb (warning: ‘mongo’ will be the name of the service created on the next step. Please be sure to use the same value as CCE (kubernetes) won’t be able to resolve the name ->IP@)
3. Create the Containerized Application
CCE -> App Manager -> Create a Containerized App
- – Template Type: Component Template
- – Container Cluster:
your CCE cluster - – App Name: myrocketchat
-> App Component: Click on “Create Component”:
- – Template Name:
the mongoDB template created on previous step (mongodb) - – Component Name : mongoDB
- – Component Description: –
- – AZ: Automatic (you can chose ‘custom’ if you want to deploy on specific AZ)
- – Node: Automatic (you can chose a node if you want to deploy on a specific node on the CCE cluster)
- – Instances: 1 (to match the Architecture described above)
- – Service name: mongo (warning: ‘mongo’ is the value defined as env variable for RocketChat MONGO_URL. Please be sure to use the same value as CCE (kubernetes) won’t be able to resolve the name ->IP@)
- – Public Service: No
- – Click ‘OK’ on the App component form
-> App Component: Click on “Create Component”:
- – Template Name:
the rocket.chat template created on previous step (rocketchat) - – Component Name : rocketchat
- – Component Description: –
- – AZ: Automatic (you can chose ‘custom’ if you want to deploy on specific AZ)
- – Node: Automatic (you can chose a node if you want to deploy on a specific node on the CCE cluster)
- – Instances: 1 (to match the Architecture described above)
- – Service name: rocketchat
- – Public Service: Yes
- – Service Type: Load Balancer
- – Load Balancer: The load balancer you want to use (cf. prerequisites)
- – Service Parameters: ELB Port: 3000
- – Click ‘OK’ on the App component form
- – Click ‘OK’ on the Containerized App form
If you click on ‘rocketchat’ you can find address and port on which you can access your website:
You can now access the webpage and follow the setup wizzard to configure your Rocket.Chat. For more details please refer to the Rocket.Chat user guide : https://rocket.chat/docs/user-guides/

Next step
- Demonstrate Scalability & HA
WordPress Website
The goal of this demo is to deploy a wordpress website on CCE using various FE services.
WordPress is a free and open-source content management system (CMS) based on PHP and MySQL. Features include a plugin architecture and a template system. It is most associated with blogging, but supports other types of web content including more traditional mailing lists and forums, media galleries, and online stores. Used by more than 60 million websites, including 30.6% of the top 10 million websites as of April 2018, WordPress is the most popular website management system in use.
Prerequisites
- Web access to Flexible Engine platform (APIs are not used for now)
- CCE cluster with 3 (or more) nodes. Best practice is to deploy nodes on both AZ (cf. CCE Cluster creation guide: https://docs.prod-cloud-ocb.orange-business.com/en-us/usermanual/cce/en-us_topic_0035200399.htm)
- an Elastic Load Balancer (cf. classic or enhanced load blancer creation guide: https://docs.prod-cloud-ocb.orange-business.com/en-us/usermanual/elb/en-us_elb_02_0000.html . Just create the ELB, no Listeners are requested).
- a mySQL RDS database that can be reached by the CCE Cluster (network and Security Groups) (cf. mySQL RDS creation guide: https://docs.prod-cloud-ocb.orange-business.com/en-us/usermanual/rds/en-us_topic_0046585334.html). You will need the DB password on the next step.
Architecture
The CCE cluster is be deployed on 2 availability zones (AZ) and contains 3 nodes (based on Elastic Cloud Servers (ECS)). 3 instances of wordpress (frontends) will be deployed on nodes and interconnected to a mySQL RDS database. Static files can be hosted on a OBS bucket (not included on this tutorial as it can be done by installing a WordPress s3 plugin like https://wordpress.org/plugins/wp2cloud-wordpress-to-cloud/)
Last edited byAdministrator06/04/2020
Rocket.chat
Github: https://github.com/RocketChat/Rocket.Chat
The goal of this demo is to deploy a rocket.chat server on CCE using various FE services.
Rocket.Chat is a Web Chat Server, developed in JavaScript, using the Meteor fullstack framework. It is a great solution for communities and companies wanting to privately host their own chat service or for developers looking forward to build and evolve their own chat platforms. Rocket.chat use mongoDB as database.
Prerequisites
- Web access to Flexible Engine platform (APIs are not used for now)
- CCE cluster with 2 (or more) nodes. Best practice is to deploy nodes on both AZ (cf. CCE Cluster creation guide: https://docs.prod-cloud-ocb.orange-business.com/en-us/usermanual2/cce/cce_01_0028.html)
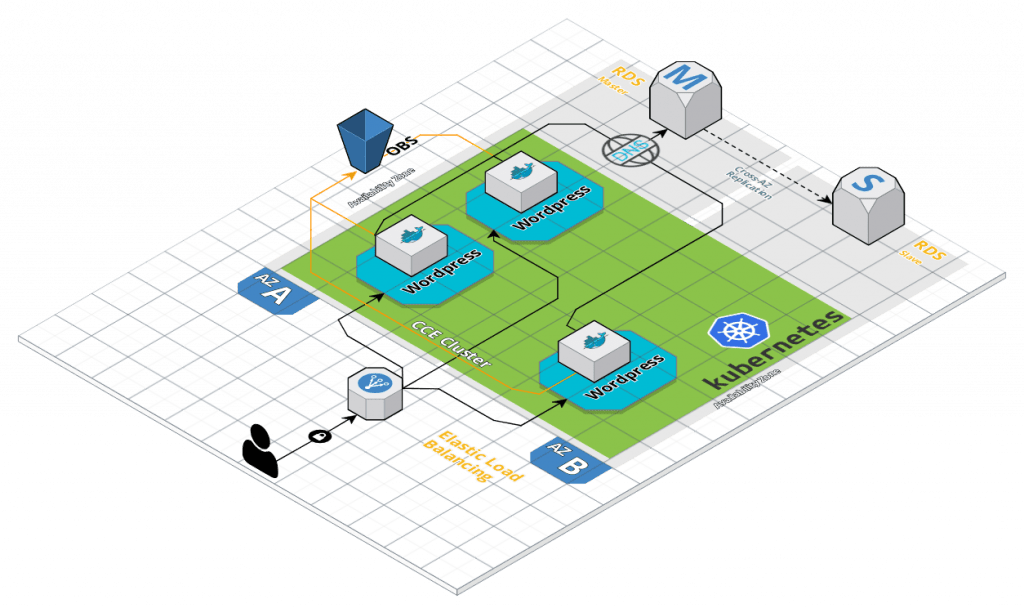
Architecture
The CCE cluster is deployed on 2 availability zones (AZ) and contains 2 nodes (based on Elastic Cloud Servers (ECS)). 1 instance of rocket.chat and 1 instance of mongoDB database will be deployed on nodes. Note that it is not the best pratice as there is no data persitence for mongoDB, for production use it is recommended to use aaS solution (Document Database Service), the point here is to deploy a basic rocket.chat thatt can be used for demo or training sessions.
Services used
- Cloud Container Engine: to deploy Rocket.chat server and mongoDB database
Step by Step deployment guide
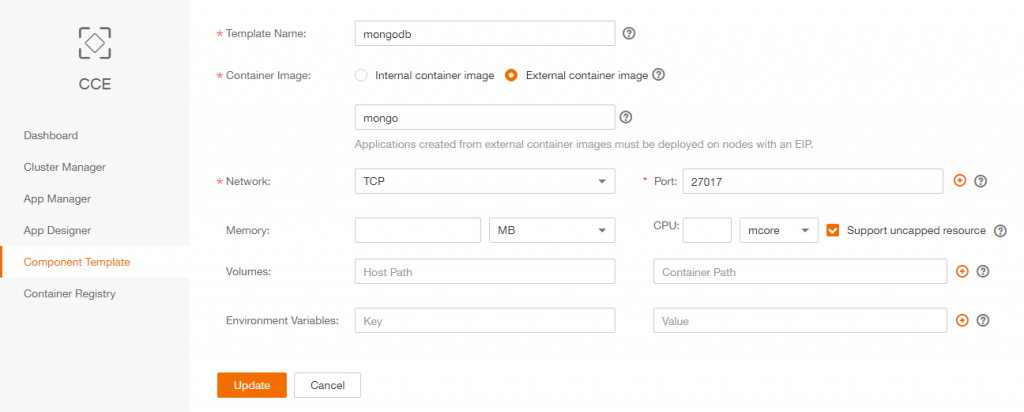
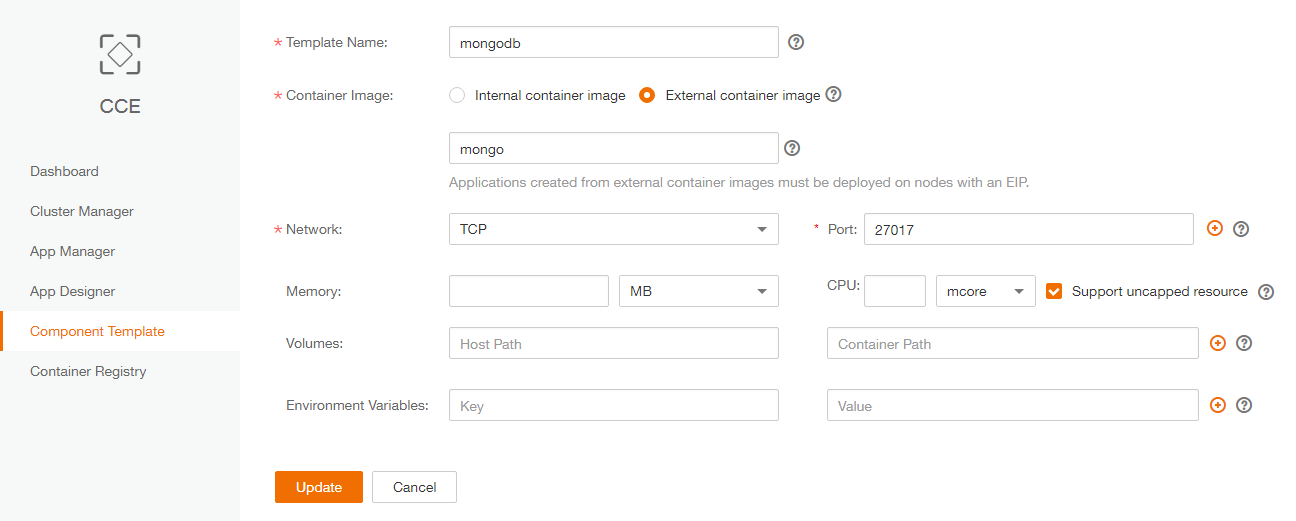
1. Create mongoDB CCE component template
CCE -> Create Template
– Template Name: mongodb
– Container Image: External Container Image.
It will use DockerHub registry by default: (https://hub.docker.com/) and we want to use the official mongoDB image (https://hub.docker.com/_/mongo/) so value on the text box will be “mongo”
– Network: TCP / Port : 27017
– Memory/CPU: default value (no ressources caping)
– Volumes: default
– Environment Variables: none
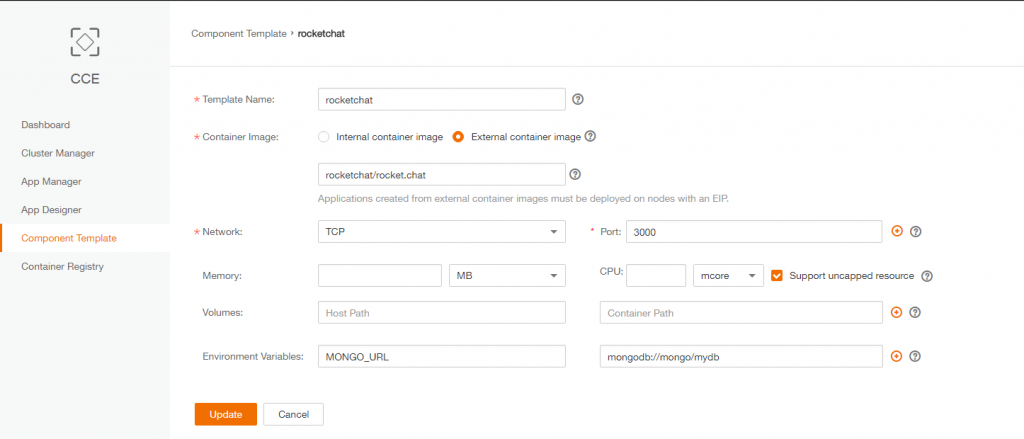
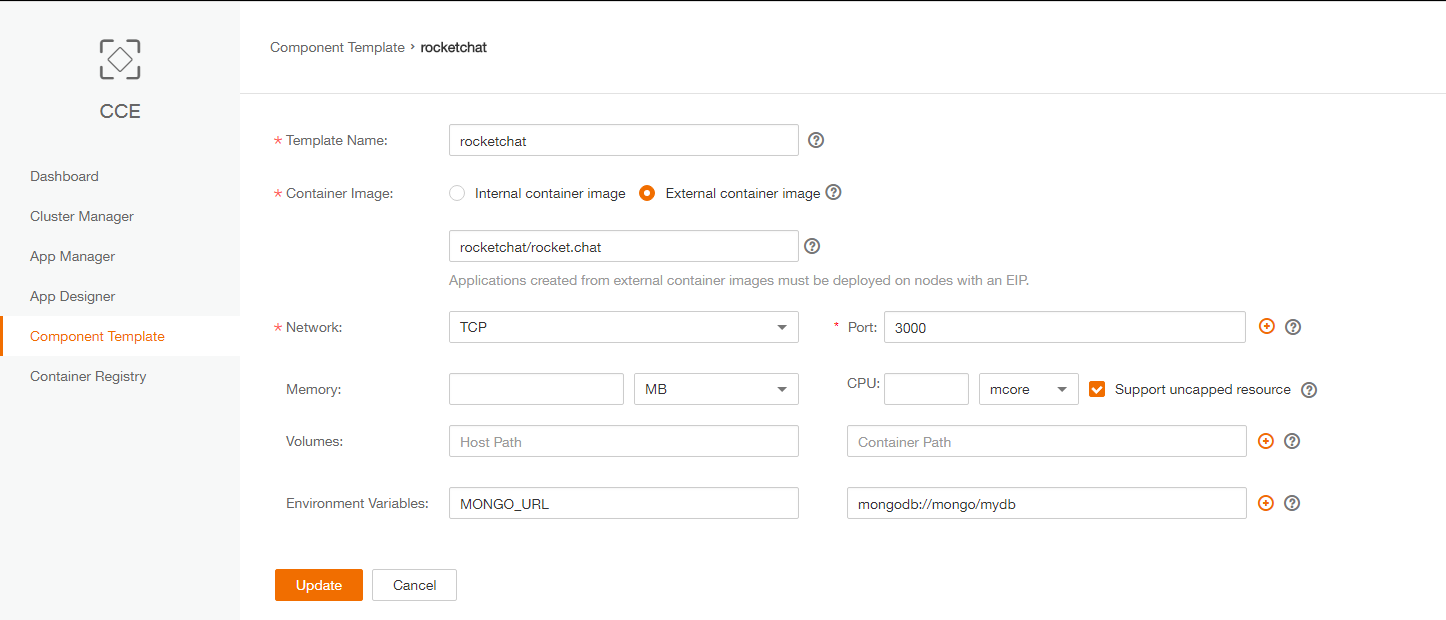
2. Create rocket.chat CCE component template
CCE -> Create Template
– Template Name: rocketchat
– Container Image: External Container Image.
It will use DockerHub registry by default: (https://hub.docker.com/) and we want to use the official Rocket.chat image (https://hub.docker.com/r/rocketchat/rocket.chat/) so value on the text box will be “rocketchat.rocket.chat”
– Network: TCP / Port : 3000
– Memory/CPU: default value (no ressources caping)
– Volumes: default
– Environment Variables:
MONGO_URL : mongodb://mongo/mydb (warning: ‘mongo’ will be the name of the service created on the next step. Please be sure to use the same value as CCE (kubernetes) won’t be able to resolve the name ->IP@)
3. Create the Containerized Application
CCE -> App Manager -> Create a Containerized App
– Template Type: Component Template
– Container Cluster: your CCE cluster
– App Name: myrocketchat
-> App Component: Click on “Create Component”:
– Template Name: the mongoDB template created on previous step (mongodb)
– Component Name : mongoDB
– Component Description: –
– AZ: Automatic (you can chose ‘custom’ if you want to deploy on specific AZ)
– Node: Automatic (you can chose a node if you want to deploy on a specific node on the CCE cluster)
– Instances: 1 (to match the Architecture described above)
– Service name: mongo (warning: ‘mongo’ is the value defined as env variable for RocketChat MONGO_URL. Please be sure to use the same value as CCE (kubernetes) won’t be able to resolve the name ->IP@)
– Public Service: No
– Click ‘OK’ on the App component form
-> App Component: Click on “Create Component”:
– Template Name: the rocket.chat template created on previous step (rocketchat)
– Component Name : rocketchat
– Component Description: –
– AZ: Automatic (you can chose ‘custom’ if you want to deploy on specific AZ)
– Node: Automatic (you can chose a node if you want to deploy on a specific node on the CCE cluster)
– Instances: 1 (to match the Architecture described above)
– Service name: rocketchat
– Public Service: Yes
– Service Type: Load Balancer
– Load Balancer: The load balancer you want to use (cf. prerequisites)
– Service Parameters: ELB Port: 3000
– Click ‘OK’ on the App component form
– Click ‘OK’ on the Containerized App form
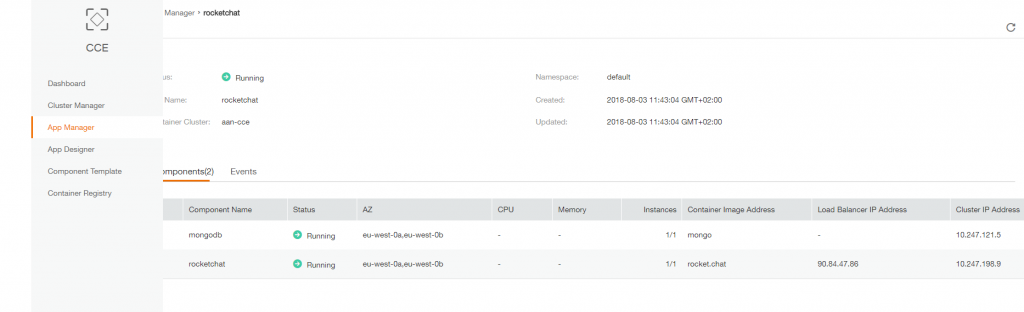
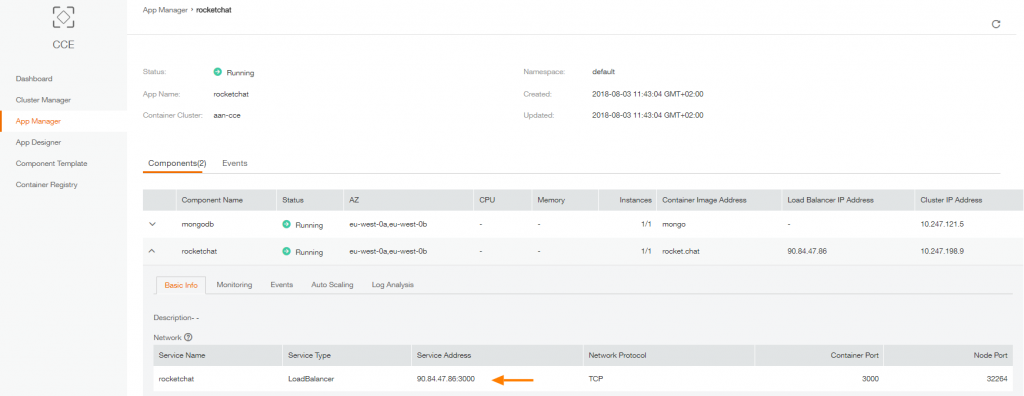
Wait for the App creation and then click on the App name. Here you can find thetwo components (mongo and rocketchat) with ‘Running’ status:
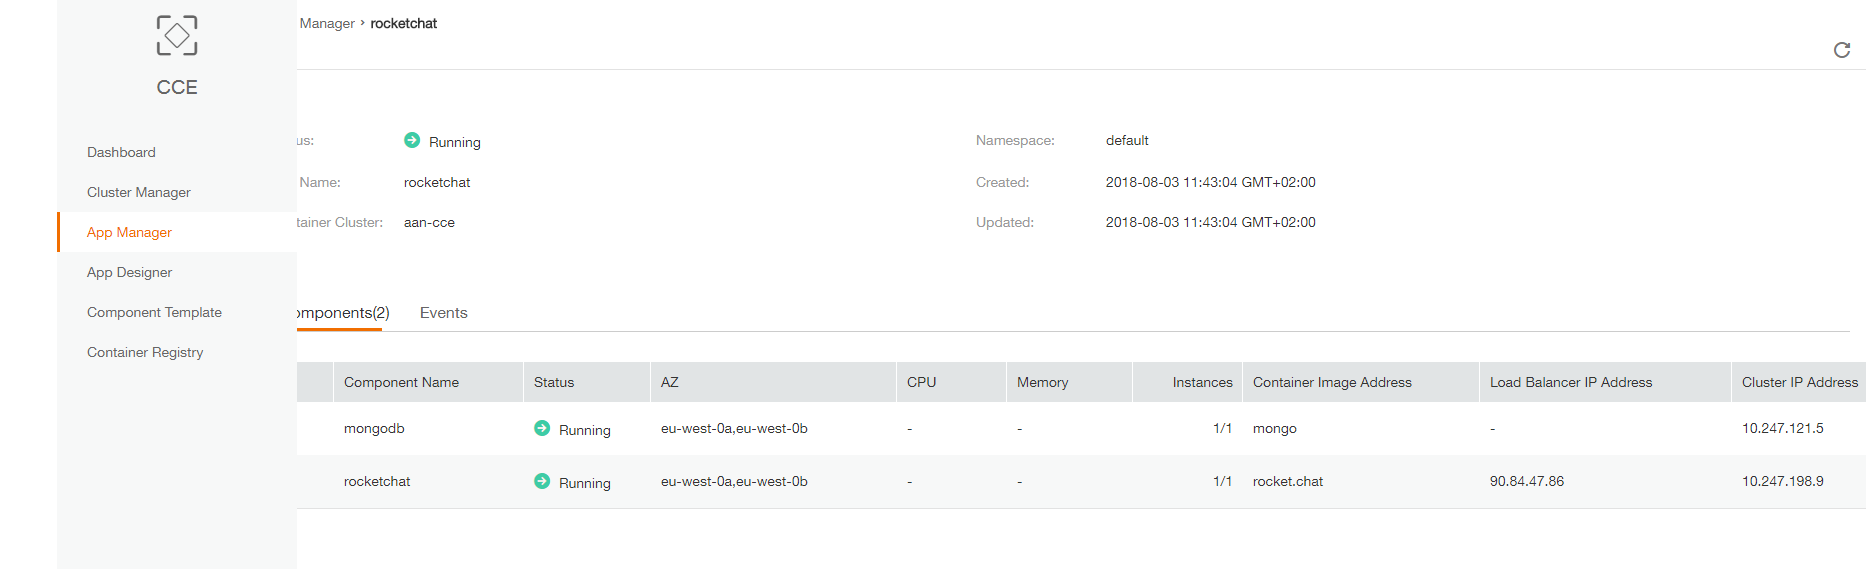
If you click on ‘rocketchat’ you can find address and port on which you can access your website:
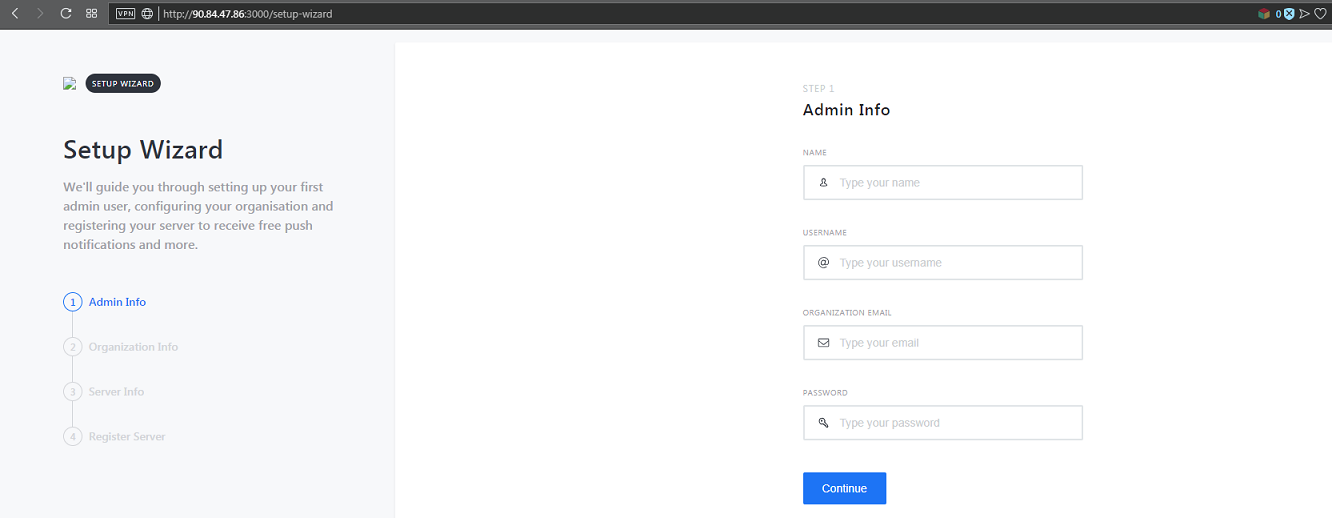
You can now access the webpage and follow the setup wizzard to configure your Rocket.Chat. For more details please refer to the Rocket.Chat user guide : https://rocket.chat/docs/user-guides/
Next steps
- Demonstrate Scalability & HA
WordPress Website
The goal of this demo is to deploy a wordpress website on CCE using various FE services.
WordPress is a free and open-source content management system (CMS) based on PHP and MySQL. Features include a plugin architecture and a template system. It is most associated with blogging, but supports other types of web content including more traditional mailing lists and forums, media galleries, and online stores. Used by more than 60 million websites, including 30.6% of the top 10 million websites as of April 2018, WordPress is the most popular website management system in use.
Prerequisites
- Web access to Flexible Engine platform (APIs are not used for now)
- CCE cluster with 3 (or more) nodes. Best practice is to deploy nodes on both AZ (cf. CCE Cluster creation guide: https://docs.prod-cloud-ocb.orange-business.com/en-us/usermanual/cce/en-us_topic_0035200399.htm)
- an Elastic Load Balancer (cf. classic or enhanced load blancer creation guide: https://docs.prod-cloud-ocb.orange-business.com/en-us/usermanual/elb/en-us_elb_02_0000.html . Just create the ELB, no Listeners are requested).
- a mySQL RDS database that can be reached by the CCE Cluster (network and Security Groups) (cf. mySQL RDS creation guide: https://docs.prod-cloud-ocb.orange-business.com/en-us/usermanual/rds/en-us_topic_0046585334.html). You will need the DB password on the next step.
Architecture
The CCE cluster is be deployed on 2 availability zones (AZ) and contains 3 nodes (based on Elastic Cloud Servers (ECS)). 3 instances of wordpress (frontends) will be deployed on nodes and interconnected to a mySQL RDS database. Static files can be hosted on a OBS bucket (not included on this tutorial as it can be done by installing a WordPress s3 plugin like https://wordpress.org/plugins/wp2cloud-wordpress-to-cloud/)
Services used
- Cloud Container Engine: to deploy WordPress frontends
- Relational Database Service (RDS): for mySQL database
- Domain Name Service (DNS): used as private registry to point on RDS database adress
- Elastic Load Balancer (ELB): used as Load Balancer above CCE cluster
Step by Step deployment guide
1. Create a private DNS record set:
DNS service -> Create Private Zone
- Name: services.fe.
- VPC: same as CCE cluster
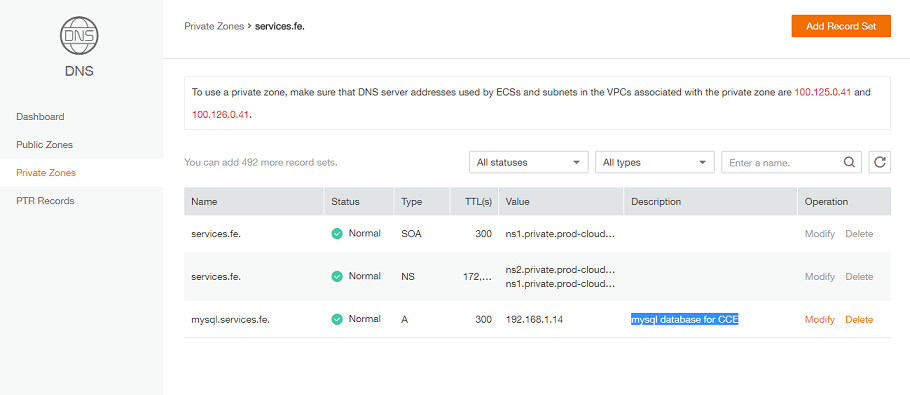
DNS service -> Private Zones -> services.fe. -> Add Record Set
- – Name: mysql
- – Type: A-Map domains to IPV4 addresses
- – TTL: 300 / 5 minutes
- – Value:
ip of your RDS database
You should have something like this
2. Create CCE component template
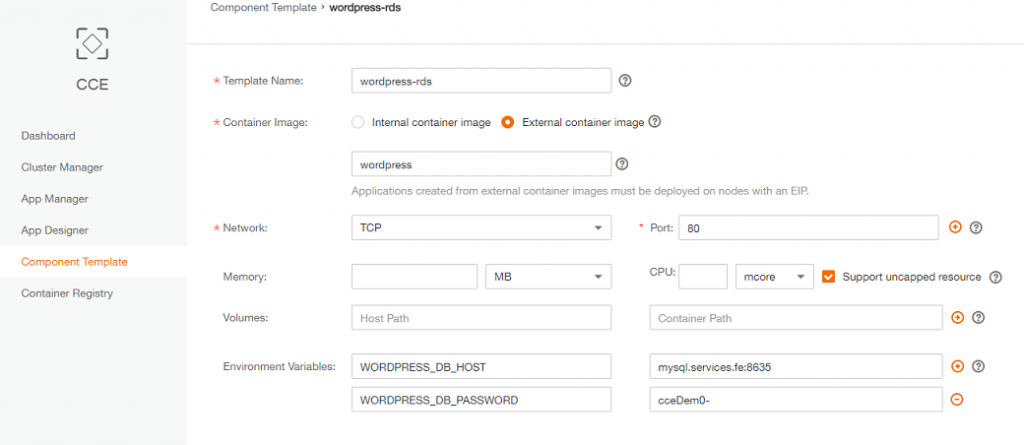
CCE -> Create Template
- Template Name: wordpress-rds
- Container Image: External Container Image.
It will use DockerHub registry by default: (https://hub.docker.com/) and we want to use the official WordPress image (https://hub.docker.com/_/wordpress/ ) so value on the text box will be “wordpress”
- – Network: TCP / Port : 80
- – Memory/CPU:
default value(no ressources caping) - – Volumes: default
- – Environment Variables:
WORDPRESS_DB_HOST : mysql.services.fe:8635 (warning: change the RDS database port if needed)
WORDPRESS_DB_PASSWORD : your database password (the one you have set during RDS creation)
3. Create the Containerized Application
CCE -> App Manager -> Create a Containerized App
- – Template Type: Component Template
- – Container Cluster:
your CCE cluster - – App Name: mywordpress
-> App Component: Click on “Create Component”:
- – Template Name:
the template created on previous step (wordpress-rds) - – Component Name : wordpress-rds
- – Component Description: –
- – AZ: Automatic (you can chose ‘custom’ if you want to deploy on specific AZ)
- – Node: Automatic (you can chose a node if you want to deploy on a specific node on the CCE cluster)
- – Instances: 3 (to match the Architecture described above)
- – Service name: wordpress-rds
- – Public Service: Yes
- – Service Type: Load Balancer
- – Load Balancer: The load balancer you want to use (cf. prerequisites)
- – Service Parameters: ELB Port: 80
- – Click ‘OK’ on the App component form
- – Click ‘OK’ on the Containerized App form
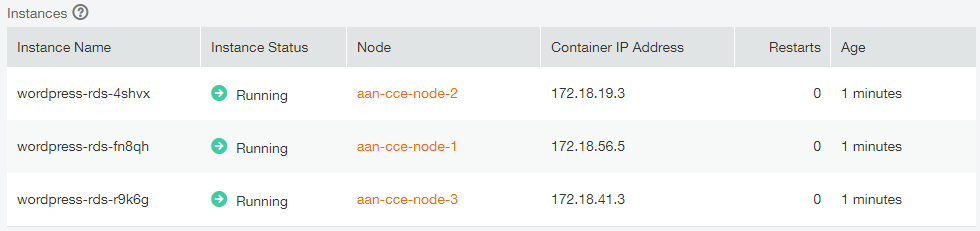
Wait for the App creation and then click on the App name. Here you can find the ELB ip adress and port on which you can access your website:

You can see that WordPress is now running on 3 containers hosted on 3 CCE nodes :
Next steps
- Demonstrate Scalability & HA
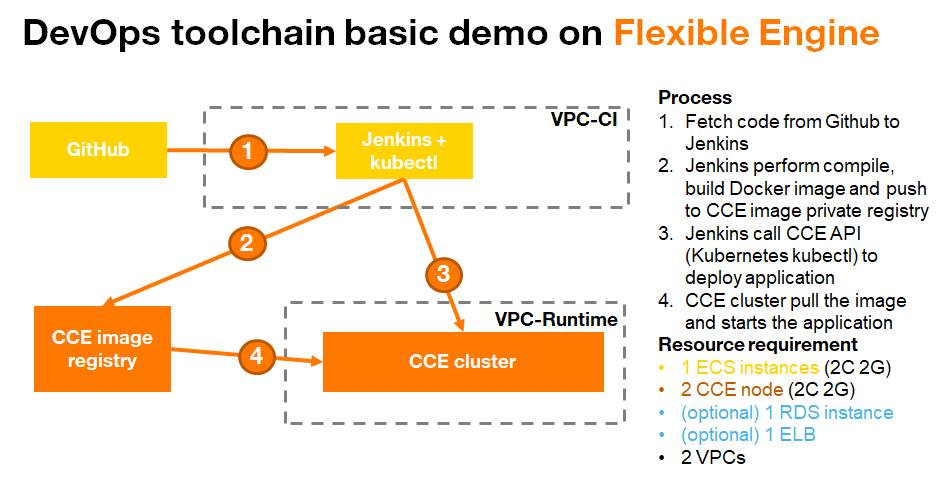
CI/CD Demo
This is a guide on how to integrate CCE with Jenkins to set up a CI/CD Demo environment on FlexibleEngine.
Target of this documentation should have basic understanding of FlexibleEngine especially the services related to the Demo:
VPC, ECS, CCE and how to manage these services such as creating a VPC/Subnet, creating an ECS, logging in to an ECS with SSH, creating an CCE cluster etc. In this documentation it will not describe the details how to do these basic actions on FE and instead just use one short description telling what needs to be done, for those bascis actions you can refer to the online documentation (https://docs.prod-cloud-ocb.orange-business.com/index.html).
Architecture
Prerequisite
1 . A project in FlexibleEngine and a User in this Project with Console and API access privilege to manage resources (VPC/ ECS/CCE).
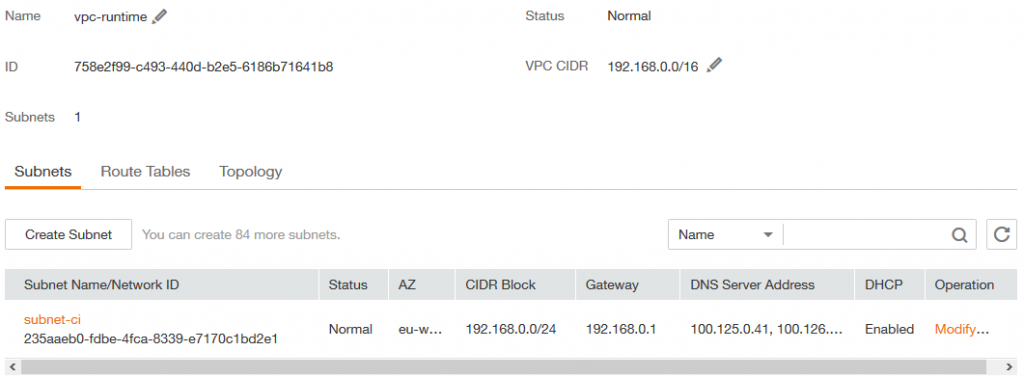
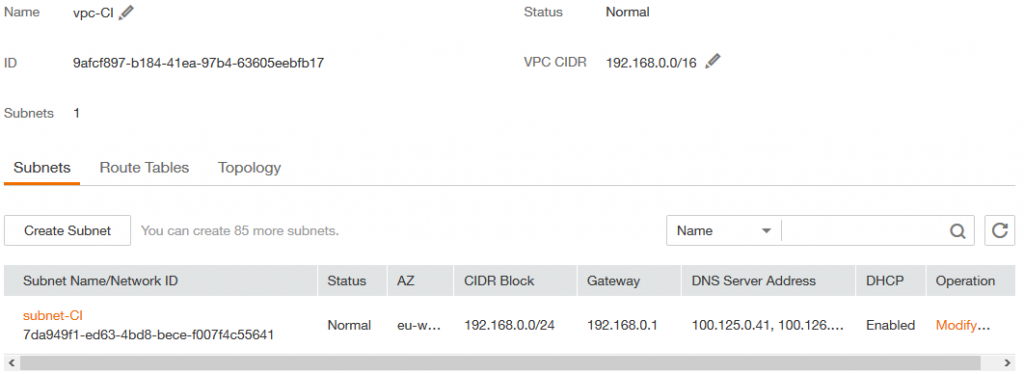
2 . Two VPCs are created, one is VPC-CI, another is VPC-Runtime, and in each VPC a subnet is created.
VPC-Runtime and subnet-runtime in this VPC
VPC-CI and subnet-ci in this VPC
3 . An ECS VM (We name it as VM-Jenkins) with OS Ubuntu 16.04 x86-64 is created and attached to subnet-ci, with an attached EIP and that can be reached from SSH client

Note: for all the following operations in ECS vm-jenkins, using a non-root user (for example: cloud) is highly recommended.
4 . A CCE cluster (an existing one or a new one, here we name it as cce-runtime) with 2 nodes is created, and the cluster is attached within VPC-Runtime and subnet-runtime. Also in this case, we will attach EIP for each node for the external testing of accessing services that the App opens.
Otherwise, the certificate file is need to be uploaded in order to enable using private container image we are going to build (please follow the guide: https://docs.prod-cloud-ocb.orange-business.com/en-us/doc/pdf/20180530/20180530115106_9d1333530a.pdf: 2.2 Uploading an AK/SK File)
Step 1: Installation
1. Set up Github Repository
- Login to www.github.com, (if you don’t have one account, please register one and login)
- Fork a repository from this repository (https://github.com/Karajan-project/hellonode) and set it as Public repository, then you will get your own repository (https://github.com/<your register account>/hellonode) for this demo. (The reason why you need to have your own repository is because you will need to modify the source code to trigger the build project in Jenkins.)</your>
2. Set up Jenkins and Required Plugins
- Login to ECS VM-Jenkins with SSH
- Install Jenkins
Note: JDK is mandatory to run Jenkins, so before installing Jenkins, please install JDK at first.
Install JDK:
sudo add-apt-repository ppa:openjdk-r/ppa
sudo apt-get update
sudo apt-get install openjdk-8-jdk
Install JDK:
wget -q -O - https://pkg.jenkins.io/debian/jenkins.io.key | sudo apt-key add -
sudo sh -c 'echo deb http://pkg.jenkins.io/debian-stable binary/ > /etc/apt/sources.list.d/jenkins.list'
sudo apt-get update
sudo apt-get install Jenkins
Note: the port Jenkins listens on needs to be added in the security group Inbound rule. If you didn’t change the port that Jenkins listens, it will be 8080 default.
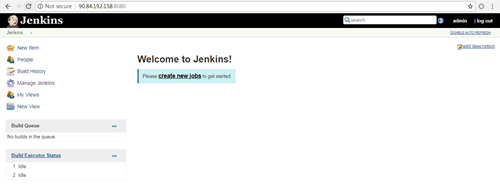
Check Point: enter << http://< External IP Address > :< Port> >> in browser to see if Jenkins is installed successfully and can be accessed normally. When logging in successfully, follow the wizard to initialize Jenkins, then you will go to this page.
Install Jenkins recommended packages
On Jenkins webpage “go to plugin manager” and install the following plugins (Refer: https://jenkins.io/doc/book/managing/plugins):
- Docker Pipeline
- Kubernetes Cli
- Pipeline
- Github plugin
Note: Depending of the Jenkins version some of those plugins may be already installed
3. Setup docker
Login to ECS VM-Jenkins with SSH and execute the following CMD:
sudo apt-get remove docker docker-engine docker.io
curl -fsSL https://download.docker.com/linux/ubuntu/gpg | sudo apt-key add -
sudo add-apt-repository "deb [arch=amd64] https://download.docker.com/linux/ubuntu $(lsb_release -cs) stable"
sudo apt-get update
sudo apt-cache policy docker-ce
sudo apt-get install -y docker-ce
Check Point: execute cmd “sudo systemctl status docker” to check if docker is installed successfully with the following similar output:

Step 2: Configure and Create Jenkins Project
Configure Github repository
Automatic building: To make sure that the project in Jenkins can be triggered automatically when there is new commit/push to the source code repository.
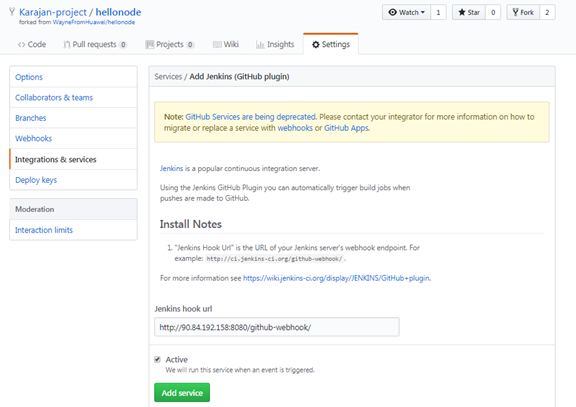
Go to settings -> Integration & Services under the new forked project and install the “Jenkins Github plugin”, and the Jenkins hook url should be:
http://<jenkins access ip> :< Jenkins access Port>/github-webhook/
As an example:
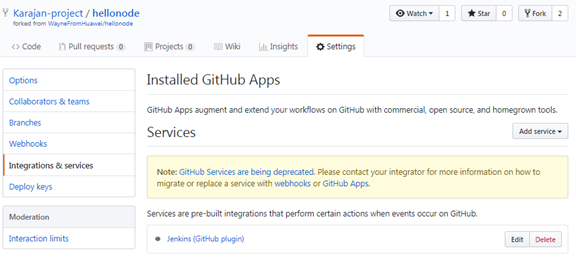
Final Status after completion:
2. Configure Jenkins
Add user “Jenkins” to group “docker” to make sure jenkins can invoke docker:
sudo usermod -a -G docker jenkins
Then restart Jenkins
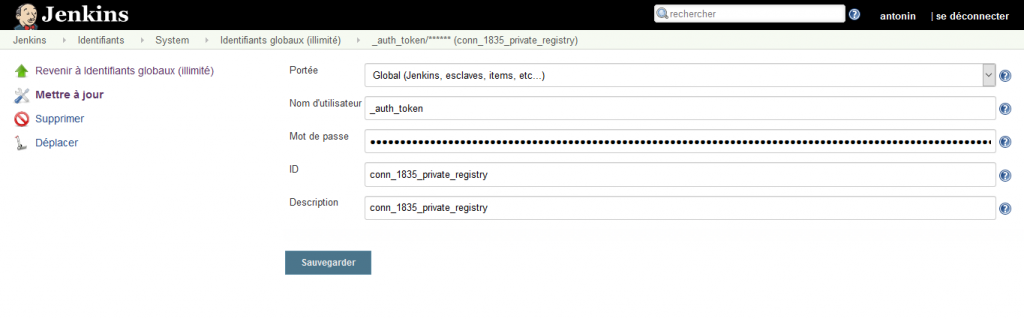
sudo service jenkins restartCreate CCE private registry credentials
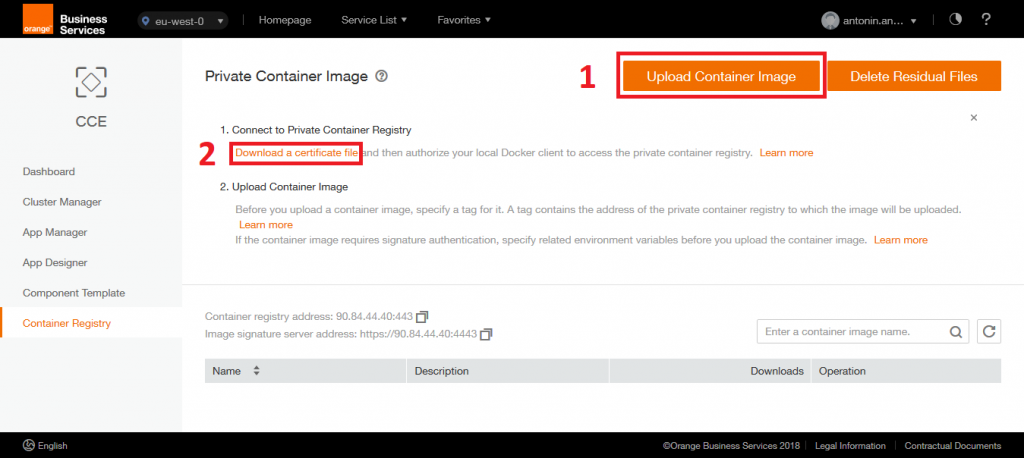
a. Download a certificate file from Container Registry
With file name “dockercfg.txt”
b. Get auth token
On Jenkins VM execute the command:
echo -n {auth}| base64 –din this command, the {auth} must be replaced by the value of auth parameter in the dockercfg.txt file. Example command:
echo -n X2F1dGhfdG9rZW46YTljYWI4YmNiZWJjNGNmMDhjZjkwODI1ODQxYzBhZWdItVUdGS1Y4VQSDQS09KSUZRVEw0VUwtMjAxNjA2MTcxODAzNTgtZTc1ZmJiNmFlNTIwYjA3ZTA4ZjY5OThiOGEyZG FiNTJiYjgyNWI4YjRhNDQ4YzMwNjRmNDBiZGI5OWE3NDQxMA==| base64 -dExample command output:
_auth_token:1c1ea38bc3dd4910879170b154ac5eedMO3WATY4WASMHTWDTOV6-20180824102142- c56d5ccc9dcdd8da9345ddfa02b7354425e6e1c0e2a2f7bcbace0ff0c1f20966While 1c1ea38bc3dd4910879170b154ac5eedMO3WATY4WASMHTWDTOV6-20180824102142- c56d5ccc9dcdd8da9345ddfa02b7354425e6e1c0e2a2f7bcbace0ff0c1f20966 is the token we get and _auth_token is the username.
c. Create credential with the user name and token
Create Kubernetes CLI Credential
a. Install kubectl in vm-jenkins:
Download kubectl
curl -LO https://storage.googleapis.com/kubernetes-release/release/v1.7.3/bin/linux/amd64/kubectl
chmod +x kubectl
Add kubectl to the PATH env
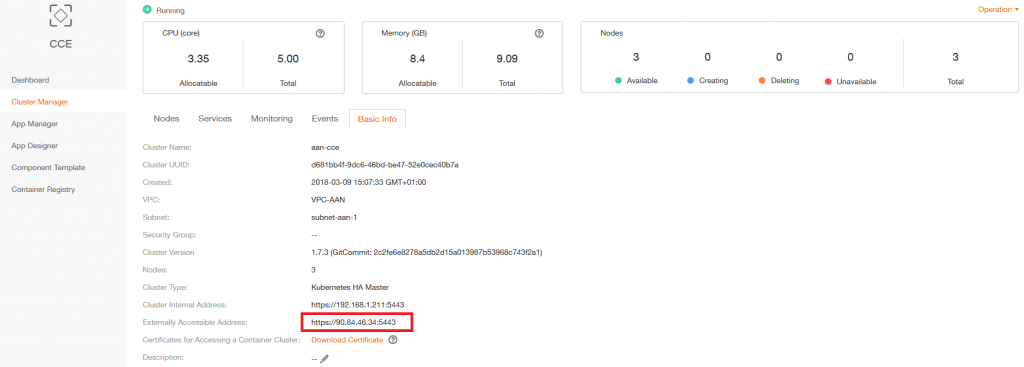
sudo cp kubectl /usr/local/binAppend the following line in /etc/hosts:
90.84.194.11 kubernetes.default.svc.cluster.localNote: 90.84.194.11 is the IP Address of the CCE cluster from here illustrated below, you need to replace the IP Address from your own CCE cluster.
b. setup and connect to the CCE cluster
Download certificate files from CCE cluster console, and you will get three files:
cacrt, clientcrt, clientkey
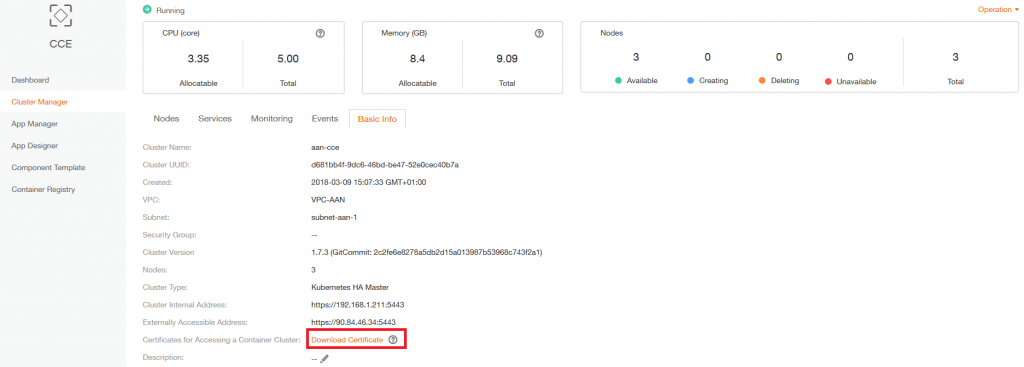
Upload the above three files to vm-jenkins and execute the following CMDs:
kubectl config set-cluster default-cluster --server=https://kubernetes.default.svc.cluster.local:5443 --certificate-authority=cacrt
kubectl config set-credentials default-admin --certificate-authority=cacrt --client-key=clientkey --client-certificate=clientcrt
kubectl config set-context default-context --cluster=default-cluster --user=default-admin
kubectl config set current-context default-context
c. get token content
Execute:
kubectl -n kube-system get secretTo get the default token with name “default-token-*”, for example: default-token-Rt3nd

Then execute:
kubectl -n kube-system get secret default-token-rt3nd -o jsonpath={.data.token}|base64 -dto get the token content:
Note: replace default-token-rt3nd with the real token name in your environment

d. create credential in Jenkins with the token:
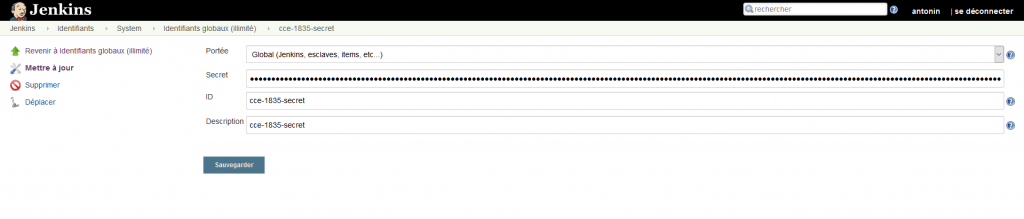
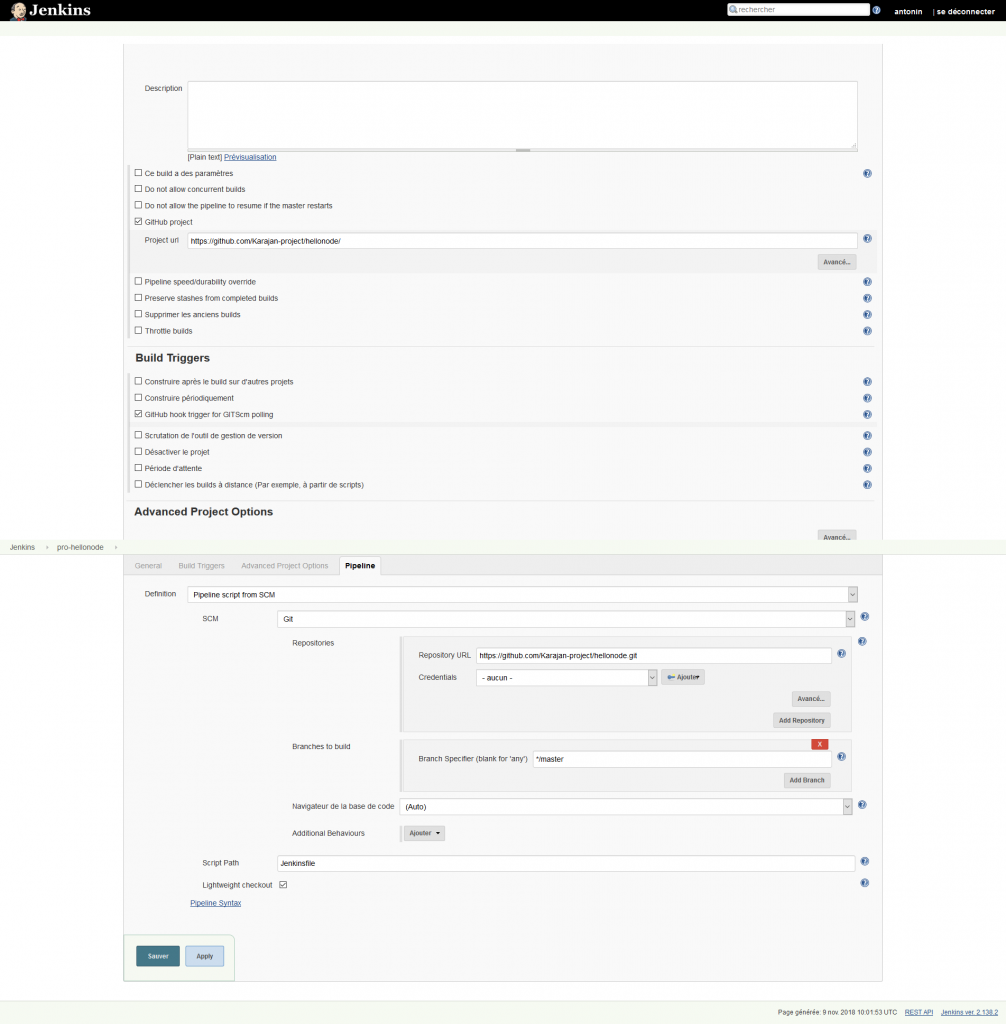
Jenkins pipeline (we name it as pro-hellonode)
a. Create a pipeline project in jenkins

Refer to the following parameters which are needed to be specified
3. Configure Docker Client
Add the container registry address (refer to CCE Container Registry console image following) insecure-registries parameter in the /etc/docker/daemon.json file. If not already existing, we have to create daemon.json file.
{
           "insecure-registries": ["{container_registry_address}"]
}
https://obs-public-staticfiles.oss.eu-west-0.prod-cloud-ocb.orange-business.com/cceregistryIP.png
Example:
{
           "insecure-registries": ["90.84.44.40:443"]
}
Run the following commands to restart Docker:
sudo systemctl daemon-reload
sudo service docker restart
4. Modify github repository resource code to adapter your environment
- Jenkinsfile
Go to your github repository, and edit directly the “Jenkinsfile” file on the web portal or you can edit at your local desktop and then push/commit
For the following 4 places:
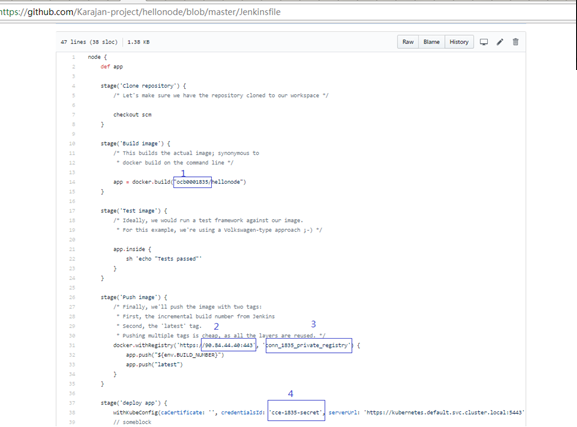
- Number 1 is the domain id (using lowercase)
- Number 2 is the CCE container registry address (Refer to Step 2 -> segment 3 Configure Docker Client)
- Number 3 is the credential ID for connecting CCE container registry address (refer to Step 2 -> Segment 2 Configure Jenkins -> Create CCE private registry credentials)
- Number 4 is the credential ID for connecting CCE cluster (refer to step 2 -> Segment 2 Configure Jenkins -> Create Kubernetes CLI Credential)
- rc.yaml
Go to your github repository, and edit directly the “Jenkinsfile” file on the web portal or you can edit at your local desktop and then push/commit
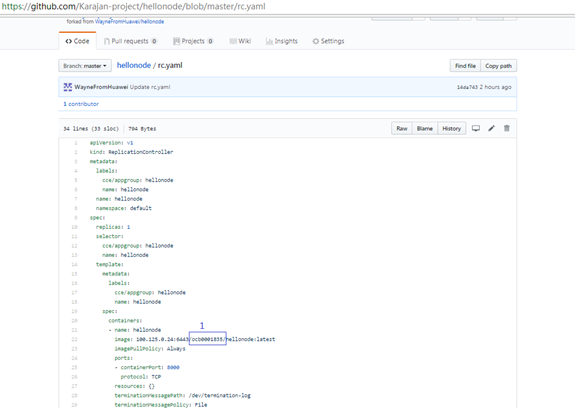
- Number 1 is the domain ID that needs to be modified (lowercase)
Test
- Go to the source code repository main page and modify the file main.js from “Hello, flexible engine, this is build #1” to “Hello, flexible engine, this is build #2”.
- Check the pro-hellonode project in jenkins and it should be running automatically.
- Check App Manager of CCE and the application should be deployed automatically after the pro-hellonode project completes successfully.
- Go to url http://<containter ip>:<containter port> and the index page of the application should be displayed like this:

</containter></containter>