-
Overview
-
Practical sheets
-
-
- Aucun article
-
-
- Aucun article
-
-
-
- Backup : Agent-Level B&R via NSS for IAAS offer
- Backup : Create VCOD Backup
- Backup : Netbackup Agent Installation for Linux
- Backup : Netbackup Agent Installation for Windows
- Backup : Overall Design for VCOD Offer
- Backup : User's Guide for VCOD Offer
- NSX-T : Configuring a Distributed Firewall
- NSX-T : Create VPN Ipsec
- NSX-T : Creation of T1
- NSX-T : DNAT configuration
- NSX-T : How to configure a Gateway Firewall
- NSX-T : SNAT configuration
- NSX-T: Create and Configure a Geneve Overlay Segment
- NSX-T: How to configure an IPSEC solution
- vCenter : Clone a VM
- VCenter : Create a new VM
- VCenter : Create a snapshot of a VM
- VCenter : Reset cloudadmin password
- VCenter : Storage Vmotion on a VM
- VCenter : Upgrade Vmware tools on a VM
-
-
Q & A
-
Services
- Backup
- Bare Metal Server
- Bare Metal Server
- Bare Metal Server GPU
- Block Storage
- BVPN access
- Certifications
- Cross Connect
- Dedicated Cluster
- DRaaS with VCDA
- Dual Site
- Dual Site
- HA Dual-Room
- Internet access
- Licenses
- Loadbalancer As a Service
- Network
- Network Storage
- Object storage
- Object storage
- QoS Appliance
- Security
- Shared colocation switch option (Cross connect)
- Support and Coaching
- Tools
- VCenter On Demand
- VM Replication
NSX-T: How to configure an IPSEC solution
1. IPSEC service should be created first to configure IPSec VPN further, once IPSEC service is created given in the IPSec VPN creation section, go to Local Endpoints menu under VPN.
2. Click on “ADD LOCAL ENDPOINT“.
3. Fill the “Name“, “IP Address“, and “Local ID” field for Local Endpoint.
4. In case you are using certificate based authentication then you may select certificate.
5. Click on “SAVE” to save the local Endpoint.

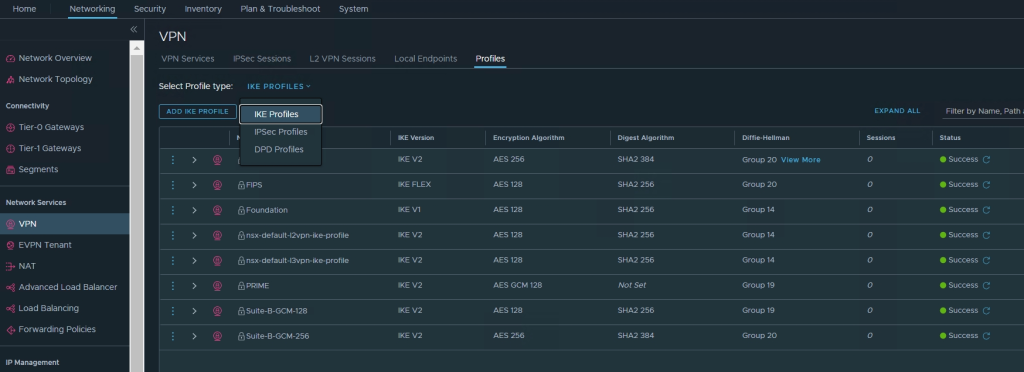
6. If you want to create custom profiles(IKE, IPSec, DPD) then go to Profiles Menu and choose the profile you want to create else if you want to use Default profiles then skip to Step 9.
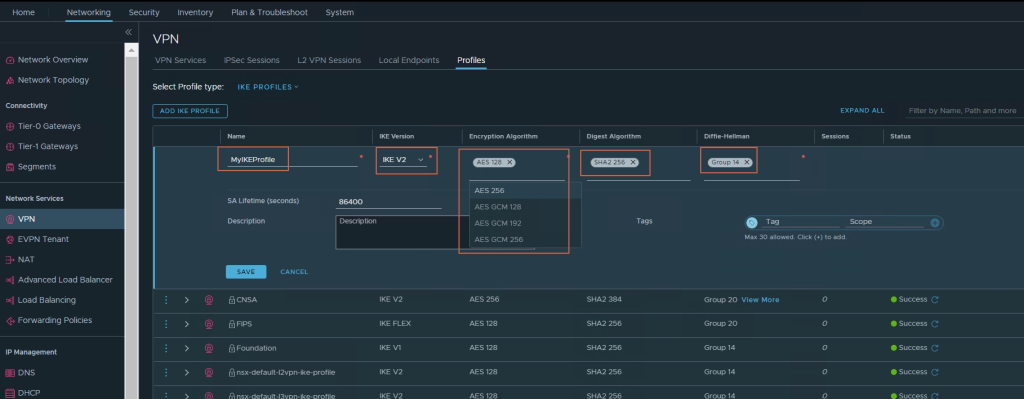
7. Fill in the Name and Choose IKE Version, Encryption Algorithm, Digest Algorithm, Diffie-Hellman (The cryptography schemes that the peer site and the NSX Edge use to establish a shared secret over an insecure communications channel.) from the Drop Down list.
8. Enter “Security Association(SA)” Lifetime (seconds) if you want it different from Default and at last click on “SAVE“.


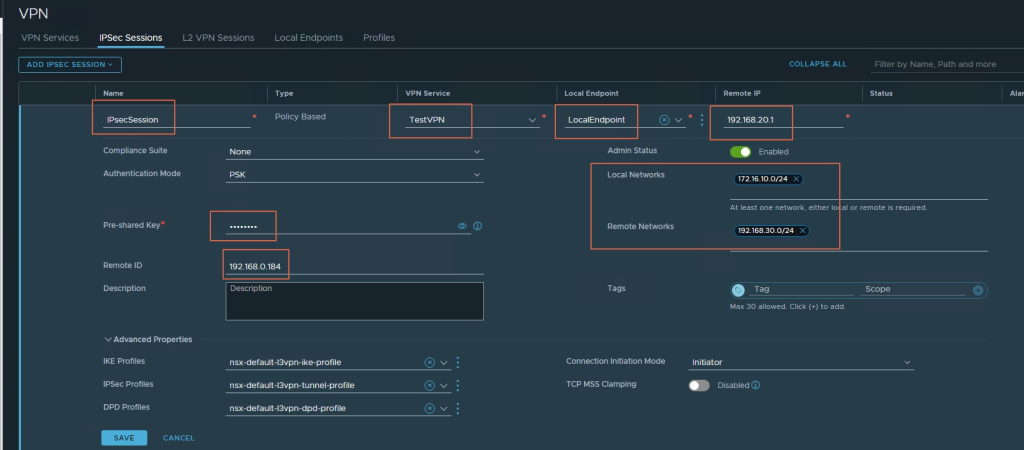
9. Now go to “IPSec Sessions“, then click “Policy Based” session if you want to create Policy Based IPSec Session, for “Route Based” session creation go to “Step 17“.

10. Fill in the “Name” for the IPSec session.
11. Select “VPN Service” which you created earlier.
12. Select “LocalEndpoint” which you created earlier.
13. Provide “Remote IP“, “Remote ID“, “Local Networks“, and “Remote Networks” IP/Subnet.
14. Enter “Pre-shared” Key value if Authentication Mode is PSK.
15. Under “Advanced Properties” You may choose the custom profiles you may have created or choose the default.
16. Verify the fields you have filled in and Click on “SAVE” to create the IPSEC Session.

17. For Route Based IPSec session creation, follow the above Steps from 1 to 6 first.
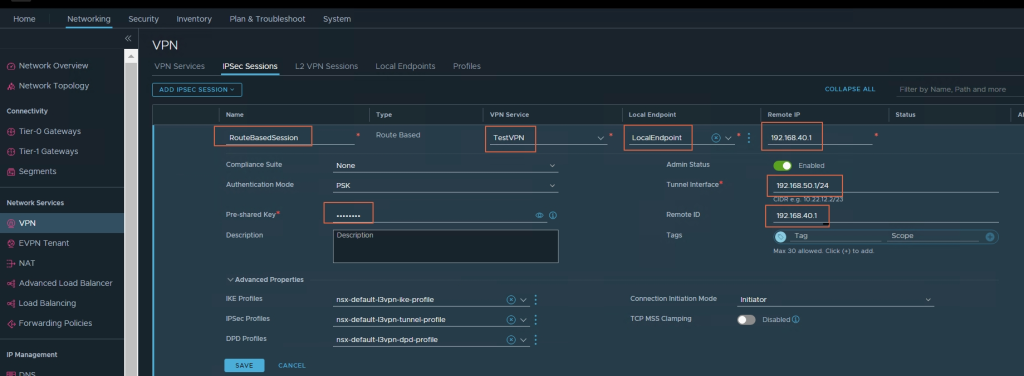
18. Now after selecting Route Based IP Session, fill out all the required fields.
19. Fill the “Name” for the IPSec session.
20. Select “VPN Service” which you created earlier for route based ipsec session.
21. Select “LocalEndpoint” which you created earlierfor route based ipsec session.
22. Provide “Remote IP“, “Remote ID“, “Local Networks“, and “Remote Networks” IP/Subnet.
23. Enter “Pre-shared” Key value if Authentication Mode is PSK.
24. Under “Advanced Properties” You may choose the custom profiles you may have created or choose the default.
25. Now click on “SAVE“.
