Step 8 – Stress testing and visualization of changes in CES
In this last step, we will test our infrastructure to verify that it knows how to adapt automatically to the load to which it is subjected.
For this, we will create a test environment from which we will send several million queries to our web server and observe its behavior. This environment will consist of a new VPC and subnet as well as a virtual machine (ecs-bench) connected to the internet.
8.1. Creating an environment to test performance
To create the VPC and subnet, enter the following information:
- Name(VPC): bench-vpc
- VPC CIDR: 168.0.0/24
- AZ: eu-west-0a
- Name: bench-subnet
- CIDR: 168.0.0/24
- Gateway: 168.0.1
- DHCP: Enabled
For the creation of ECS, enter the following information:
Basic Information
- ECS Name: ecs-bench
- AZ: eu-west-0a
- ECS Type: General-purpose
- vCPU: 4vCPU
- Memory: 16GB
- Image Type: Public Image
- Image: Ubuntu, OBS_U_Ubuntu_16.04(40GB)
- Disk: System Disk, Common I/O 40GB
Network
- VPC: bench-vpc
- Security Group: sg-bench. This security group must allow TCP packets to be entered on port 22 from your workstation, and allow all outgoing
- NIC: Primary NIC : bench-subnet (192.168.0.0./24)
- EIP: Automatically Assign
- Bandwidth: 1000Mbit/s
Login
- Key Pair: Keypair-webKeyPair (this key was created formerly)
- Data injection as File
- Select File Bench.sh ( in appendix)
Quantity: 1
Connect to this ECS in SSH and type the following Commands
- sudo apt-get install update
- sudo apt-get install apache2-utils -y
8.2. Alarm testing and Auto Scaling
The objective of this step is to be able to stress the server so that:
- The CPU 50% threshold alarm is raised, and the mail notification is sent ;
- The Auto scaling feature is
Connect to the ECS ecs-bench in ssh
Now, we can run the command to stress the web server. Warning ! Note that this command can generate additional costs as outbound traffic is charged over a certain limit.
- while (true); do ab -k –r -n 100000000 -c 1000 http://<ELB EIP>/index.html; done
By connecting to the ECS ecs-web and executing the command htop, you can see that the CPU is at 100%, which will trigger the alarm we created in step 9.3. Creating an alarm with notification. Warning! Since the time interval between each evaluation has been set to 5 minutes, the alarm will not necessarily be raised immediately.
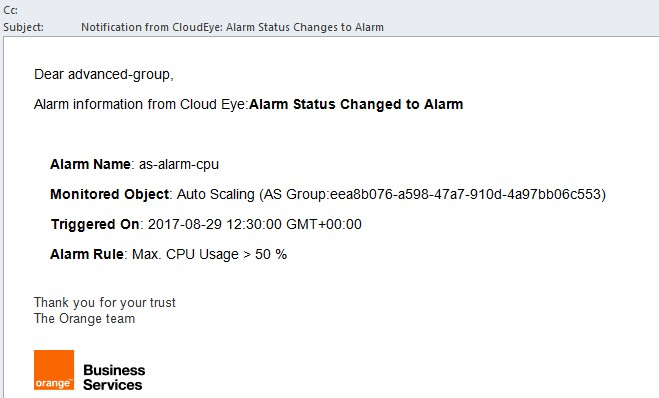
When the alarm will be raised , you will receive a notification email:
We will now verify that auto scaling has been triggered. Go to the CES and see the view we created in step 9.2.
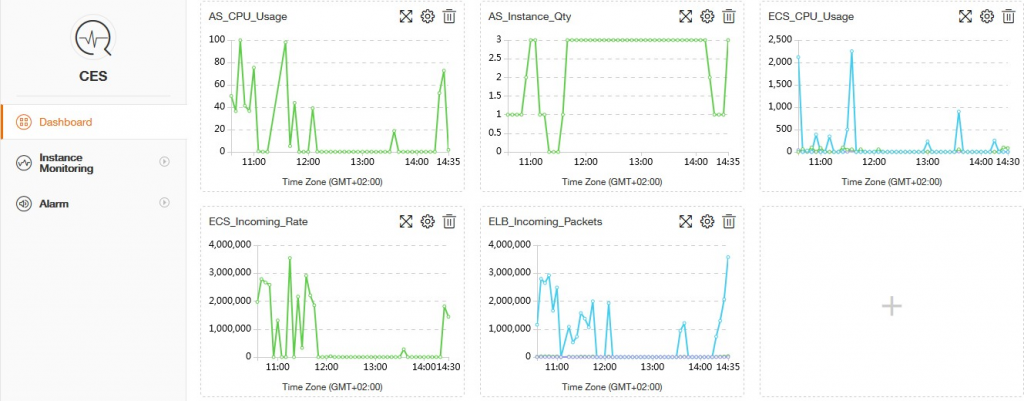
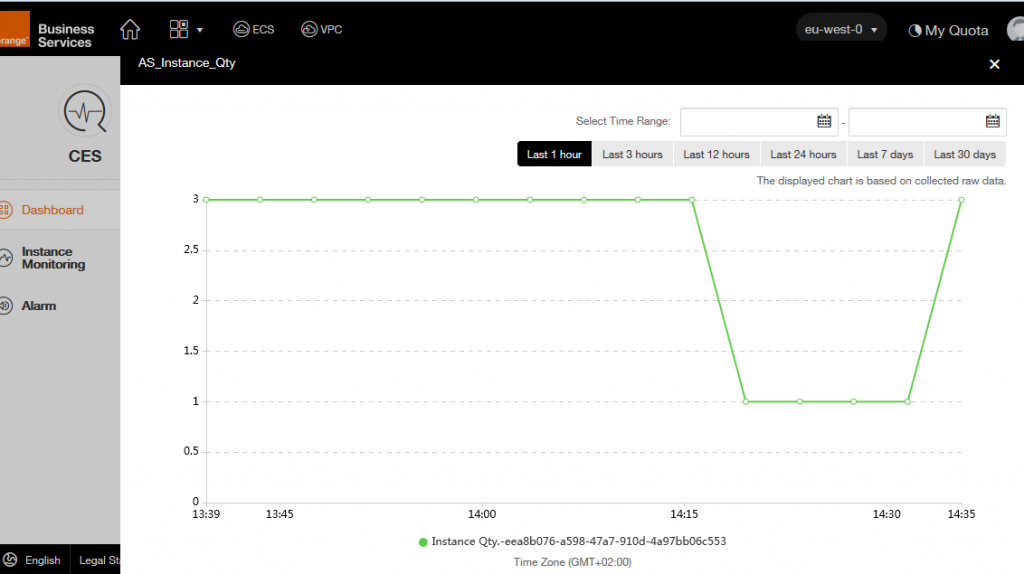
On this view, the graph that interests us is AS_Instance_Qty (1st row, 2nd column), enlarged below.
You can see that the number of ECS has increased from 1 to 3 to absorb the load.
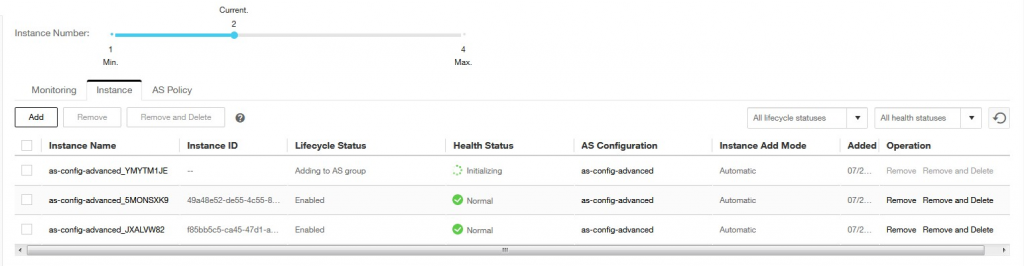
By looking at the instances associated with as-group-advanced, we also check that there are many new ECS instances.
By refreshing the website, or connecting to the website throught a private session, you can see you are using several ECS. (The name of the ECS is changing in the red Box, Saying the session is working)


Once you see your AS group is working, you can stop the ecs-bench.